


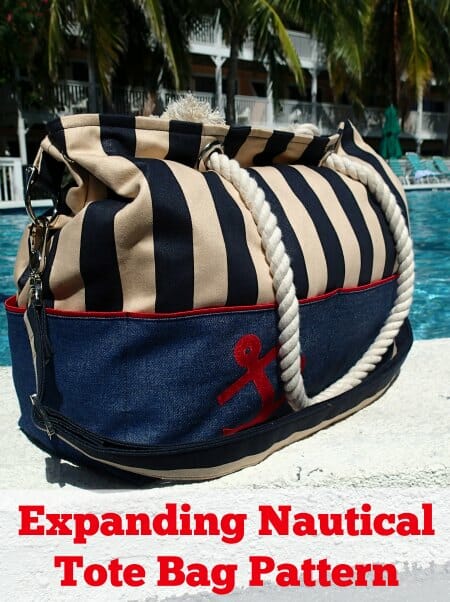
Want to keep everything ship-shape as you go to the beach or the pool?
This handy tote bag has lots of great features and optional extras to keep your organised. It also has a handy expanding feature to keep the bag trim when you don’t carry much, and expand it out when you have enough ‘stuff' for the kids too.
 With the use of really cool hardware and handles, this bag looks anything but home-made. Use a nautical fabric in red, white, and blue and big rope handles to be on-trend, or mix it up with cool prints of your choice for an everyday tote that is sure to bring admiring comments from all your friends.
Change it up a little
Of course, all the hardware and fancy stuff is optional. If you want to skip the rope handles and just sew on regular handles, that's cool too. Same with the shoulder strap.
It need not be nautical if that's not your thing – any fabrics can be used, its just a great bag!
Features:
- Lots of options
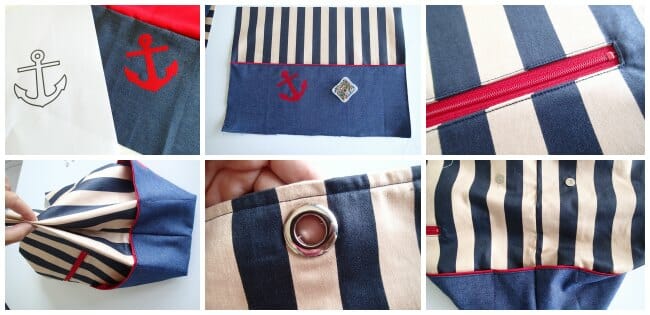
- External zipper pocket and external slip pockets
- Your choice of pockets for the inside
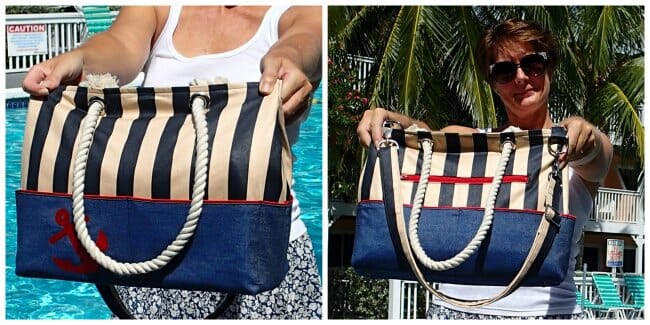
- Large expanding action – snap it closed to keep it trim or open it out to carry more
- Very hard-wearing multi-layer bottom for the bag
- You'll learn how to use some bag hardware you might not have used before.
- Optional anchor applique for the nautical look
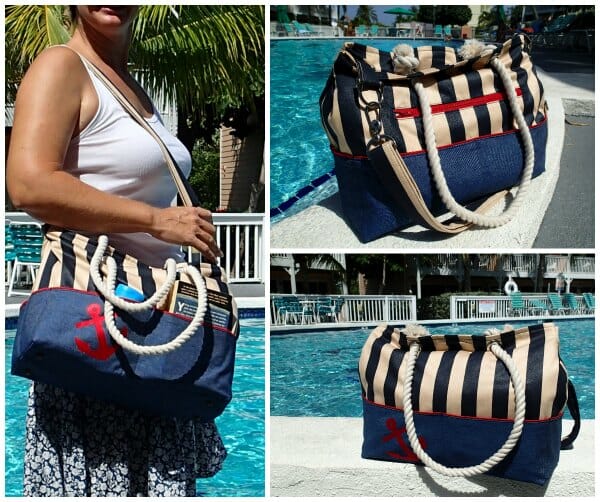
- Long cross-body strap option as well as the regular handles
- Very full photo and written tutorial as well as a 2-part video tutorial.
- Finished bag measures approx 5 x 14 inches at the base, by 12 inches tall
How to sew the Expanding Nautical Tote Bag Pattern
You can download the pattern and instructions for the Expanding Nautical Tote Bag from my design account at Payhip. It's free and easy. If you have any trouble downloading or opening the pattern, please check out this post - How to download, open and print PDF sewing patterns.
Materials needed:
- Fabric – see instructions for full details
- Your choice of interfacing and stabilisers
- 2 yards of rope for handles or use regular fabric handles
- 4 Grommets, sized to suit your rope handles (optional)
- 2 snaps or magnetic closures
- 1 x 9 inch zipper for outer pocket
- 2 x 1 inch d-rings (optional)
- 2 x 1.25 inch strap swivel hooks (optional)
- 1 x 1.25 inch slider (optional)
- 4 bag feet (optional)
- Foam core board or similar for hard bottom (optional)
Download the pattern and instructions here for the full photo and written step by step – it's got a lot of detail, about 21 pages. Or watch and copy with the two-step by step videos where I'll take you through everything.
I've decided not to put all of the written instructions here – too much of it!
How to Install Bag Feet
If you want a refresher on how to install bag feet like the ones used in this project, have a look at this post from earlier in the week.
Full Video Tutorial Part 1
Full Video Tutorial Part 2
Subscribe to the YouTube channel:
And that's it – your expanding tote bag is completed. I SO love this bag. Hubby says its the best bag I've ever made, and I think that has a lot to do with both the right choice of eye-catching fabrics and the hardware I used. I think a good bag is worth investing in, and I enjoyed using some bright shiny hardware to really take this bag to the next level.
You can download the pattern and instructions for the Expanding Nautical Tote Bag from my design account at Payhip. It's free and easy. If you have any trouble downloading or opening the pattern, please check out this post - How to download, open and print PDF sewing patterns.


I like this idea. Just wish I could pay more at this time. Your projects are inspiring. Most decent people will be willing to pay something.
Your video tutorial says the optional strap is 50 inches long and 5 inches wide, but the pdf instructions says the optional strap is 36 inches long and 5 inches wide. Which is it? Love this bag.
Hi Catherine, because the strap is adjustable if you use the specified slider, you should make the strap 50″. With the slider, you can shorten it as much as you want. Sorry for any confusion.
Lovely bag, and the tutorial was fabulous, very well explain. I really enjoyed watching this video and look forward to making my bag. Thank you.
Thanks for the pattern and the video tutorial, now I must find time to make this bag as it will be so useful. x
Wonderful bag, great tutorial – thank you very much!
Deby, I too, love this bag. I have made two of them, one a gift and one for me. Now my other sister wants one. Thanks for the pattern and great sewing tips.
Hi Deby, I’m trying desperately to locate the grommets w/screws that you used. I didn’t have any luck with the “3D Hardware” site. Help PLEASE?
Hi Pamella, when I click on the link that says “4 Grommets, sized to suit your rope handles” it takes me right to the exact grommets I used from 3d Hardware. Maybe when you clicked they were temporarily sold out? But they are back in stock now. Click through on the word Grommets and you’ll go to the right page.
Thank you Deby for the pattern , love this bag .
Thanks so much for sharing! You always post such great bag projects!
Love the rope handles, Deby!!! And the nautical colours – just perfect. Featured today…
Thanks Pam. I dropped by and left a comment and shared.
This bag is amazing!
Beautiful! I’m in love! Thanks for Sharing!
Is there a actual pattern? I’ve ended up in Craftsy, then back here whenever I click on pattern. Thank you for your help!
When you go through to the Craftsy page, on the top right is a big orange button which says ‘Add Digital Pattern to Cart’. You add to your cart and check out. Its free so you don’t need to enter any payment or address etc. You’ll get an email receipt to confirm and a download link, the pattern is in your pattern library permanently and you can download it from there any time. Let me know if you still don’t get it.
Excellent tutorial, Deby! Easy to follow!! Thank you!
Very stylish bag, Deby!
And I also meant to say “Who doesn’t love red, white and blue!!”
Very cute! The rope handles are a very creative idea! I pinned it to my free patterns board. 🙂
Thanks for the pin Meghan. Just visited your site – it was new to me but its just full of great info. I read through your serger tips. I don’t have one yet, but if/when I do I’ll know where to come.
Thanks Deby! 🙂
Hi Deby,
Thanks a lot for the pattern and all the tutorials. I made your cosmetic bag. It was the first time inserting a zipper for me. Thanks for making it so easy.
Where do you buy your purse hardware?
Thanks,
VK
Thanks for your comment about the bag – glad it turned out well. For this nautical bag, and some others I’ve got coming up, I bought from this seller on Etsy. Great range, great prices and sends it worldwide – it a winner for me – https://www.etsy.com/shop/3Dpatternpaper
This is such an awesome bag. I have had a nautical themed bag on my to-sew list and just can’t seem to get around to it.
What a great bag! I love it and I’ve downloaded it in hopes that I will be able to make one this summer. Thank you Deby for the excellent instructions and pattern!
So cute. Thanks, once again! I don’t know how you do all that you do.
That’s awesome that you include video tutorials; I always wonder why more folks don’t do that!
I’m guessing because it’s so much extra work! It takes me a long time to make the video because I get so nervous that I mess up a lot, or the cat keeps jumping up on the table, or I just sew it wrong. Then I have to edit it into something that seems OK. But I like to learn this way and assume others do too. Plus, when you are as bad at taking pictures as I am, then video is an easier way to show something being done. Thanks for dropping by Stephanie.
this is great; happy coluirs; useful size; looks good; and two ways to carry; it really is perfect for summer 🙂
Thank you so much for this pattern! I love bags and this one is a must make! I think it would also make a great diaper bag, will have to try it!
D.G. L
You are so sweet to offer this cute bag pattern for free. And to even make a video too!! Wow! Thank you so much.
Thanks Cherie. I really enjoy doing it. And as my husband often says, I enjoy the sound of my own voice so I’m always happy to chat away on video about sewing. Plus no one can answer me back!
I love this bag! I can’t wait to make it!!
Thank you for offering it to us for free!
Wow, Debbie! That’s a gorgeous, very useful bag! Thank you so much for offering that pattern. For free, no less.
It’s my pleasure. I hope you enjoy sewing it.