


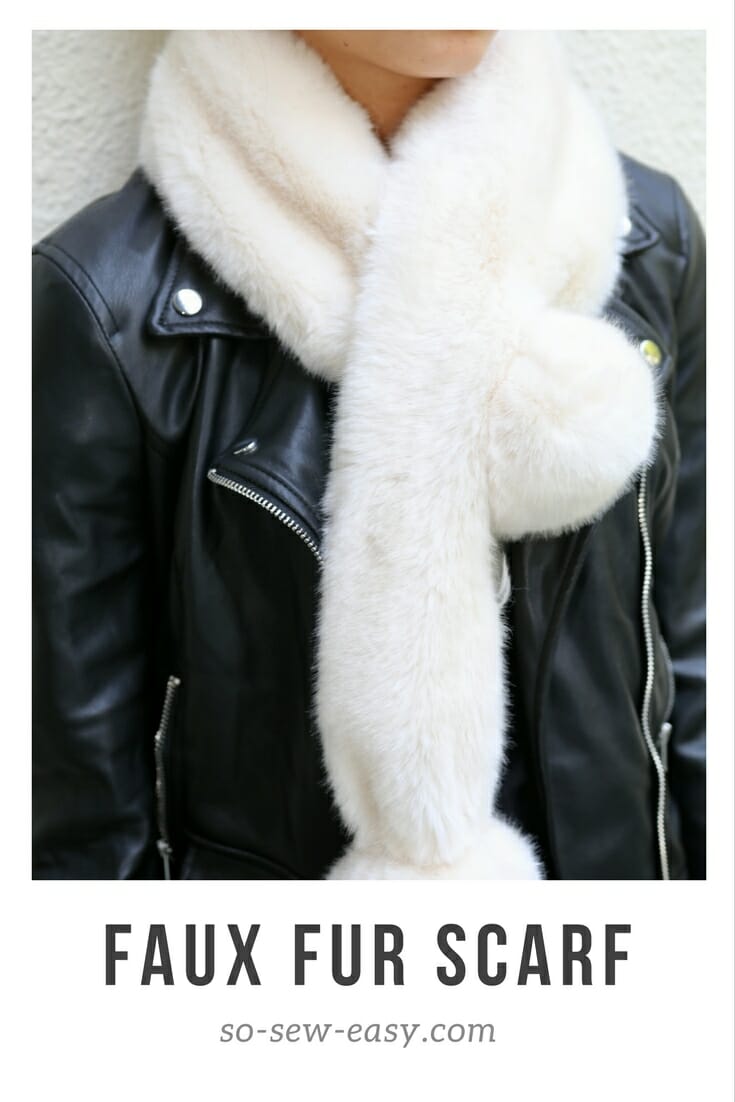
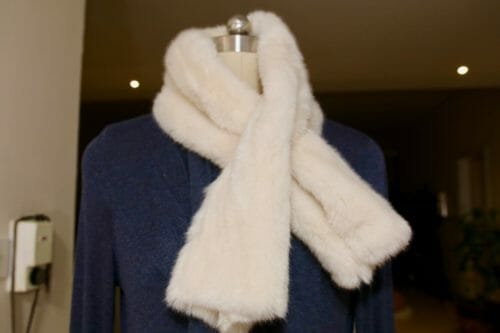
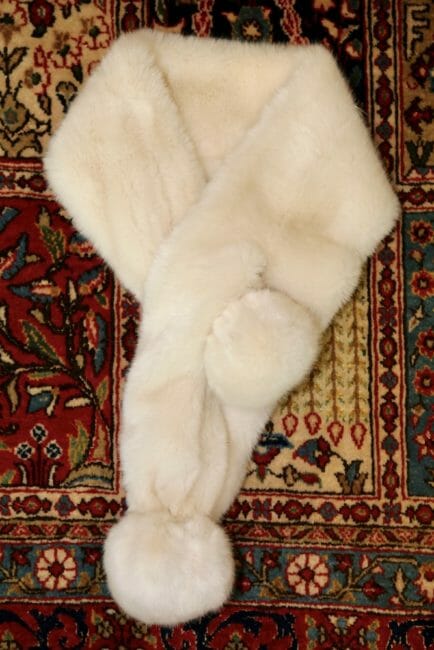
I have been traveling recently, so this is a short and sweet tutorial on how to make a cool and practical faux fur scarf to fight off the winter cold. This scarf will not only keep you warm this winter, but it will also be a stylish and trendy addition to your wardrobe all the way through to spring.
Unless you've been living under a rock, you would have noticed the statement of the season is a furry “something” hanging from your body or handbag. I am a practical person, but I do like trends. They can be fun to follow and if you can make them yourself, you'll save a bundle and only pay a fraction of the price of buying something trendy in a store.
Fur is everywhere this season. It shows a very feminine touch without being too girly. Indeed I love it because it keeps me warm and looks great. And just so we're clear, I'm only talking about faux fur, not the real stuff, so no one should take offense, please…
My only concern with designing a fur scarf was if it were to be too long, you might have to wrap it around a few times. In this case, if you are vertically challenged, as I am (5'1″ or 157cm), you would just look like a boa constrictor is about to swallow you. If you're tall and can pull the look, then you're those people I admire from afar while saying to myself “next time I am born I will be tall” Congratulations! You can do whatever you want either way.
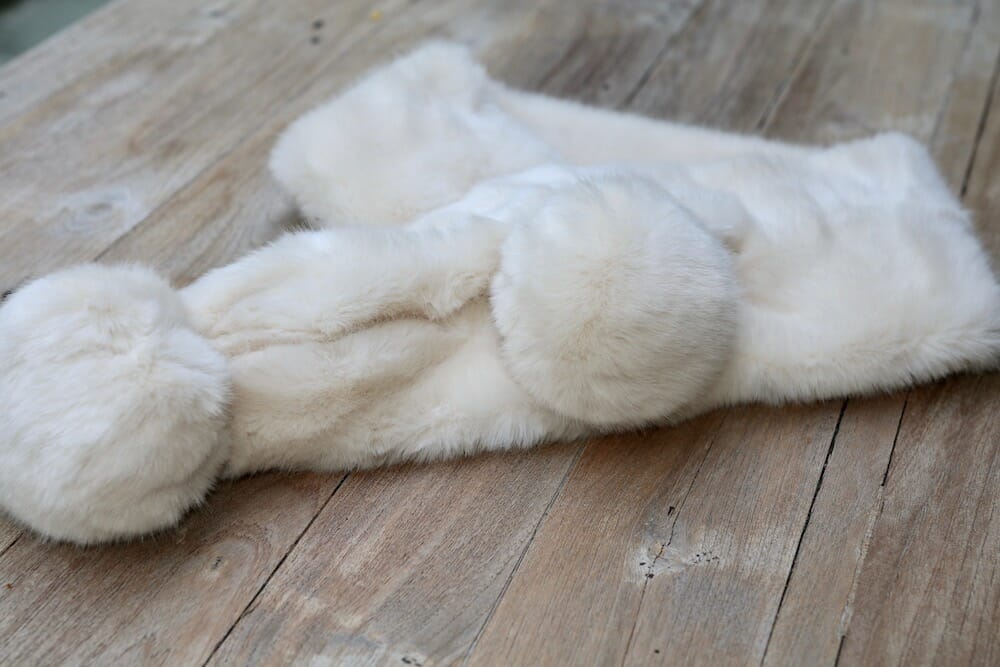
I am just saying for this tutorial on a fur scarf, we will need only a small amount of fur. There will be no lining and no special tricks to complicate our lives. This faux fur scarf has a slit or what I'm calling a “keyhole” to capture one end of the scarf which is accentuated by a fur pompom. This will hold the scarf so you don't have to worry about it if you are biking or skiing or even just running around town. Of course, you can make the scarf a bit bigger if you require it, but I think this size is stylish and super convenient for almost everyone.

For Tips on working with fur please check out this tutorial. It has a short yet comprehensive list of things to know before you handle this type of material especially if you are new at sewing.
Let's start!
Materials
- only about a quarter of a yard at 60″ wide
- thread to match
- stuffing or Poly-fil
Tools
- sewing machine
- shears or craft knives. (This is the one I use and it is great!)
- jersey needle #12
- two hand needles
Fabric recommendations
Pattern Download
You can download the pattern for this Faux Fur Scarf from our account at Payhip.
For help downloading and printing PDF patterns, please CLICK HERE.
Pattern layout
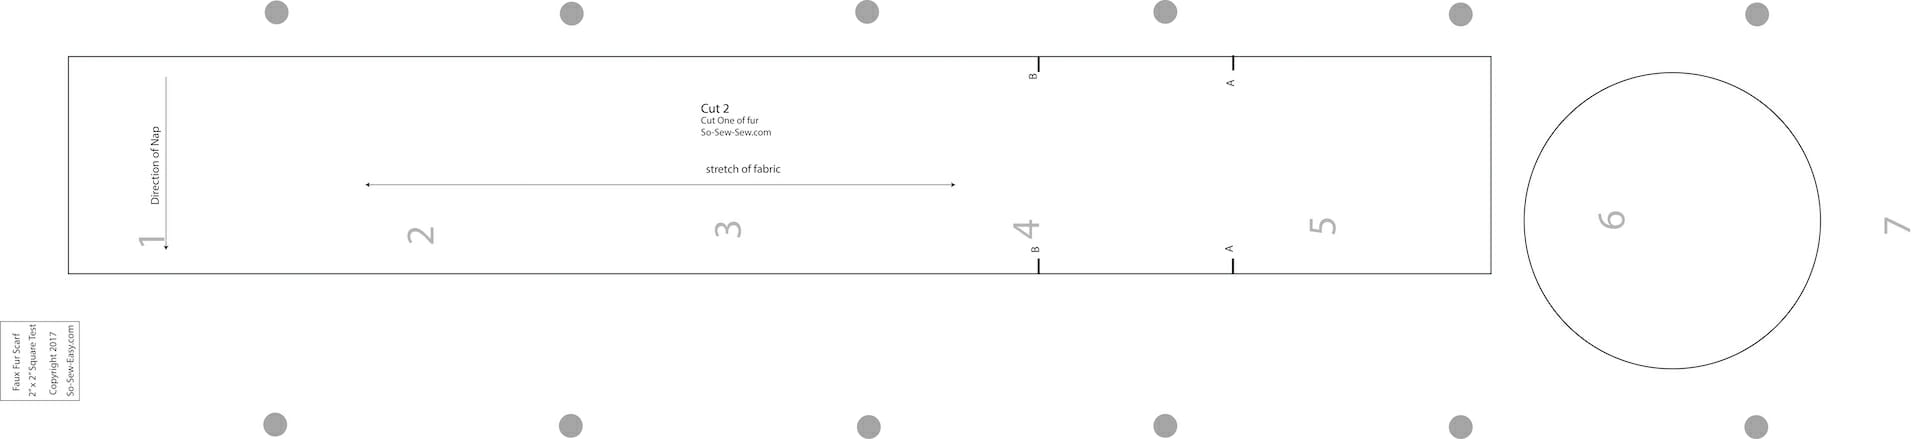
Step One: Print the pattern
Print the pattern on a landscape using the latest version of Adobe Reader and on Actual Size.

Sewing Tip: Trace the pattern directly on the wrong side of the fur and cut following the directions in this tutorial. Use a sharp cutting craft knife or very sharp shears.
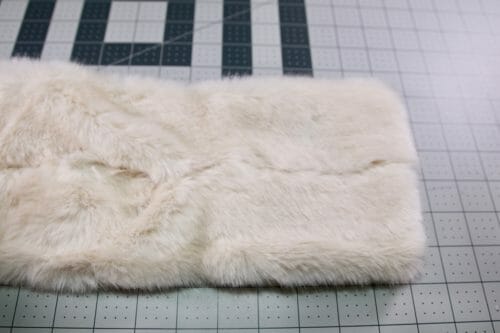
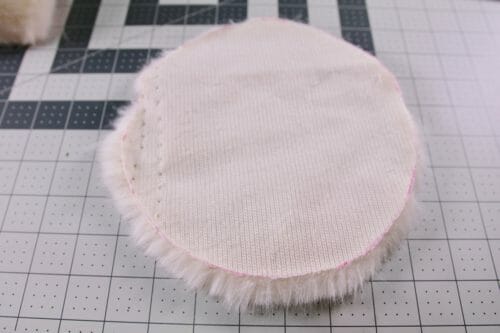
Step Two: Join one side
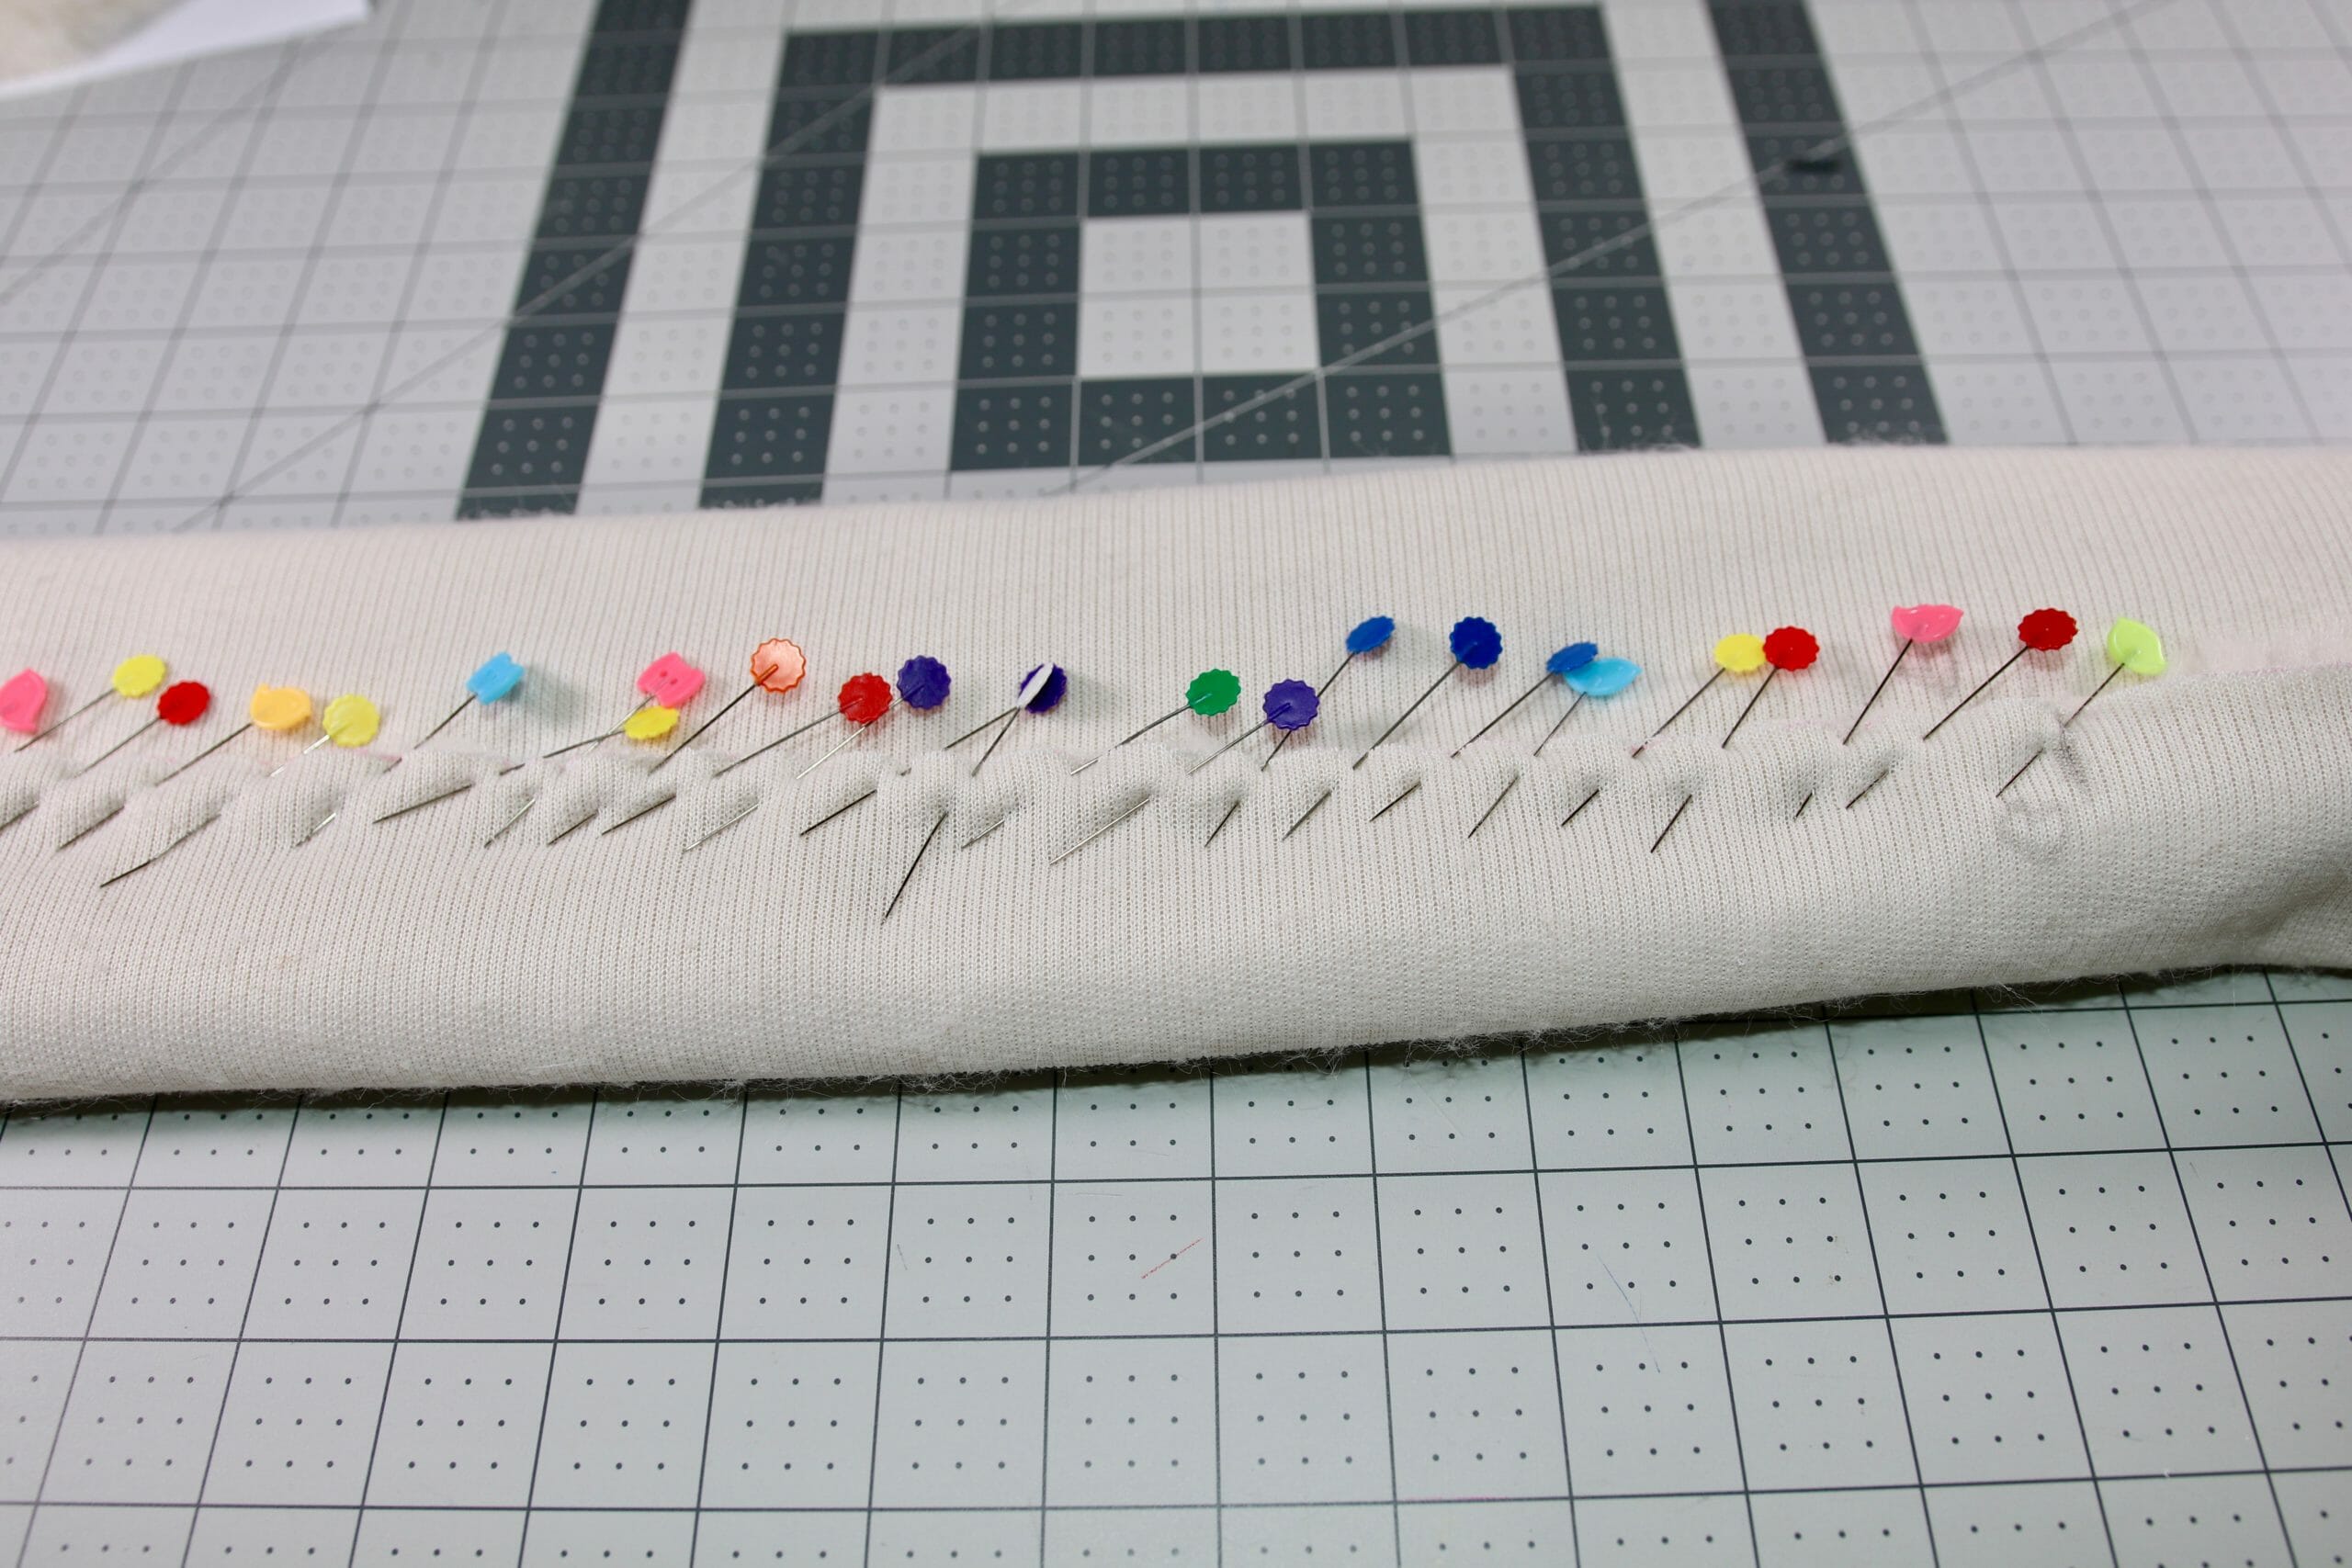
Fur side down, mark the notches of the pattern on both sides and pin starting from the left-hand side of the scarf to point B. Do not pin beyond point B.
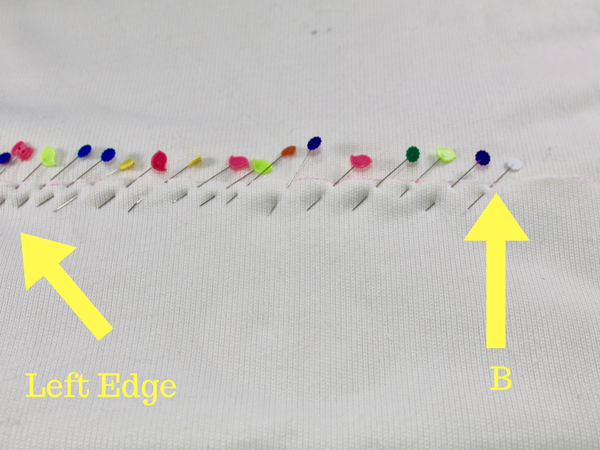
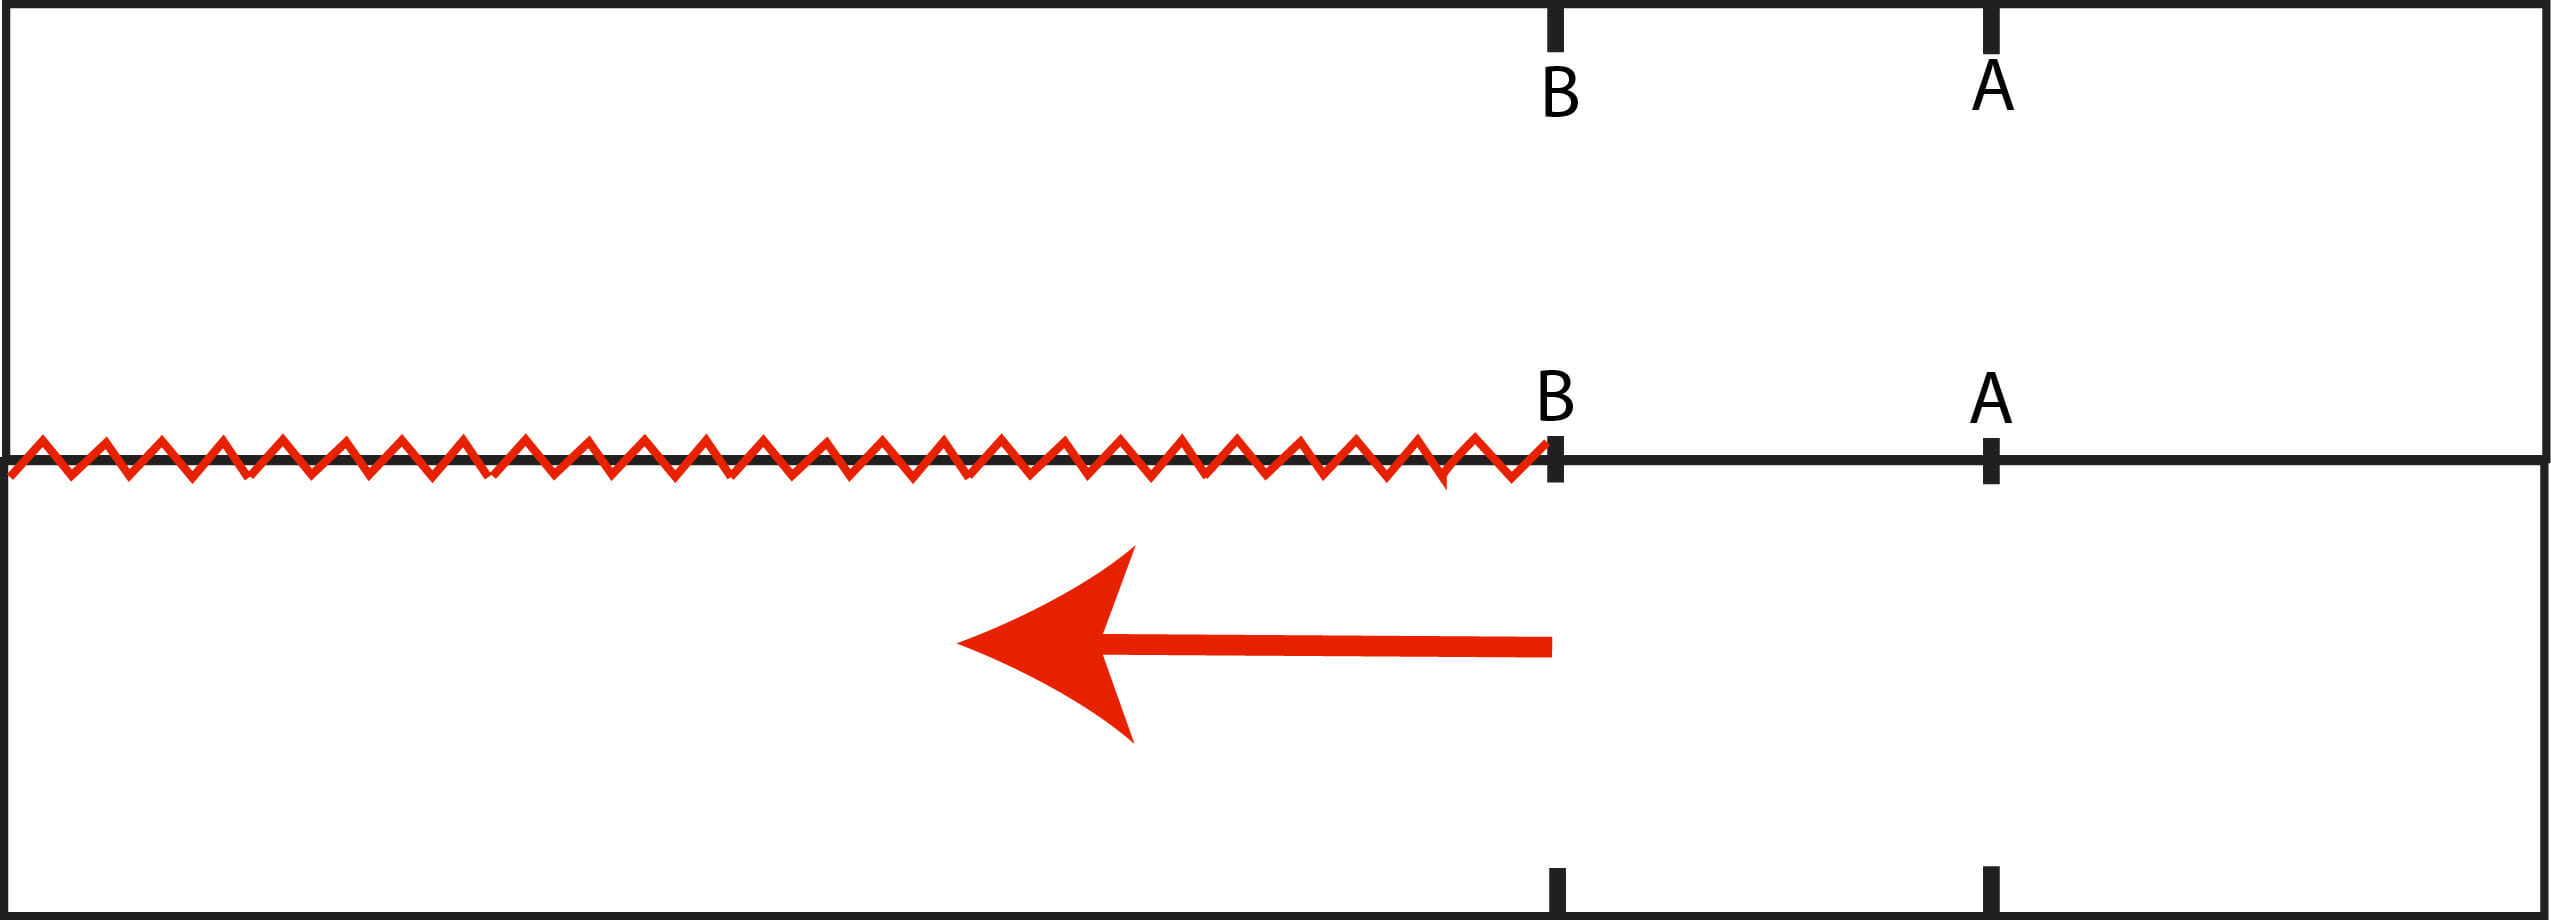
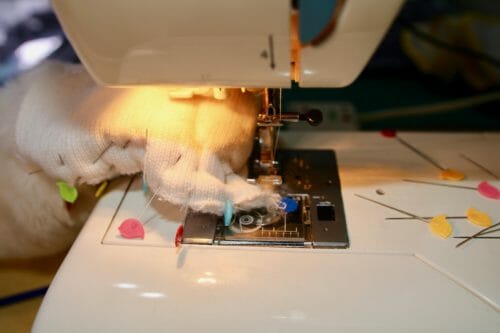
Sew to point B using a small zigzag. Mine is size number three and it is big enough to capture both sides of the knit side without catching the hairs.
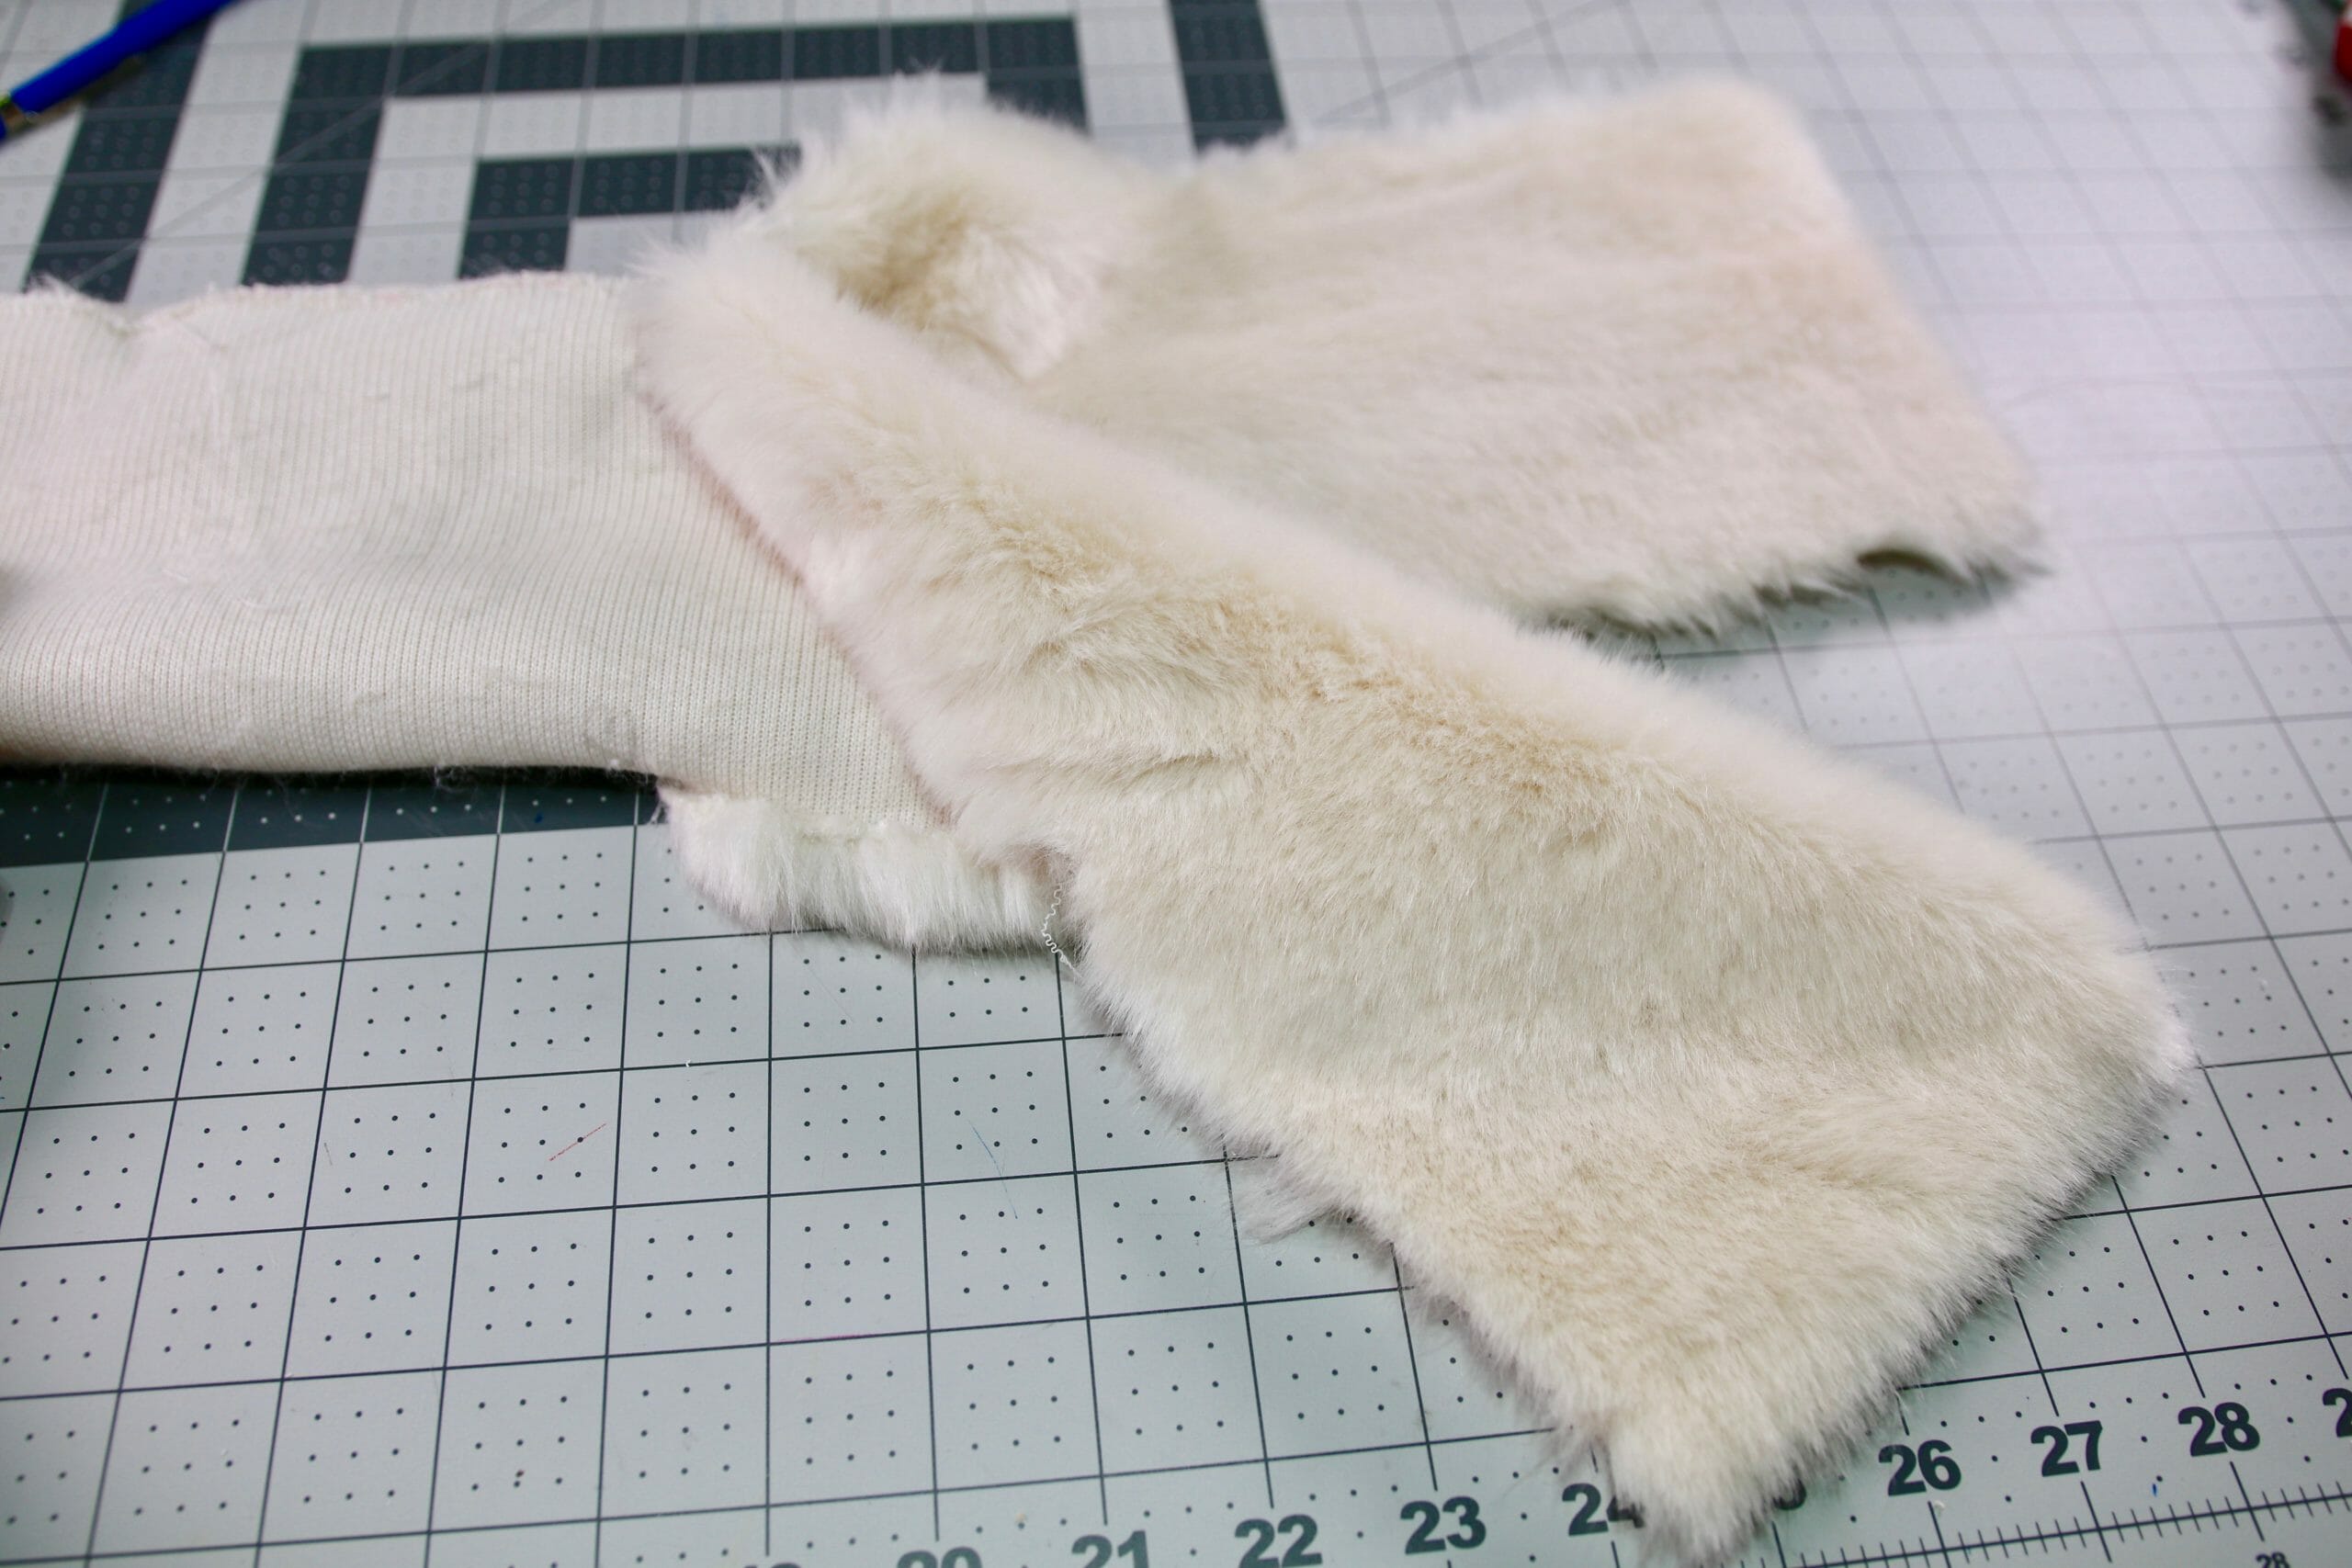
Turn the work fur-side up.
Step Three: Join the other side
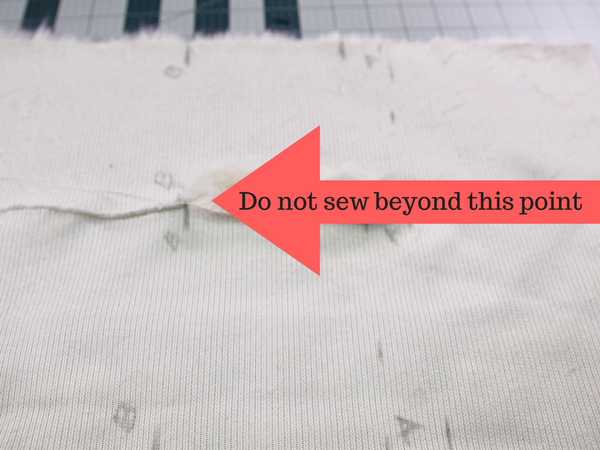
With the fur sides together, pin exactly the same way you did in the step above. Do not pin or sew from point B. We need to leave this part of the scarf open in order to sew the slit first. Trust me, I have made a couple of mistakes making this scarf already and this is the best and easyest way to do it.
This is what you should have by now.
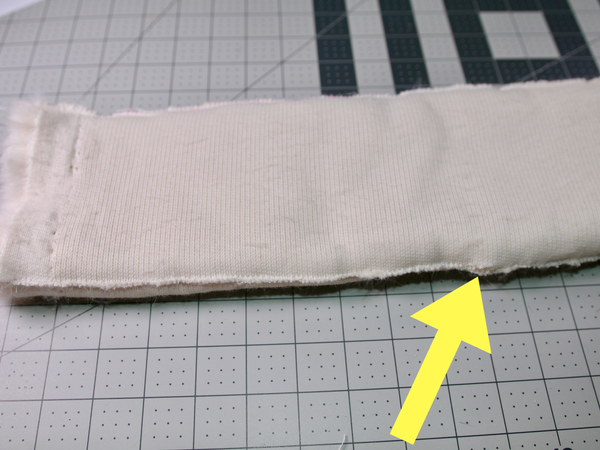
Before you turn the scarf fur side out inspect your seams. Notice there is a gap on mine, so I will pass the zigzag one more time to make sure I do not have any other gaps.
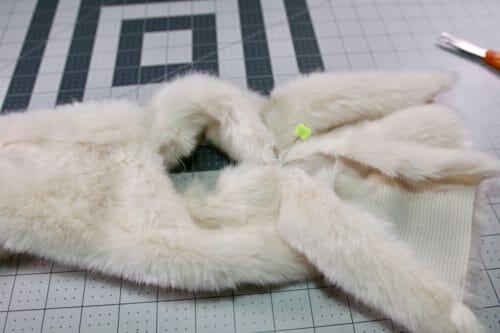
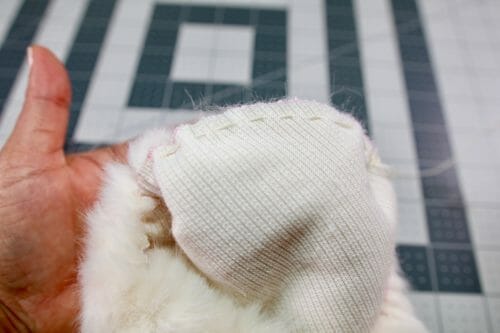
Step Four: Making the split or keyhole
Turn the scarf right side out. Split the sides. We will be working on one side at a time sewing the space between B and A.
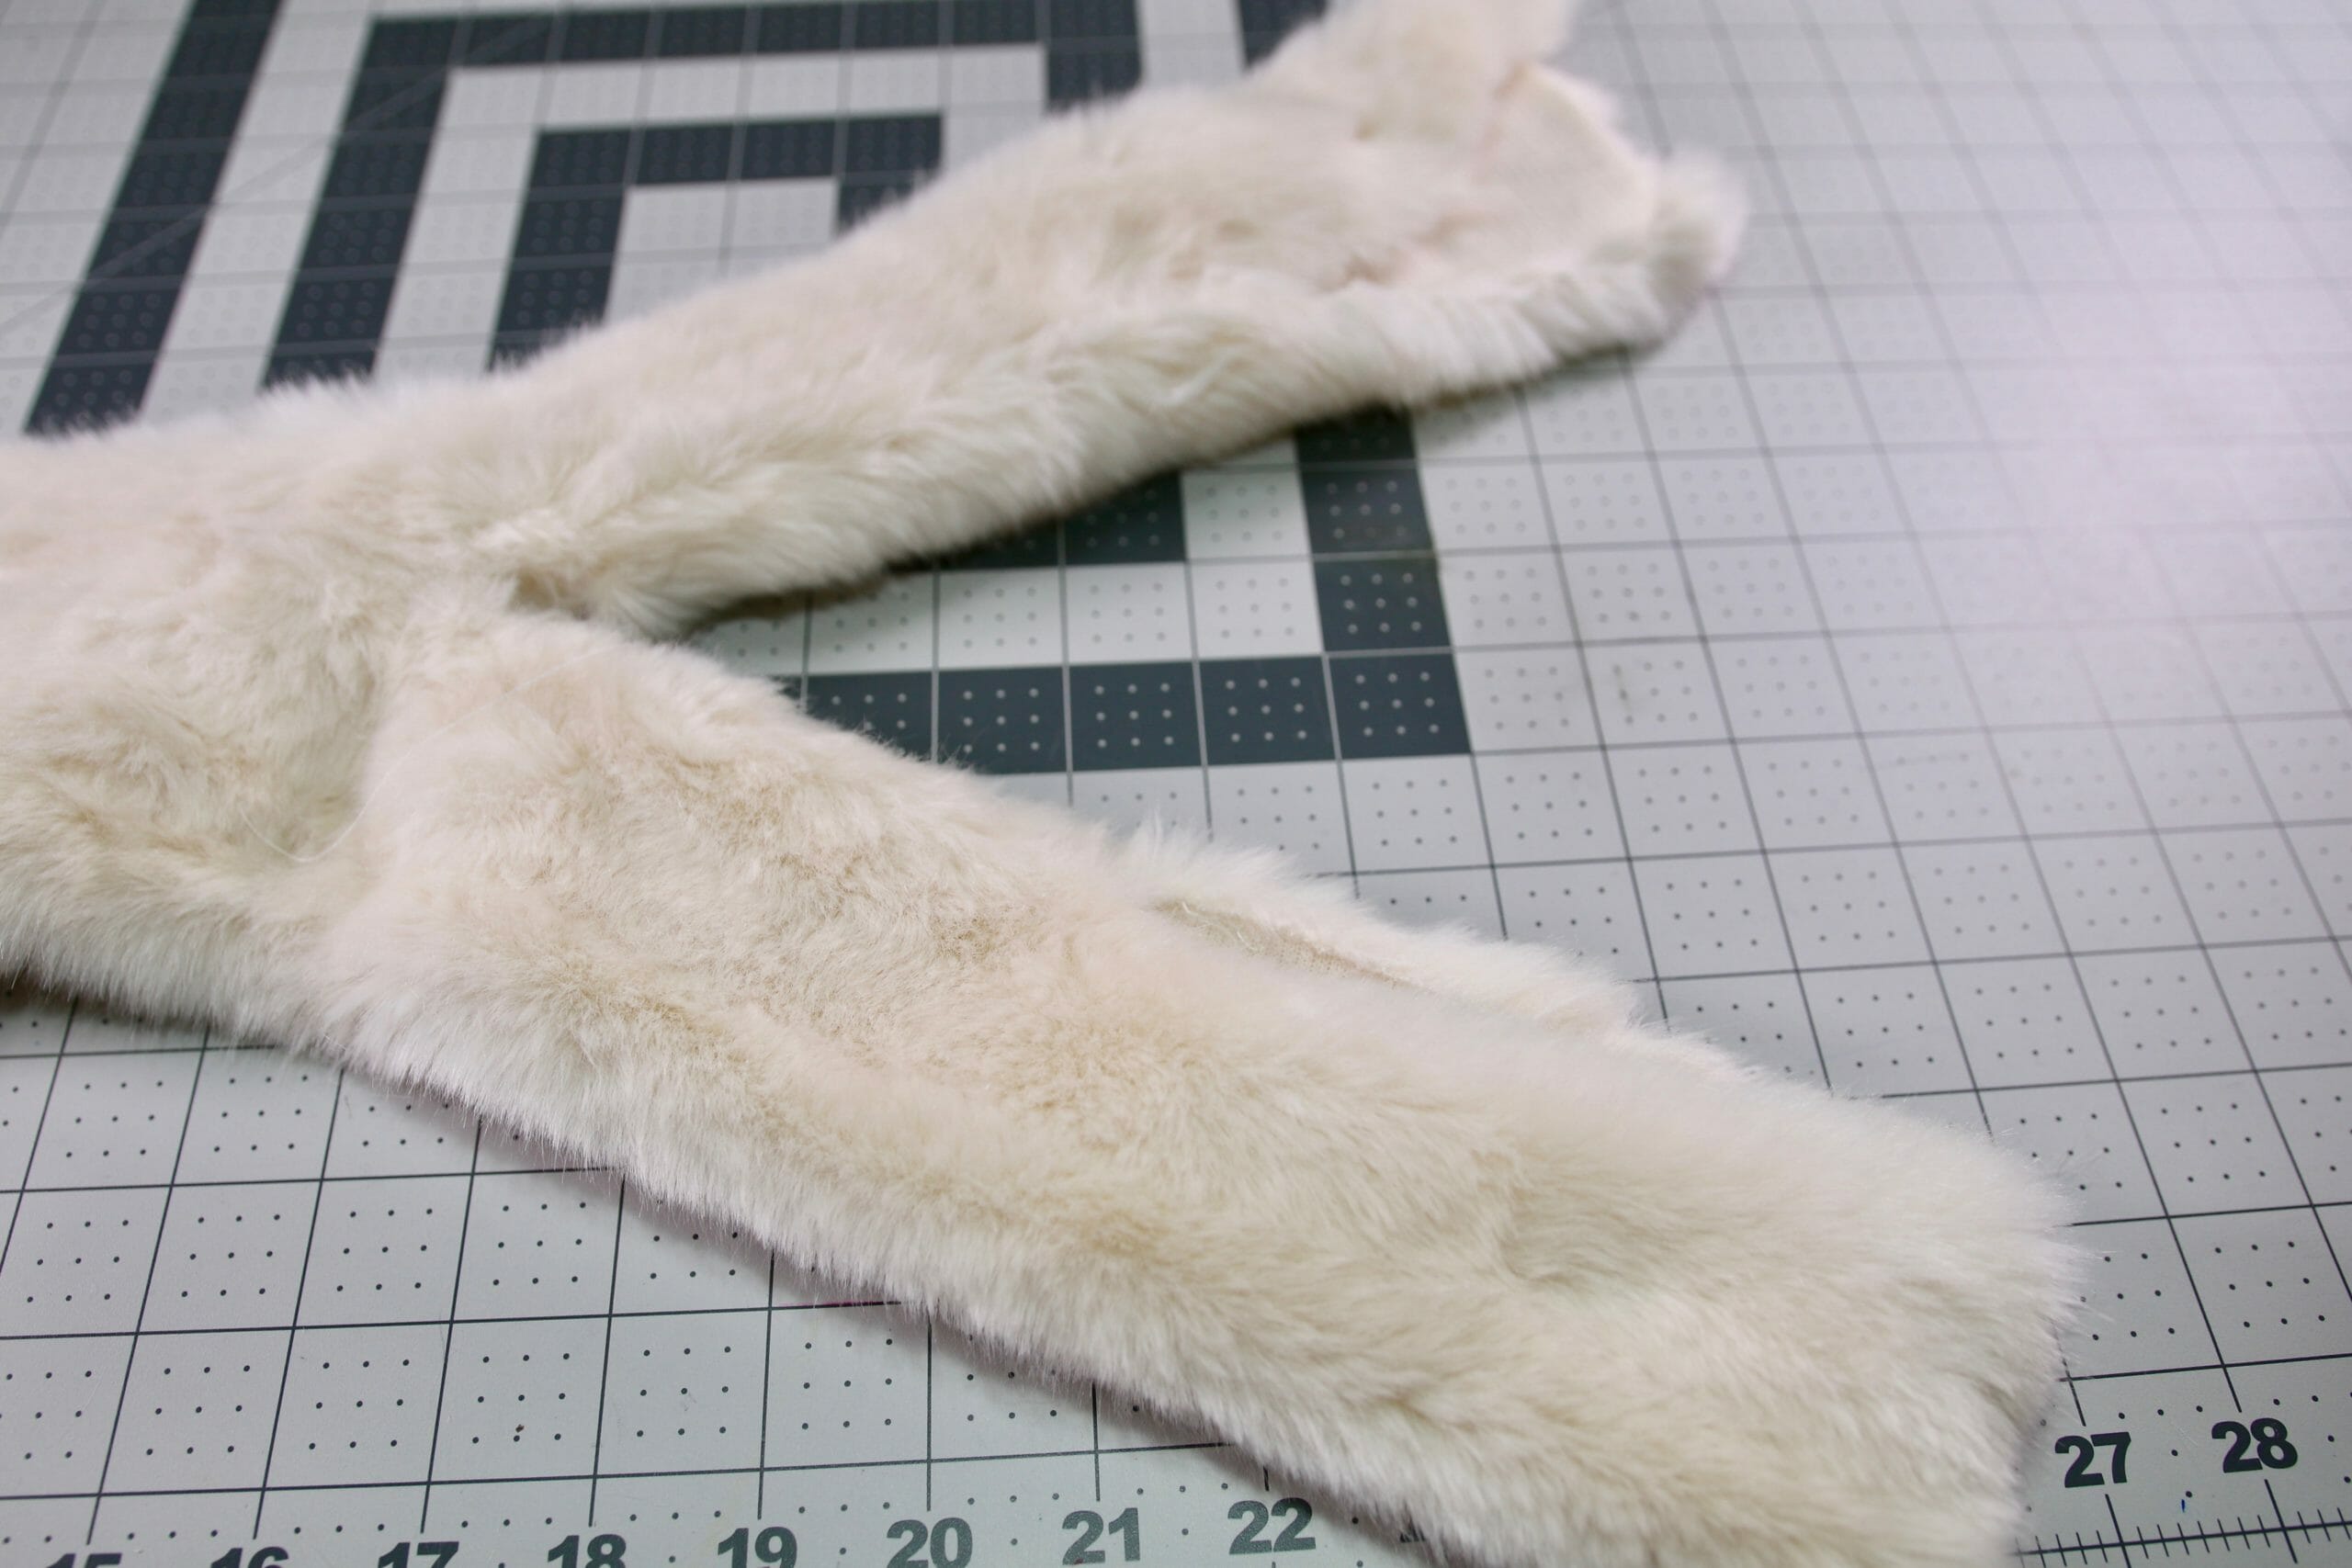
Join points A with A and B with B.
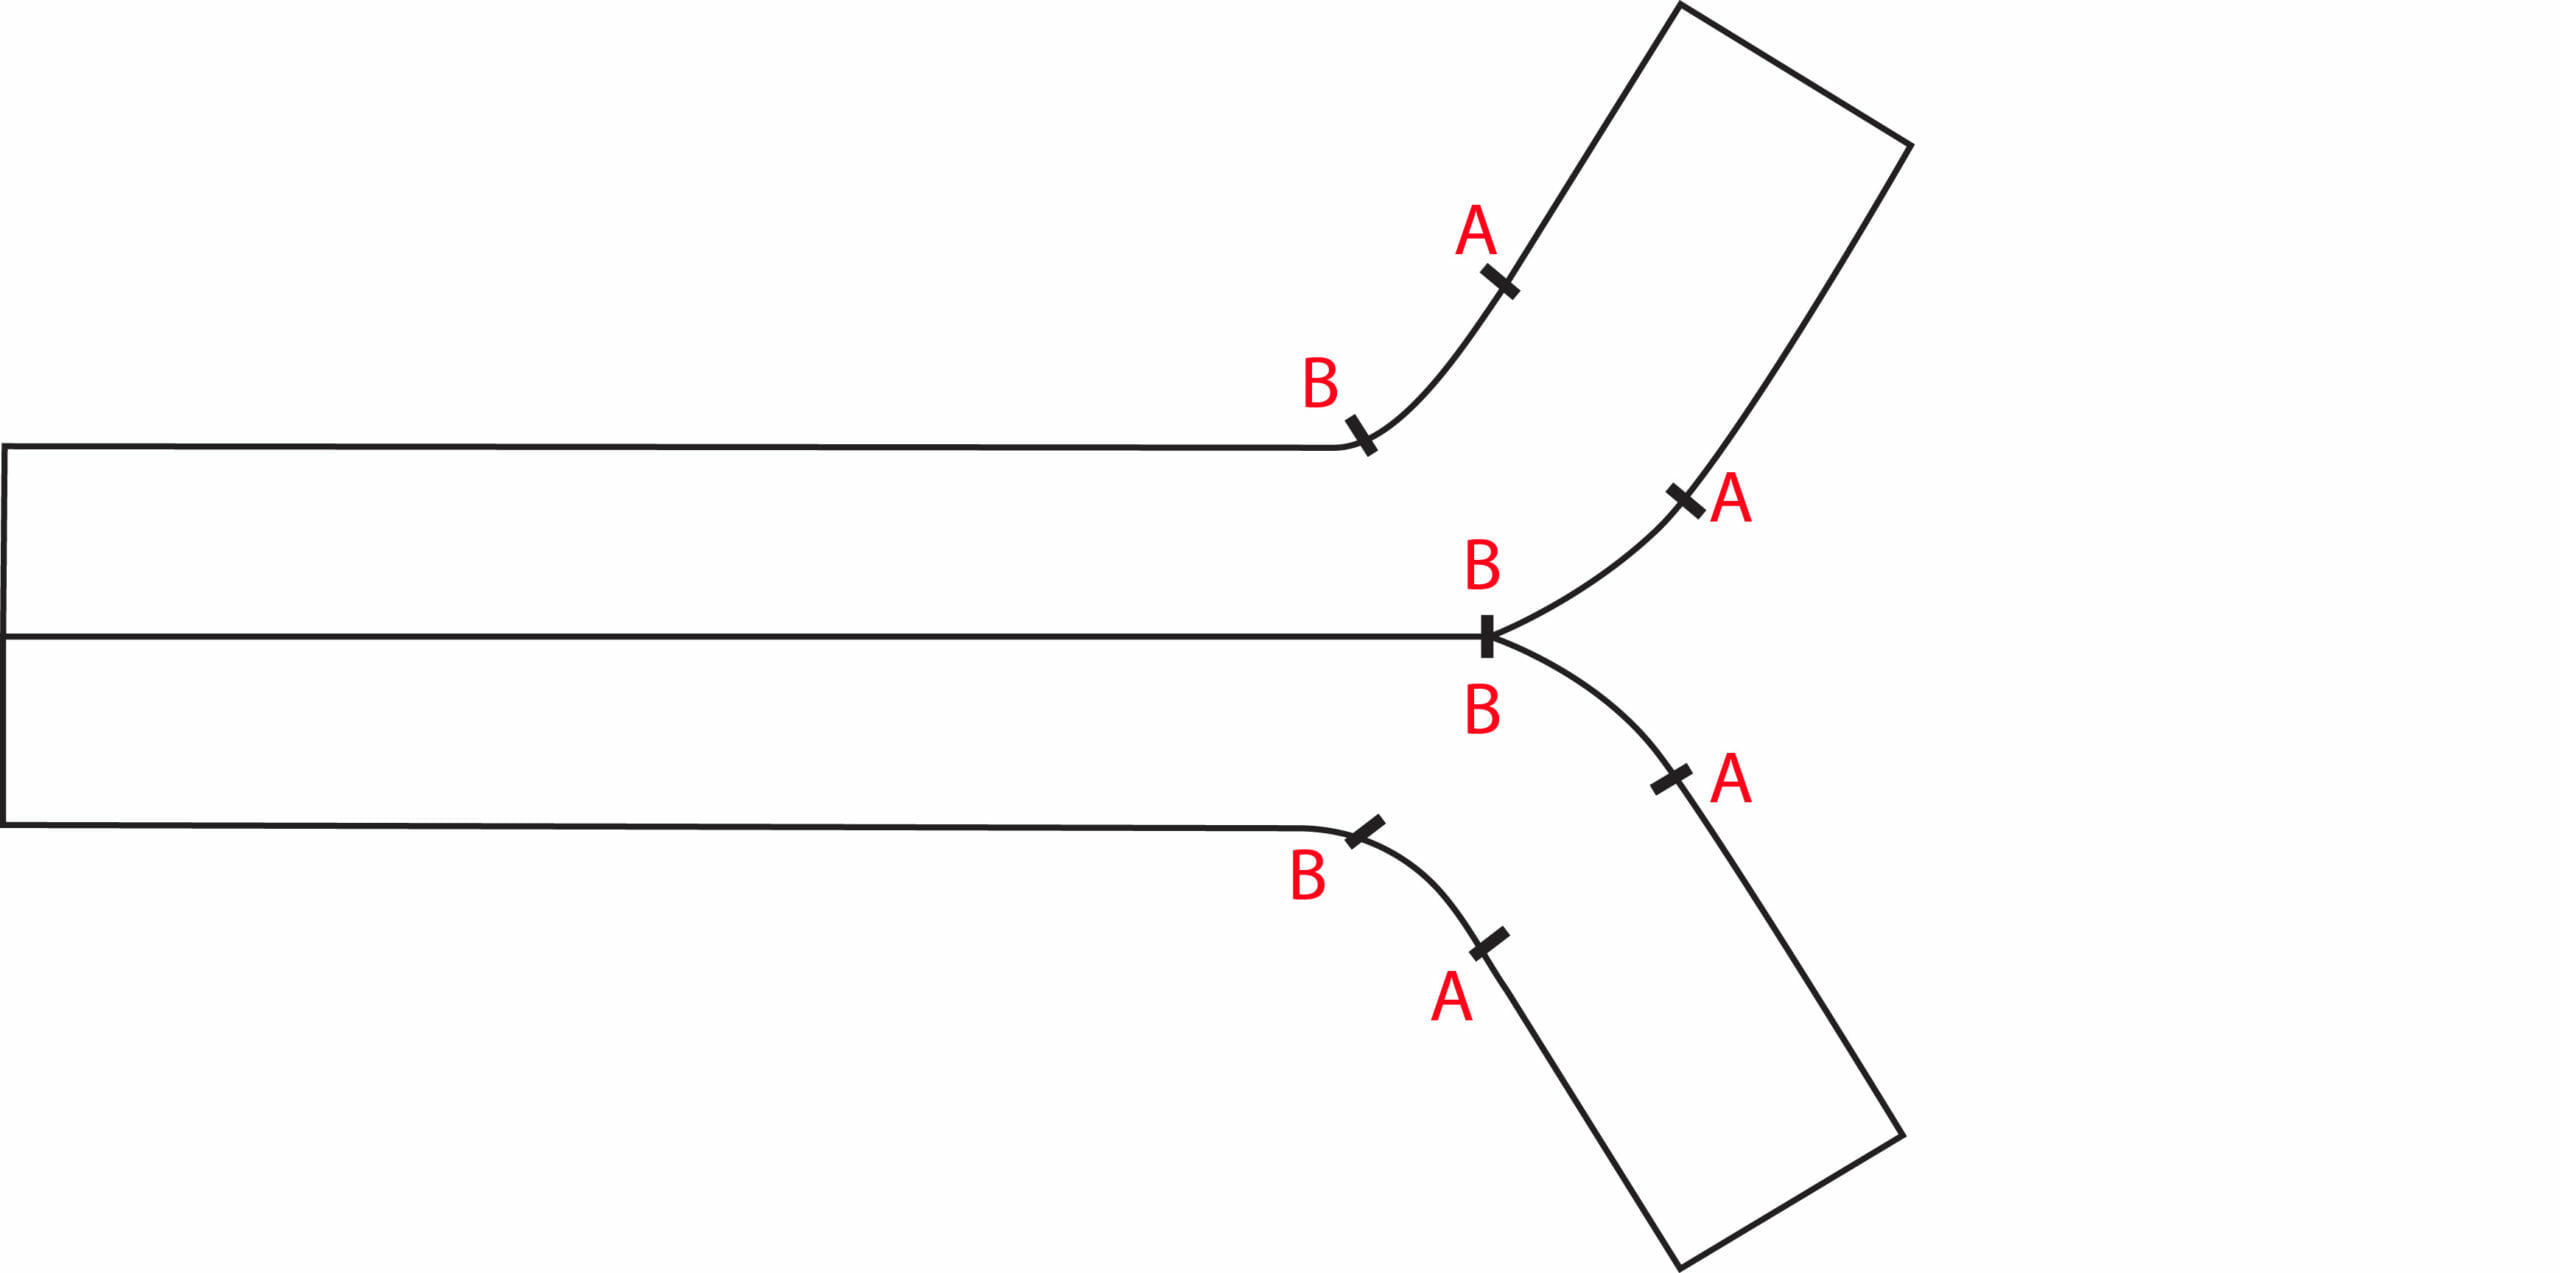
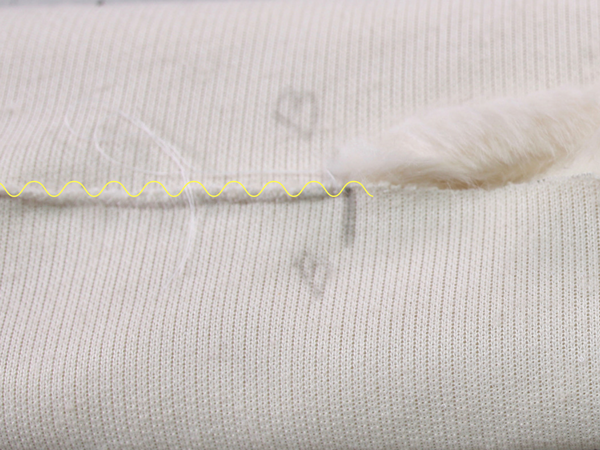
Working on the knit side, take one side and bring the edges together fur side in and pin the distance between B and A. Just look at the images below and this will be clear.
Zigzag starting as close to the stitch that you have already done that ended at point B. If your machine can not handle such a bulky fabric, you can use a blanket stitch or running stitch to sew this part by hand. Using the hole on point B turn the fur inside out.
Turn the fur inside out. Work on the other side exactly the same.
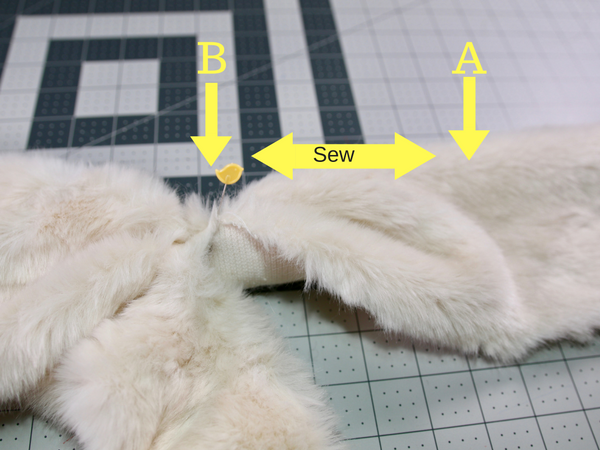
Step Five: Finishing the scarf
Fur side out, place the scarf so that the seams are facing upwards. Pin from point A to the edge.
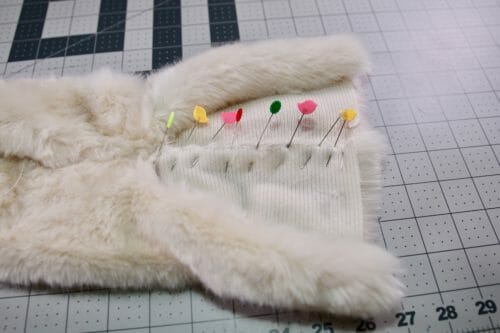
Sew with a small zigzag. Make sure you get as close to the end of the split as possible to avoid leaving a gap there.
Sewing Tip: Notice the wavy nature of my stitches. I do not mind this because it is not going to make any difference, but if I was doing a coat I would use a walking foot to avoid the seams looking like this.
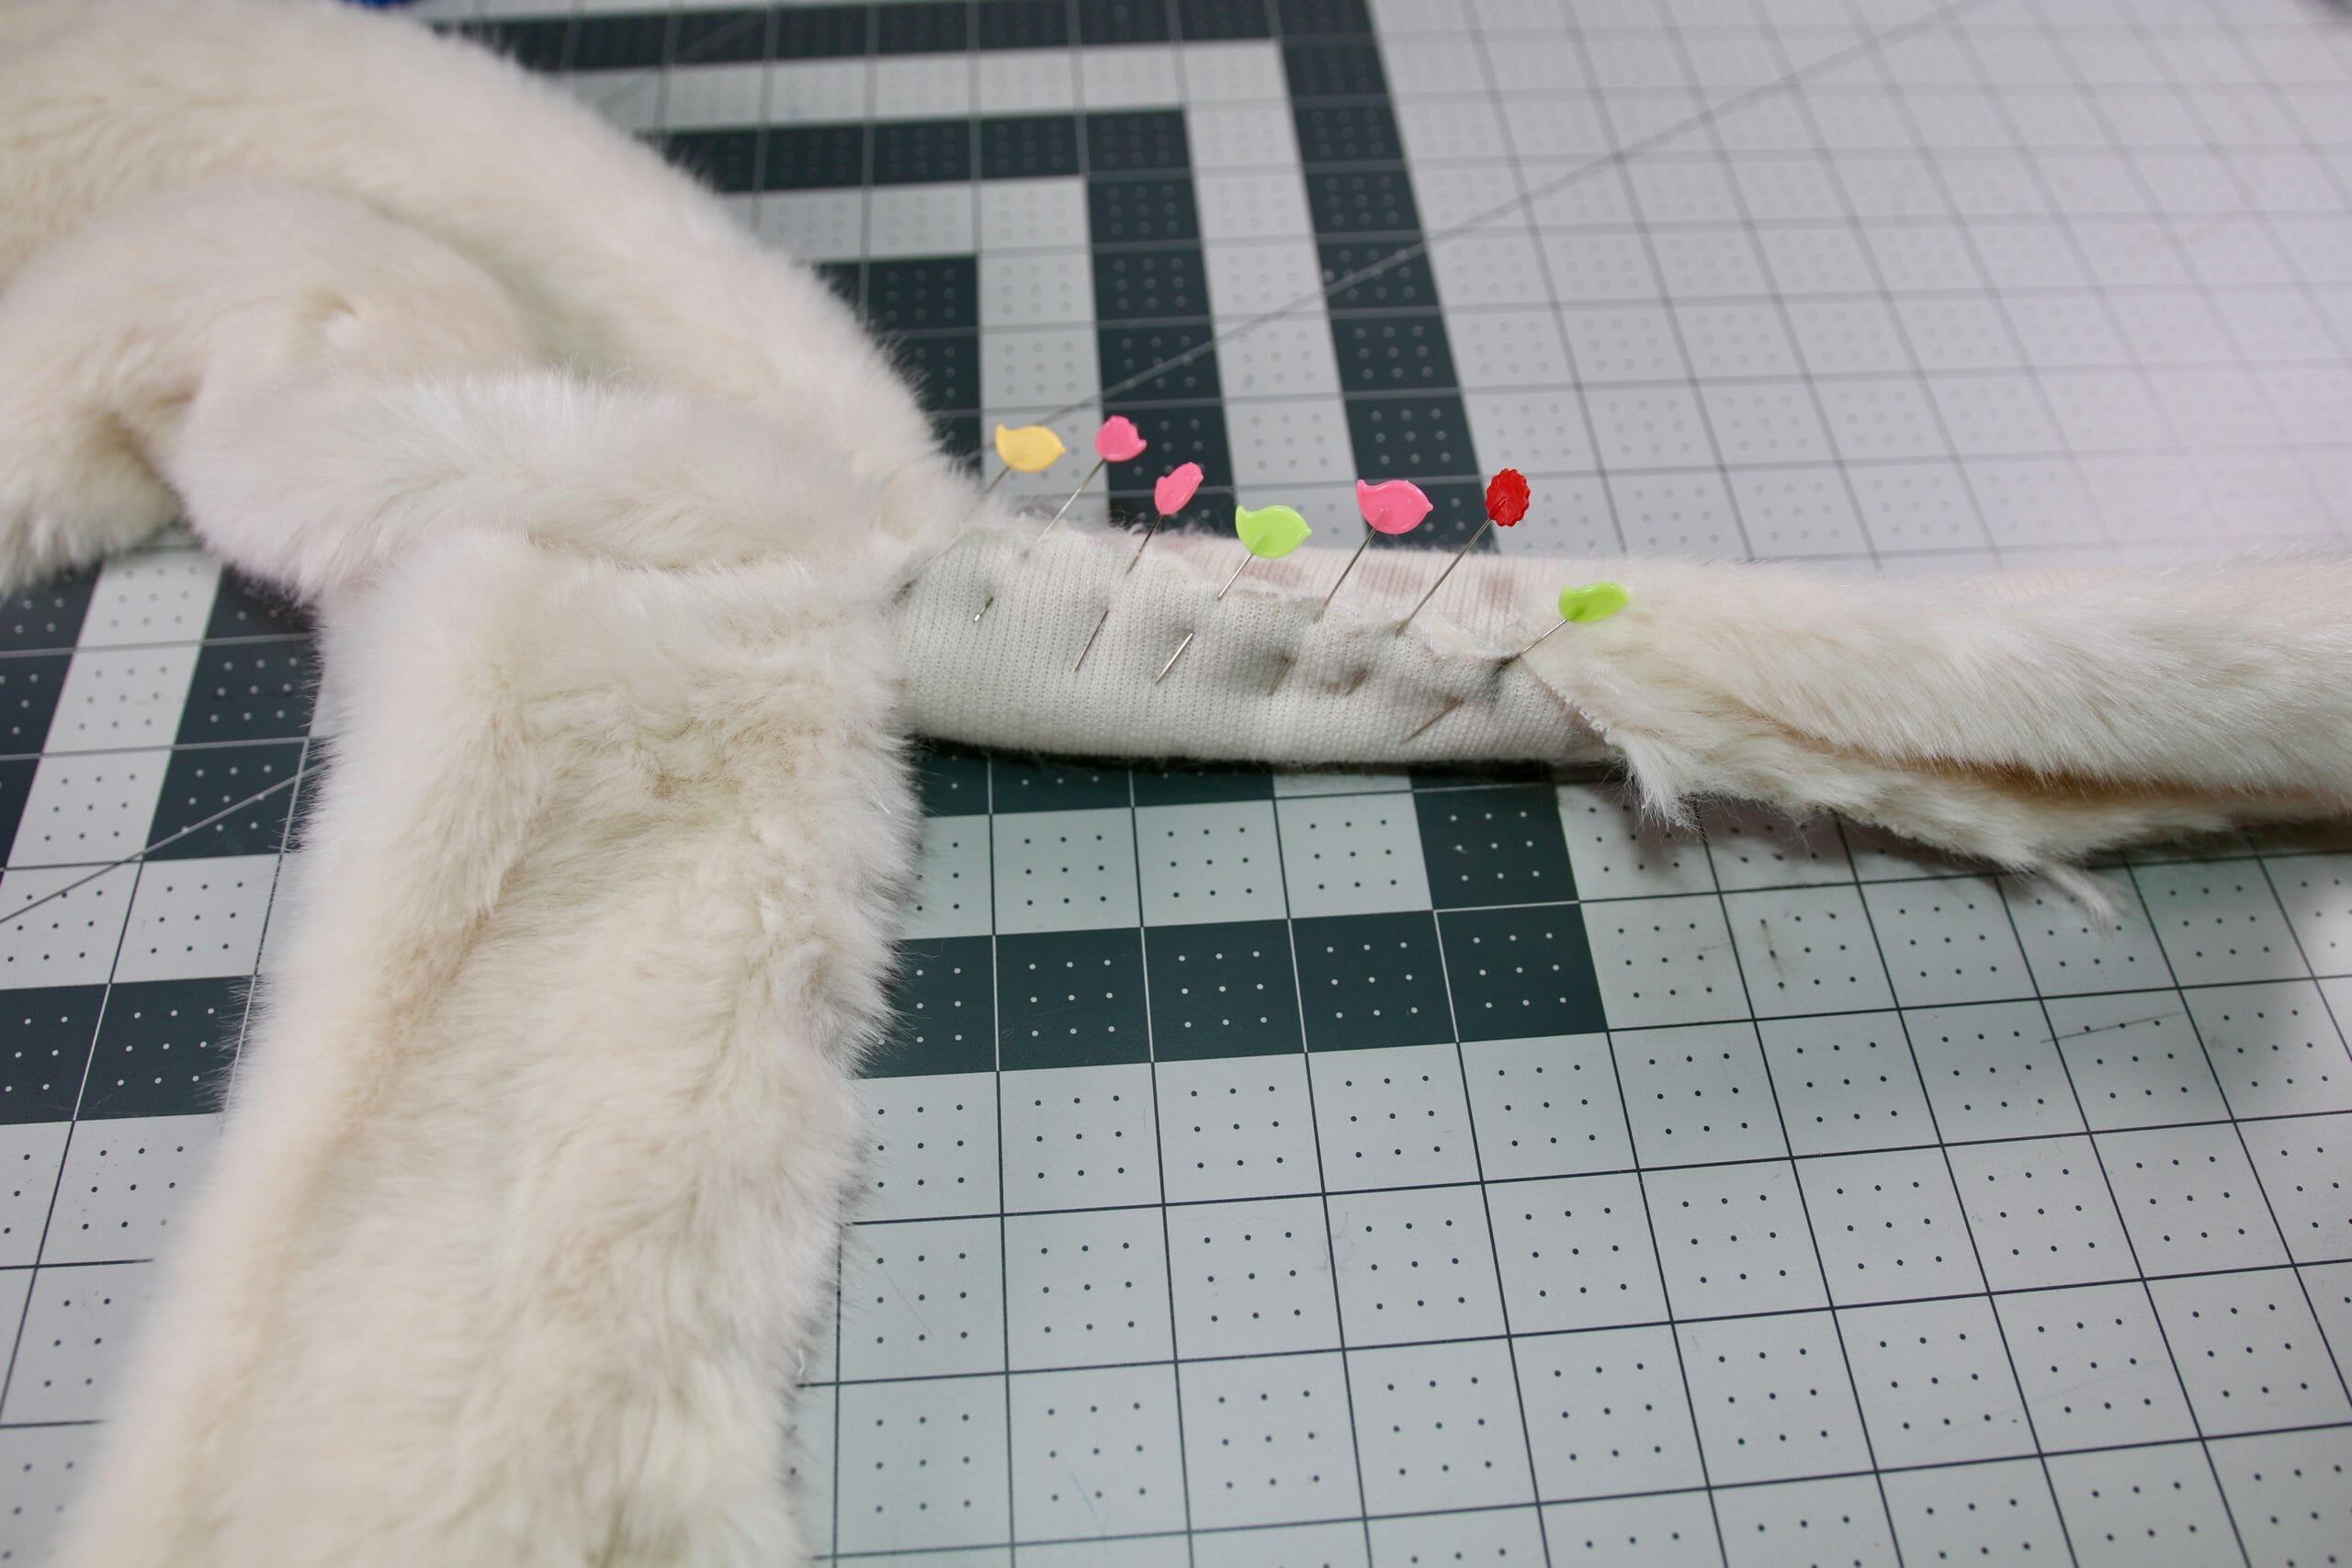
This side is the tricky bit because you have to work on the inside of the scarf. Below is the knit side showing pins from point A to the end.

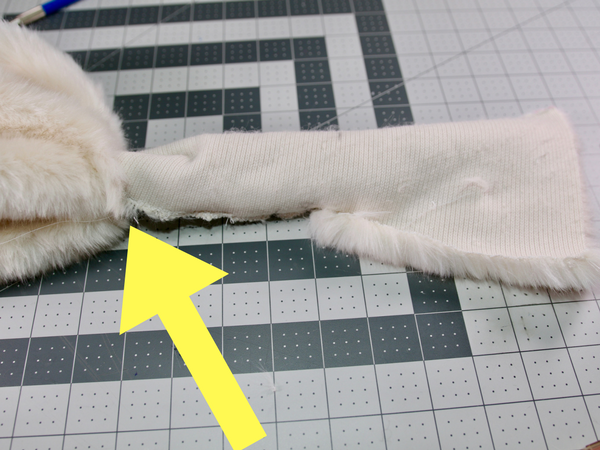
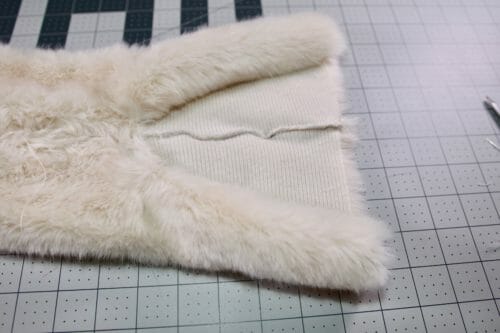
At this point, you could just sew the ends of the scarf with a running stitch, blanket stitch or the same small zigzag you have been using. The hair of the faux fur will cover the stitches and you will end up with something similar to this.
If you, however, want to add the pompoms to the end of the scarf, thread one of the needles with four threads and using a running stitch no bigger than 1/4″ sew all around the end of the scarf.
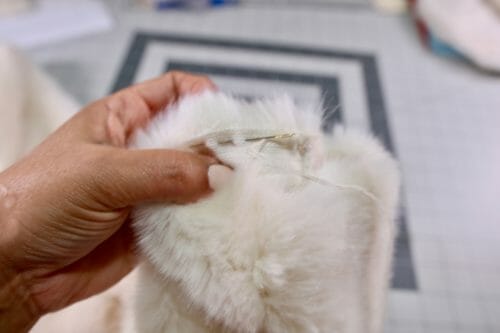
Pull the thread tight to close the opening. Make a couple more stitches to secure the thread but do not cut the thread or take out the needle. Repeat the same step on the other side.
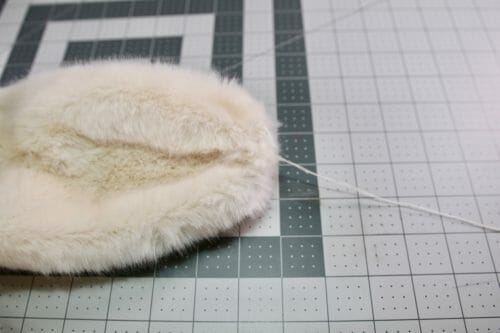
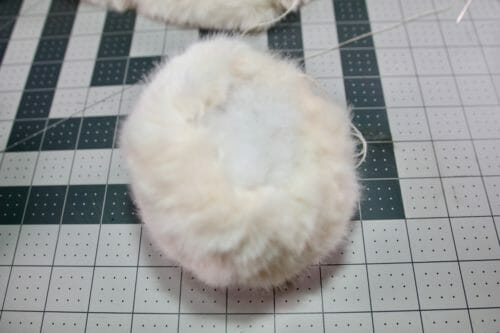
Step Six: Making the pompom
Trace the pattern on the knit side of the faux fur.
Threading the other needle use a running stitch no bigger than 1/4″ and sew all around the circle.
Pull gently until you leave a hole of about 2″ in diameter and insert the stuffing or Poly Fil. I wanted a soft look so really did not use that much stuffing. The fur is thick enough to give a firm appearance. Make a few stitches back and forth to close the hole.
Using the needle from the pompom, attach the pompom to the end of the scarf by sewing at least 8 stitches around the pompon and the end of the scarf. Using the other needle, sew a couple more stitches from the scarf to the pompom. Tie the threads from the two needles and cut the thread. Repeat on the other side.
That's it! In six easy steps, you can have an elegant scarf or a funky one depending on the color of your fur. And before you ask… Yes, you can use this pattern in any fabric you desire. Try with polar fleece if you like.
Hope you enjoyed this quick faux fabric scarf. Let me know how yours went down in the comments below.
And Until next time! Don't step on your needles!


Hi! So glad I found this email link! I have plenty of faux fur left over! Making 3!! My girls and I will definitely be warm! Thank you for offering this item!
What adjustments would you make to sew one of these for a 4-year-old?
Hi Barbara, You need to reduce the scarf length and width. Work out how long you want it and how wide, then make your pattern; the sewing instructions will make the hole useful so the scarf will not come off at the playground.
Thank you!
Darling scarf. I too am vertically challenged as I didn’t even get to 5′ however I am uncertain as to how it will work on a short neck. I am short everything, not a dwarf just short. Also, I have never sown faux fur and that being the case I would probably use all those pins to keep it all together.
Hi Joy, perhaps just make it thinner by taking off on the sides top and bottom. The length is good for a short person.
I would love to have this pattern but when I went to download it…My Virus Protection stopped it for having a sharesale embedded. I’ve attached a screen shot.
Hi Paula, here’s the direct link to the pattern page on Craftsy. https://www.craftsy.com/sewing/patterns/faux-fur-scarf/
“Grummy, why do you always wear such short skinny scarves?” “Here give me your scarf, showing you is worth many, many words.” I throw a long wide scarf around and around my neck, leaving ends as long as I am tall. “Okay, kiddo, you can stop laughing any hour now, I said it was worth words not hysterical laughter.”
At least I made it to the lofty height of 5 foot nothing ….
Our daughter-in-law and granddaughter wear scarves a lot. Will try pattern and make 2 using different type of fur. Then they change with each other. Thank you for your easy to make idea and tips.
Thank you, Rita, your appreciation is my reward! Happy New Year!
Mayra,
I love tthis scarf! I definitely want to make this one, especially since I have two faux fur pieces in my fabric stash.
I am almost 6′ tall, the scarf looks good on a much smaller female.
What do you suggest for scaling this up for taller females?
Thank you for your time and attention to all the questions and comments you receive.
Pamela
Very Easy to scale, add the length avoiding the A and B sides (or the slit) make it as long as you need to. Do post a picture so others can benefit from the fitting and thank you in advance.
Love it!
After you cut the fabric, before you do anything else, run a hand vac along the cut edges. This helps reduce the fluff pieces that seem to go everywhere. Cleaning out your machine right away, after your project is done, is a good idea too.
This is soo darn cute. My daughter is just about 5′ tall and this looks perfect for her. Thinking that once her other teacher friends see one, I’ll be doing more! Do you think it would work with the minky type fabric also? Thought I’d try one in that fabric first to get a handle on all of the little steps without the bulk of the fur.
Many thanks for all your patterns and ideas. Look forward to each of your emails!
Deb
i cannot find the “My Amazon Picks”. Where am I missing it.
Hi, Donna you probably have a pop window blocker.
Thank you for this wonderful pattern. I’m always looking for new and unusual scarf and gift patterns and this one definitely fits the bill on both fronts. Thanks so much for sharing.
My daughter-in-law says you can’t have too many scarves. This one is totally different from any one she has. It seems this will be fun to make. Thank you for sharing with us.
I don’t see anything under ‘Fabric Recommendations’ – help!
Hi Lori, they are under “My Amazon Picks” the 4 photos from amazon.
Myra, Thank you for sharing this wonderful pattern and idea. I have recently retired from 25 years of doing craft shows, and now I have a new project to use up all of my leftover yards of fur. Guess what everyone on my gift list will be getting for Christmas next year!! Please allow me to share one piece of advice with your readers: fur is very messy and it will collect in the compartment under your throat plate on your machine very quickly. Be sure to clean out that area after your project is finished and remove any fur that has been deposited in there.
Hi Susie, welcome to step in with any advice! I actually love it when readers have tips to add to the article improving the content so I thank you!
Didn’t find the fabric recommendations??
Hi Lillian, they are under “My Amazon Picks”
I already feel the warmth already! Excuse me, I need to start looking for some faux fur…….
So cute! Thanks for sharing!!
LOVE this; thanks for the tips!
This a great tutorial. I purchased a scarf similar to this pattern years ago and really like the scarf. I wish I had more, but I couldn’t figure out how to make the key hole. With your tutorial, I can make other scarves in different colors for myself. Hooray! Thank you for the pattern.
Just in time. I am making a Troll hat for my granddaughter and the hints will be very helpful. thanks
Seems easy to make, I have to try it.
Very cute! I love it! Thank you for the pattern! 🙂
Do you really use that many pins? Your sewing time would be much quicker if you didn’t have to stop so often to take out pins.
Hi Sandy, I try to show a complete beginner what would be the way to do it if he/she have never worked with fur before and rather make then they take their time and learn how to work with fur. Of course, you can use no pins at all if you are confident that the small zigzag will catch both sides.
Mayra, as a sewing newbie, I truly appreciate every single hint and detail that you provide in your patterns. I can’t wait to try this! Thanks!!! 🙂
Sandy, yes you really need all of those pins! I have been sewing on fur for twenty-five years, and the only way to keep the seams aligned, tight and free of fur is to pin, pin, pin. It may seem very time consuming, but going back to restitch the seams takes time too and removing stiches from fur to align the seam is harder than regular fabric. When it comes to sewing with fur, here are no short cuts if you want a quality finished look.
Fake fur shifts/slips as the “hair” catches against the opposite side. The extra pins will save you a lot of time.