


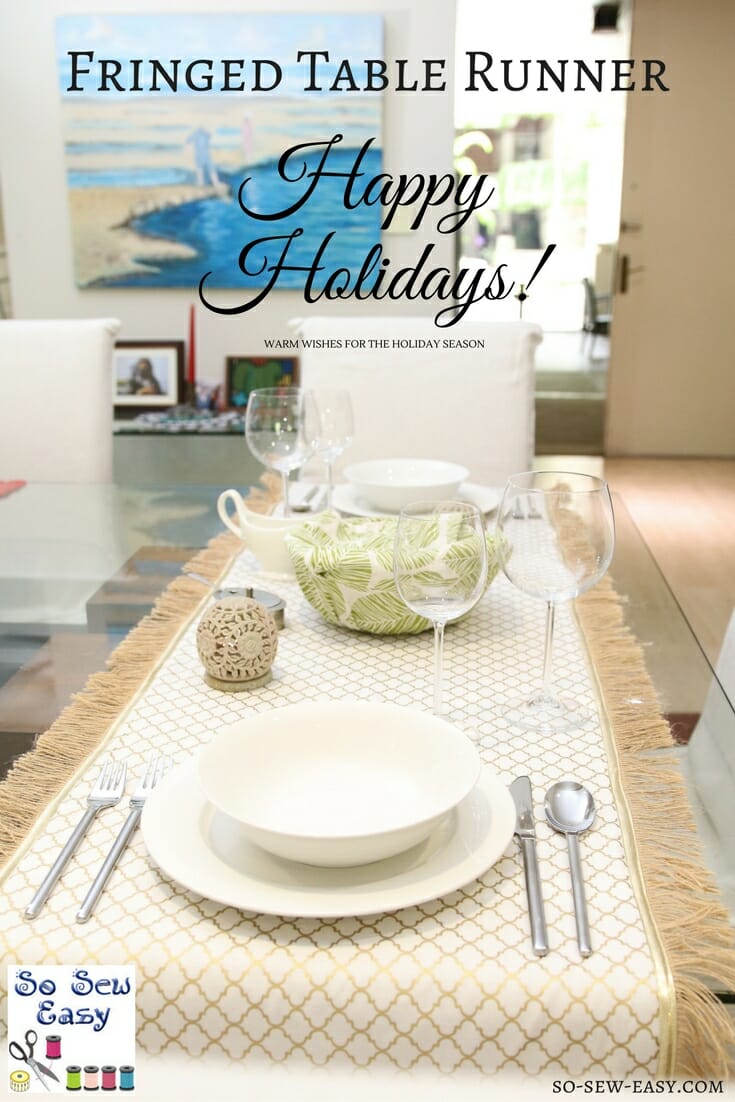
 We are going to make a fringed table runner for your holiday table in under an hour. Hard to believe? Did I mention it's reversible? The use of burlap or hessian allows us to make the fringe a super simple and elegant way. The quilting cotton makes it reversible and gives it strength. I'm sure you'll enjoy this project as much as your friends and family will find this fringed table runner an attractive addition to your holiday table.
Burlap has a special place in my heart. The smell brings back memories of sacks of produce collected at my grandfather's orchard –potatoes, oranges, lemons, sour apples and my favorite, the smell of roasted coffee. When I was a child my grandpa used to keep us busy and took us to the orchard to “work”. He would allow us to collect the wild strawberries that grew, as we would call it today, “organically”. Like many kids, it was “One strawberry for the container and two for me” until I couldn't eat anymore.
Then, we would move into collecting the red juicy fruit of the coffee plant taking care not to remove the stalk of the fruit and not to get pricked by the caterpillars that could be found sometimes under the leaves. My cousins and I would work until our arms got tired from trying to reach the higher branches of the Arabica coffee plants. After losing interest, we would put our buckets down and play hide and seek for hours among the orchard trees, eating, running and hiding. The wall of burlap sacks filled with roasted coffee was always my preferred place to hide. The smell and look of burlap today transports me back to those days when we ran young and free.
For this tutorial, you will need two yards of burlap. This is enough to make a table runner and six placemats.
Materials
- 2 yards of burlap
- 5 yards of cotton lace ribbon, one inch
- 2 yards of quilting cotton calico
- 5 yards of single fold lame bias tape 12mm/half inch wide
Fabric Recommendations from Fabric.com
Tools
- Scissors
- Sewing machine
- Pins
- Thread to match
Where to Buy Burlap
Template Download

You can download the template for this Fringed Table Runner from our account at Payhip.
For help downloading and printing PDF patterns, please CLICK HERE.
Step One: Preparing the Fabric
The burlap or hessian needs to be sprayed with water until it is damp so we can true the fabric. This is to soften the fabric fibers so they can be straightened. Iron with steam until dry. Drop the fabric on the floor and inspect the grainline. The grainline runs parallel to the selvage. If you are a beginner, to understand a bit more please read the top 5 mistakes to avoid when cutting fabric.

On burlap fabric, the selvage is indicated by stitching on one of the sides. Inspect the warp threads, they should be running parallel to the selvage. 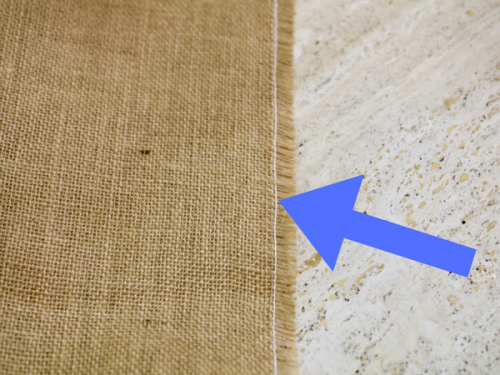 The weave of burlap fabric is very open and has a tendency to move and lose shape. Do the following very gently, to bring the fabric into shape. Ask someone to help you to pull the fabric gently on the bias. Pull at every opposite corner. Then pull at the weft and warp directions. Spray more water and iron one more time.
We are going to use the grainline lengthwise. Using the template provided, cut the burlap for the fringed table runner.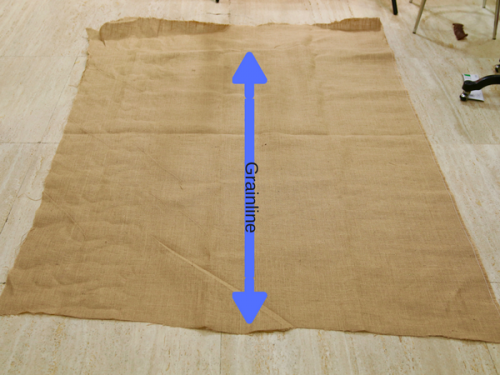 Cut out the selvage or remove the thread that keeps the fabric from unraveling.
The other half of the burlap will be enough for 6 placemats. These are just cut to size using the template and a fringe created as with the table runner. This procedure is detailed below.
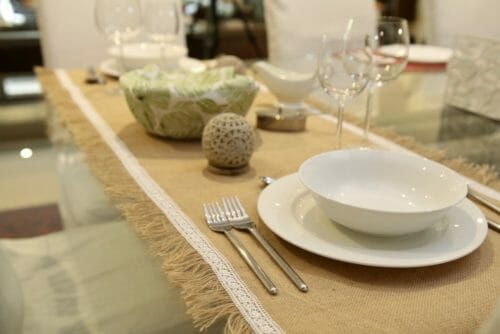
For the reverse side of the table runner, we are using quilting cotton. If you want to make the exact table runner, unfortunately, I can no longer find the same fabric which I'm sure came from Joann's fabrics. I've provided a list of good alternatives though in the materials section above.
Please spray the fabric with water and steam with the iron on the cotton setting. Set aside for later.
Step Two: Making the Fringe
The fringe is made simply by pulling the weft or the horizontal threads on the top and bottom and the warp thread on the left and right sides of the runner. 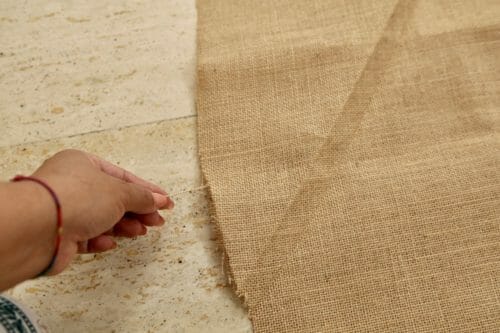 Basically, you are going to be pulling out threads in all directions. Pull until you have the desired size of the fringe on all sides. I have opted for a 2-inch fringe, but you can do more or less depending on your taste.
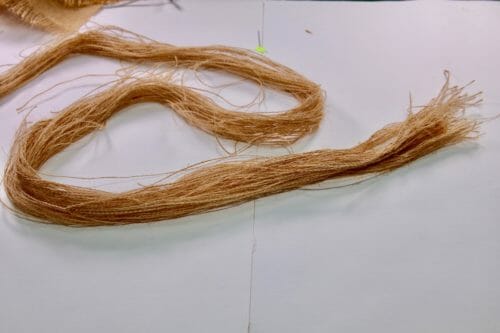
Note: do not throw away the threads you pull out of the burlap fabric. I will show you how to make a tassel with the leftovers. Pick the threads one by one and make a neat pile. Put it aside we will be using it in the next few days. 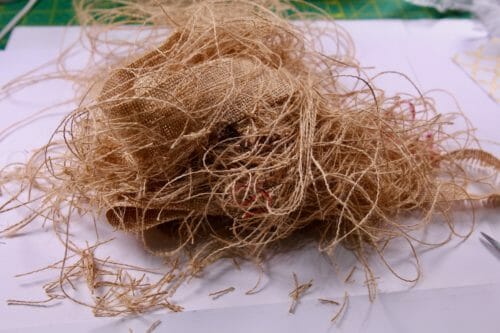
Step Three: Sewing the Lace
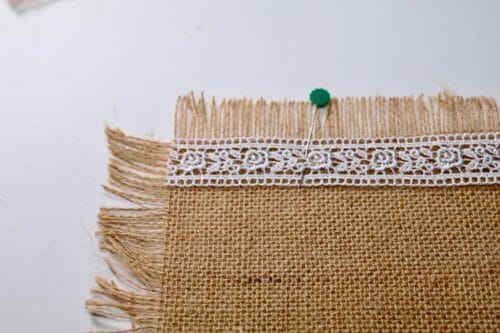
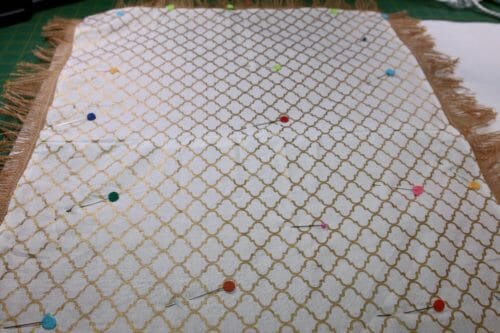
Start by pinning the lace to one of the corners. Align the edge of the lace with the beginning of the of the fringe.
 Sew with a small zigzag making sure you catch the end of the burlap.
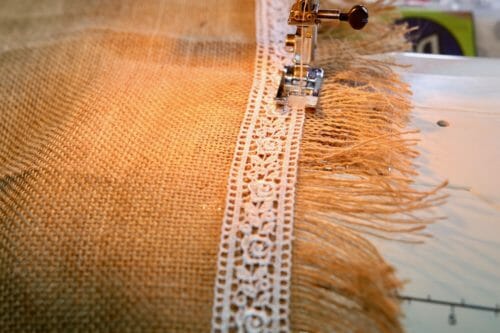 Sew until you get to be one inch from the corner marked here with the pink pin.
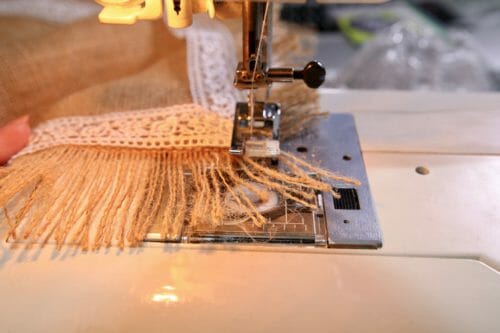
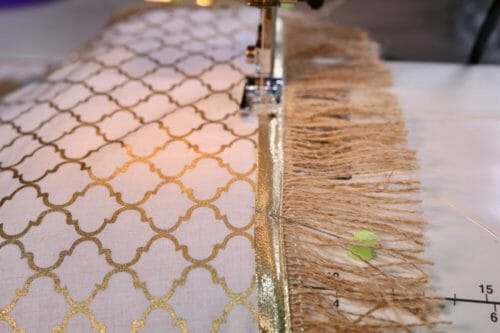
 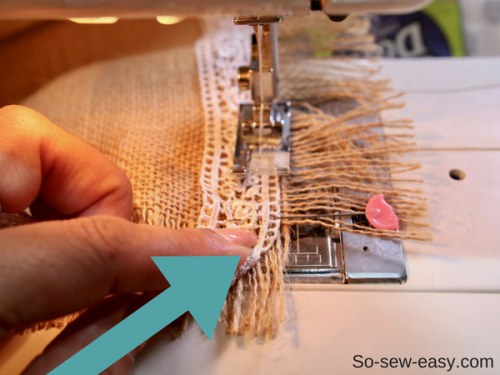 Put your needle down and lift the foot of the sewing machine. Fold the lace upwards, aligning the fold with the beginning of the fringe and place the lace over the fold. Aligning the edge of the lace closest to you over the beginning of the fringe.
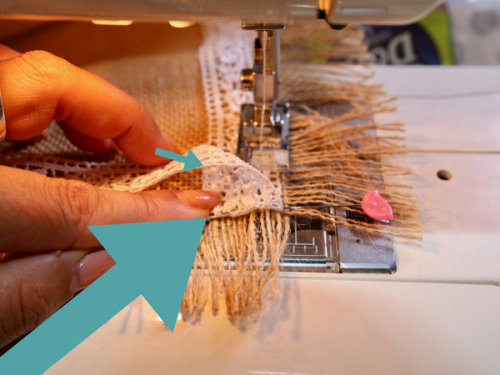 Put the foot down and continue zigzagging along the edge of the burlap and the lace. Once you get to the corner, put the needle down, pivot the work and continue sewing. Repeat this procedure to make all the corners of the table runner.
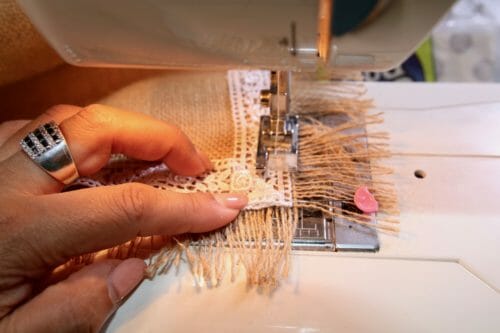

Step Four: Preparing the Other Fabric
The most important part of this step is to make sure the fabric is neither to0 large nor too small to cover the other side of the fringed table runner. For this, we need to measure the size of the burlap without the fringe. This is going to depend obviously if you decided to make a 2-inch fringe or not.
Cut the fabric the same size as the burlap plus 1/4 on all sides. This margin is to make a 1/4″ hemline all around the edge of the fabric. 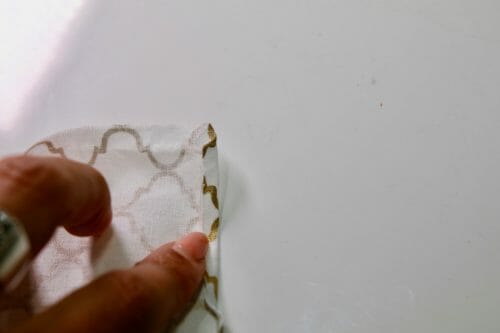 Start with the folding the corner 1/4″. Then fold the edge 1/4″ as well and start sewing.
 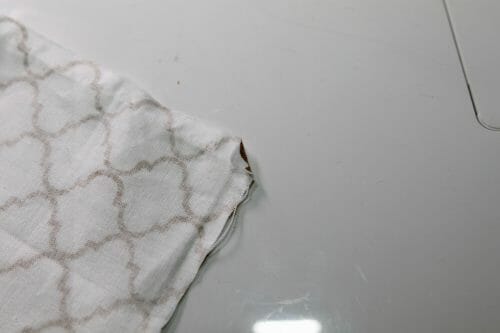 Then fold the edge 1/4″ as well and start sewing away from the corner. Once you get to the folded corner, pivot the fabric and continue sewing until you reach the place where you started.
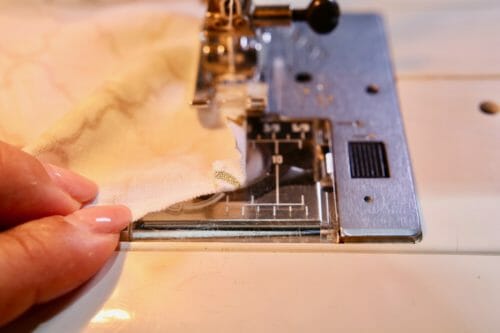 This hem is not going to be seen because it will be under the bias tape. So you can skip this step if you want.
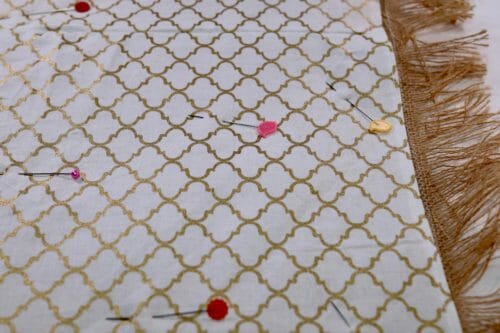
 The reason I am doing it is that I want a bump under the tape to avoid it looking flat and to give it a bit of depth and texture.
Step Five: Sewing the Bias Tape
Sew the bias tape the same way you did the lace. I am using a small straight stitch. The top thread is as close as possible to the color of the bias tape. The bottom thread matches the white lace.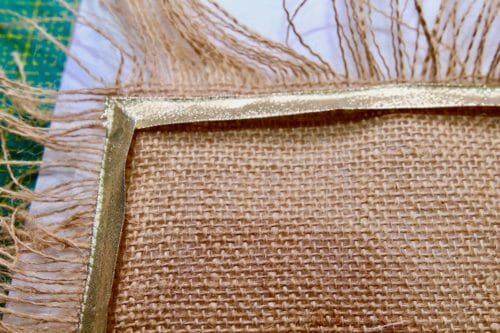
Step Six: Finishing Your Fringed Table Runner
Slide the cotton fabric under the tape and stitch on the other edge of the bias tape. Making sure the fabric is not pulling in any direction. 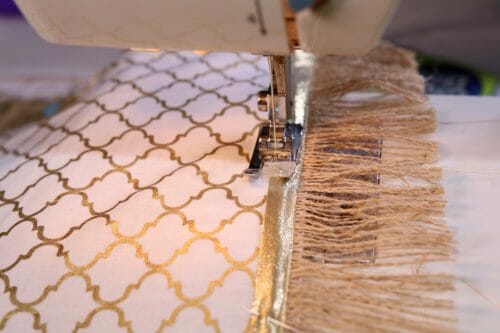
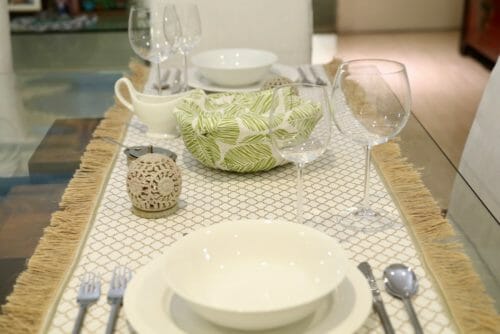
And you're done! As you can see, this reversible fringed table runner was super easy to make.
The materials I used were a gift from one of the readers who came to Singapore for a few days and we got to hang out together. She brought me some great fabrics. Of course, I was touched and surprised. I wanted to use them to make something that would last a long time but also get a lot of use in our house. And the fact that someone I now call a friend brought me some from Chicago –a place I have never been to and hope one day will– makes this fringed table runner all the more special for me. Thank you Brigitte B this one is for you!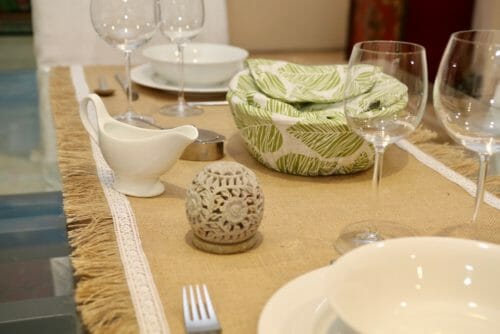


Thank you for that great info on truing up the burlap. I have been a crafterandsewer for over 50 yrs and never knew to do that.
I remember in Home Ec class, 50 years ago, our teacher showed us how to use textured fabric to make table ‘tops’ by unraveling the edges. So cool to see this method so embellished – thanks!
I am definitely making some as Christmas gifts. These are cute and would fit into any decor. THANK YOU!!
Great way to use burlap. Runner turned out to nice. Thank you for sharing.
Is this washable?
yes it is but you have to iron while is damp still.
This is wonderful and so clever! And knowing that burlap comes in many different colors, it would be fun to do gray/New Year’s’ red/Valentine’s/4th of July/patriotic; light green/spring/Easter; dark green/summer/ brown or orange/Fall.
Love, love, love your tutorials and sewing patterns. Keep up the great work.
Love the fabric ? Thanks for the pattern!
Beautiful ! How would you recommend cleaning the runner, as burlap doesn’t wash well. Thank you for your reply.
This is really striking. The combination of textures is really lovely and would show off both plain tableware and any tableware with some gilt. I see potential for holiday presents here !
Bonjour,
Thank you again for your kindness to allow us to participate with your creativity by giving us all those tutorial and free patterns.
Yolande
This reminded me of the very first thing I ever “sewed.” In 4-H we made place mats using duck fabric. (There wasn’t any “sewing” involved) We pulled a thread about 1/2 inch from each edge, then removed the outer ones to create the fringe. Mine were bright yellow! 🙂 Fond memories.
Very nice, Mayra! Seeing this I am starting to get into Christmas mood 🙂
Thank you very much for all the hard work, since you also have to work so many hours. You are a fantastic. I will give this a try.
Many greetings from Germany,
Jessi
Thank you Jessi! Please do share a photo of your runner.
Thank you for sharing this pattern. I would like to try and make this table runner, and although I successfully downloaded the pattern, I can’t for the life of me seem to be able to find a way to print the instructions with the lovely photos??? With other patterns I’ve downloaded, I get a pdf with the pattern and instructions, but this time I can only seem to get the pattern, but not the instructions. I’ve even tried to download to PDF converter, but I don’t know how that works. I have saved this pattern into my account, but when I look at it, only part of it is saved. The instructions aren’t there. Please help. What am I doing wrong. #newatthis. Thank you. 🙂
Hi Debbie, you are not doing anything wrong. I run late doing the pdf because of my work load, I work 16 hours or more a day 7 days a week and I still do not make all the things I need to do. The instructions are in the article for free. Enjoy!
Miss Debbie, I open a Word document and copy the instructions (highlight the first area I want and scroll to the bottom, and holding down the shift key click on the last of the area I want to copy), then in my Word doc I right click and click on paste (or holding down the control key press the letter v) – Then I can size the photos smaller and edit as I want and save in my sewing folder under documents! There, I can return to it as needed. And I save the template to the same folder. hope this helps.
Try having someone read them to you and you can hand write them out. You know the key words you would need to read to know what to do next. That way you would have the instructions next to you while you are sewing. Or maybe you could use the ‘snipping tool’ if you have a Windows computer? I use that often.
[…] How to make a fringed table runner in under an hour – 1 freebie(s)? […]
Love the creative design and the how to photos are great. Thanks for sharing with us.
Wow, beautiful! I am going out right now to get the burlap. Thanks for sharing this beautiful idea.
Very pretty and practical! Can’t wait to make one!
Thank you Ruth, I do hope you make one share your pictures.
This is very nice. My only concern is that the burlap would easily get dirty since it’s rough texture doesn’t clean easily. Would this be washable? I don’t envision burlap isn’t very easy to clean and it picks up dirty easily.
Thank you for the very thorough tutorial.
Hi Judy, yes this is a concern of mine as well. I have sprayed it with a fabric protector.
Love it, very classy and elegant looking at the same time! It will appeal to people who like a more rustic look as well. Good idea!
That is exactly what I was going for! Thank you!
I used to work in a fabric storeand when a customer wanted burlap, we would find the thread nearest the yardage they wanted, and we would pull the read out to create a channel for cutting the burlap
I wish everyone sold it like that. That is the way to treat burlap.
How do you clean? Can burlap be washed
Yes it can, spot clean the food spots if any with a sponge, then wash it cold water with gentle soap, soak for a 3 to 5 minutes then rinse. Do not wring, dry flat.
This is a fantastic idea! Very creative to use the burlap as the fringe itself. This is a great gift idea as well. Thank you for all your hard work.