


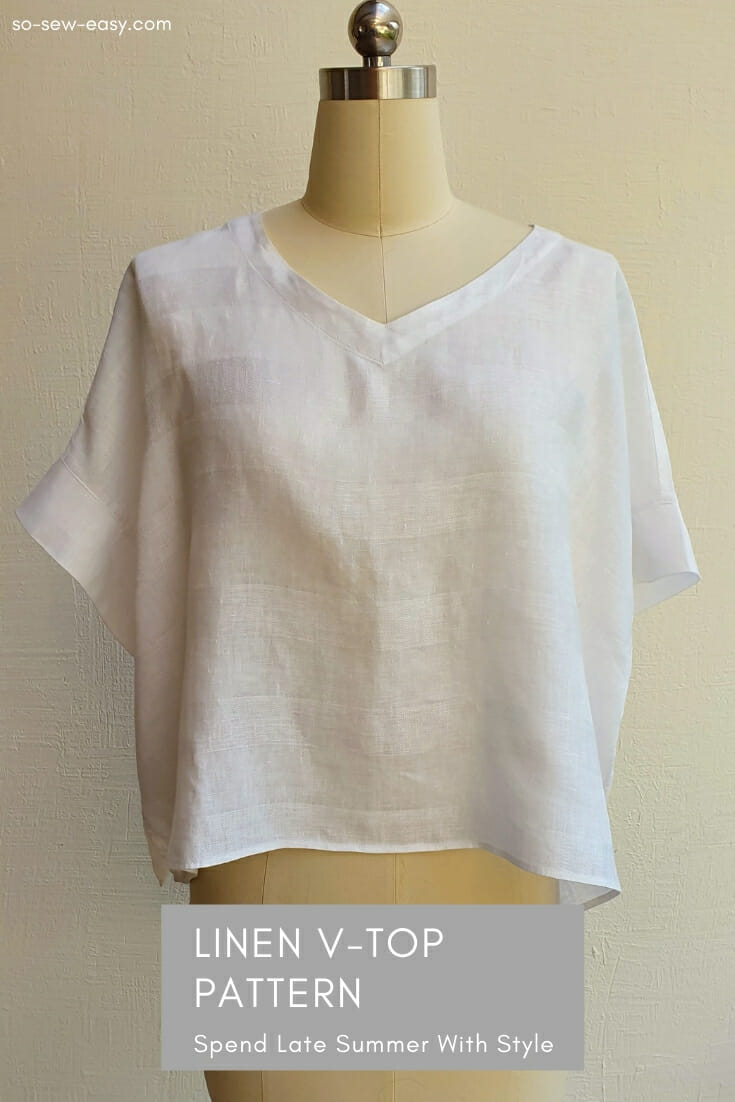
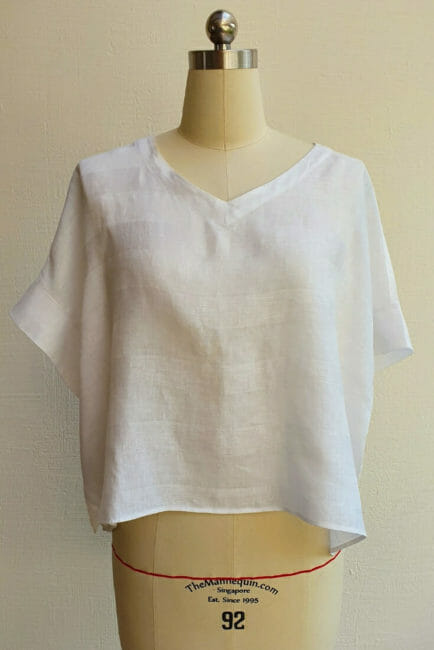
This late summer Linen V-Top pattern is my free and easy pattern for this weekend. Last week I shared with you my fabric hunting trip in Rome. So I thought I'd begin to use the fabric before it becomes just another memory in my stash of fabric (plus, the sooner I use it the sooner I can make the excuse to go somewhere to get more fabric).
The linen I purchased at The Azienda Tessile Romana is very delicate with a patchwork woven pattern. It changes the texture slightly and makes it look more luxurious. The weave is loose so this is the perfect fabric for a wide top like this one.
There are a few places in the world where you can find linen of the absolute highest quality. Italy, Ireland, Latvia, and Lithuania are the top producers of the finest quality of linen. Linen from Italy is a thing of the gods, or so the Romans thought. I happen to agree. No other fabric has the capacity to take you through a balmy, sweaty, sticky summer like linen can. The best part is that it lasts for many, many years. The price might seem high, but given that the fabric will give you many years I think it's worth the investment.
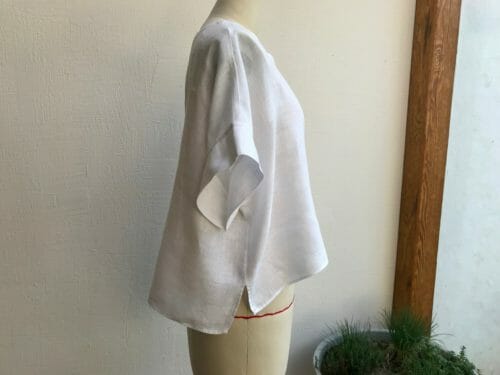
This Linen V-top Pattern is for leggings, shorts, long skirts, pencil skirts, and jeans. It is loose-fitting allowing you lots of room to move. It has a V-neck to lengthen the neckline and slim a girl with a large chest. The front is higher than the back with vents to accommodate larger hips.
Skill Level: Confident beginner
Please, read all the instructions before starting this project.
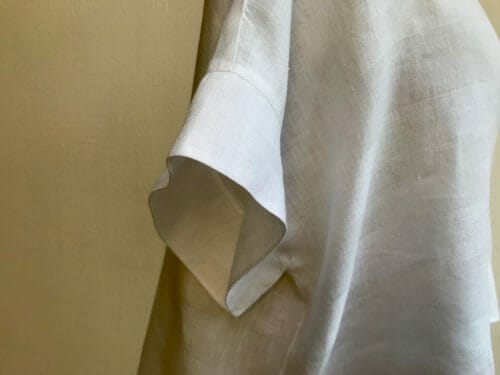
In this Linen V-Top pattern tutorial you will be able to practice sewing a neck facing, understitching, and sewing a casual inserted sleeve, it is the same type of sleeve that you can see on the Kimono Top I shared with you before.
I recommend washing and drying the linen before using it so there is no surprise shrinkage once you sew the fabric. If you have 2 yards expect shrinkage of 4 to 6″s depending on how tight the weave is.
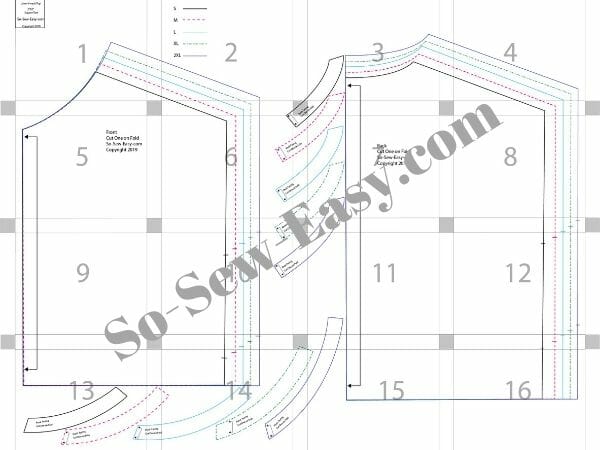
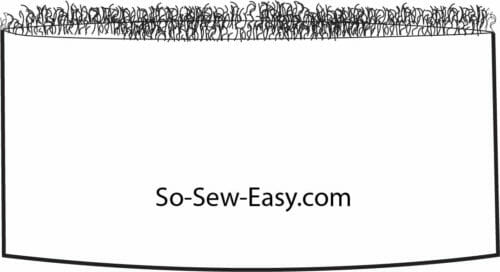
Pattern Layout
Fabric Suggestions from Amazon.com
Materials
- 1 1/2 yards of white or solid colored linen
- thread to match
- fusible interfacing (just enough for the facing)
Tools
- sewing machine
- scissors
- iron with steam
- erasable ink or tailor's chalk (this is my preference)
How To Download Your Linen V-top Pattern
Use the latest free version of Adobe Reader, use “Actual Size” and “Landscape” format.
Pattern Download
We're going to continue to use the new Payhip webstore to distribute our patterns.
Our patterns are still free, but now you now have the option of making a small contribution if you like our work! We'd really appreciate it and it will help is keep going with new and fun designs like this. Even a dollar or two really goes a long way.
Thanks so much in advance for helping us out. You can use any credit card and you don't need a Paypal account, although you can use one if you have one.
Sizes: S to 2XL
As I mentioned before this is a very loose top, so the use of a loose weave fabric is essential so it will drape around and not make it look as if you were wearing a tent.
It is a boxy pattern so the bust measurement is the only measurement you will need
Body Size Measurements
| Size | S | M | L | XL | 2XL |
| Bust | 32 1/2″ – 34″ | 36″ – 39″ | 40″ – 43″ | 44″ – 45 3/4″ | 46″ – 48″ |
How To Sew Your Linen V-Top
The seam allowance is included; it's 1/2″ on the sides and armbands, and 1/4″ on the neckline.
NOTE: I want to say thank you to Carie who kindly pointed out that I have forgotten to add the seam allowance to the pattern, please do so.
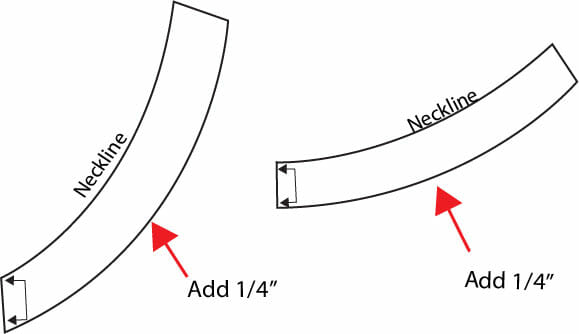
The facings do not have seam allowance so please add a 1/4″ to make them 1″ wide after you have attached it to the neckline.
The best and fastest way will be to use your overlocker. This time I am using the Brother 1034D. It's one of the most popular overlockers globally and the easiest to use. We even have a video to help you thread the machine, check it out here: https://www.youtube.com/watch?v=5q0z0QiNVQM
Apply fusible interfacing to a rectangle large enough to accommodate the facing. Cut the facing and put it aside, we will sew the shoulders first.
Subscribe to the YouTube channel:
Step One: Sew The Shoulders
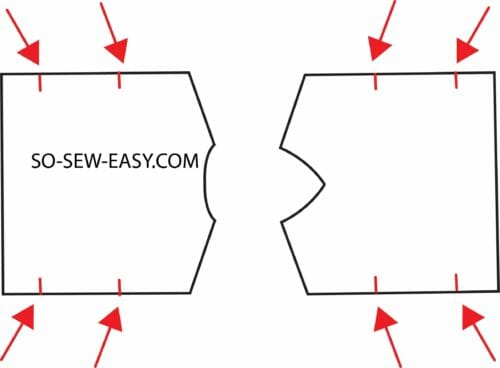
Using your tailor's chalk mark the vents end the sleeves.
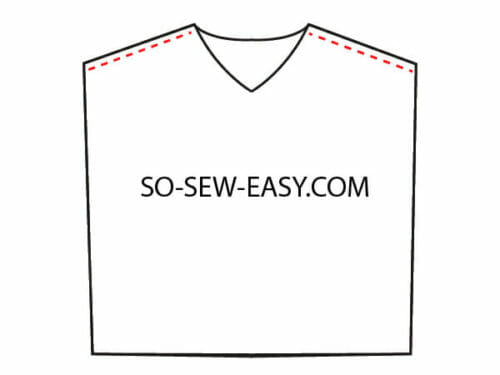
Sew the shoulders at 1/2″ then using your overlocker reduce the seam allowance to 3/8″.
Iron the seam towards the back.
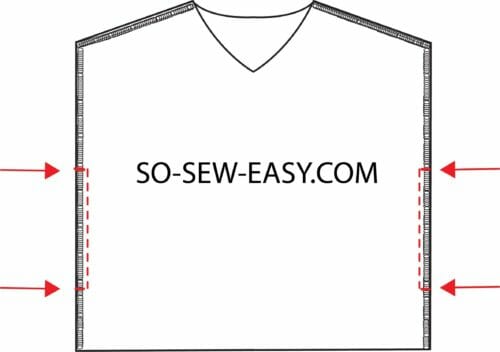
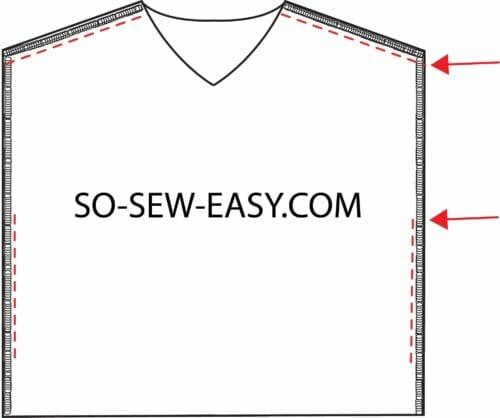
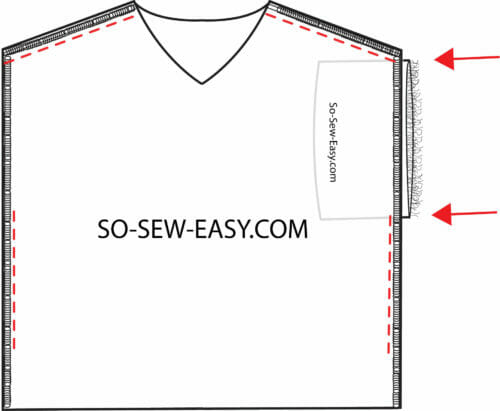
Step Two: Sew The Sides
Flatten the top of your work area then, using your overlocker, sew the sides without cutting the fabric.
Right sides facing each other sew the top from the armhole mark to the vent. Iron the seam allowance OPEN. *THIS IS AN IMPORTANT STEP* Later, the seam allowance will become the vent and the hem.
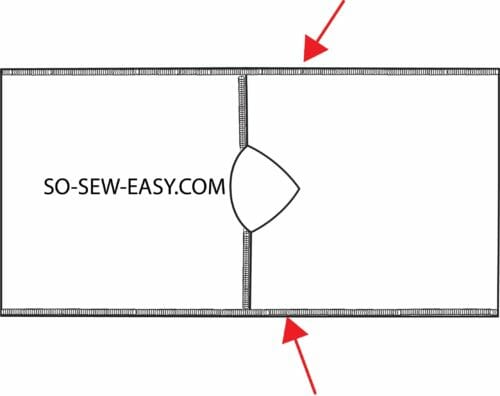
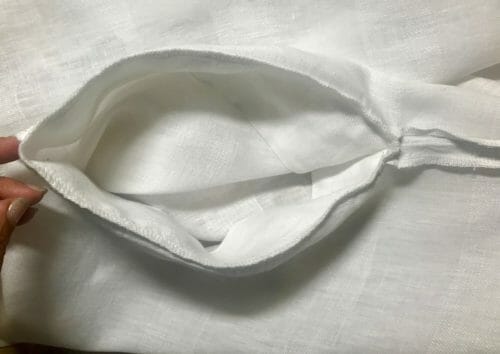
Step Three: Sewing The Facing
Right sides together sew the facing on the sides. Iron the seam allowance open.
Match the seam allowances of both the top and the facing with right sides facing each other. Pin the facing to the neckline and sew at 3/8″.
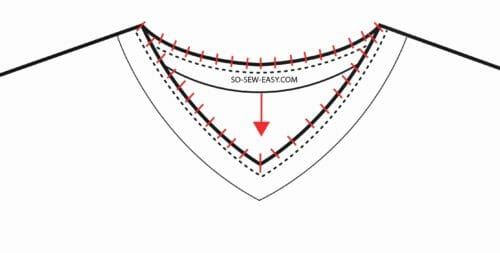
Snip the seam allowance every 3/8″, stopping 1/8″ before the stitching. The most important cut is going to be at the front where the V is located. Cut to but not through stopping at about 1/8″. Turn the facing inside out. Iron the facing, turning the hem 1/8″, or use your serger to clean the edges. Understitch the facing, make sure the seam allowance is with the facing away from the blouse.
If you have a hard time understanding this step please have a read at the following tutorial, it describes in detail how and why to understitch.
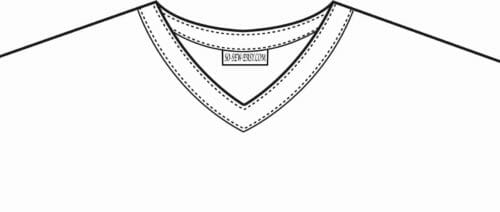
Sew the facing down using a small stitch.
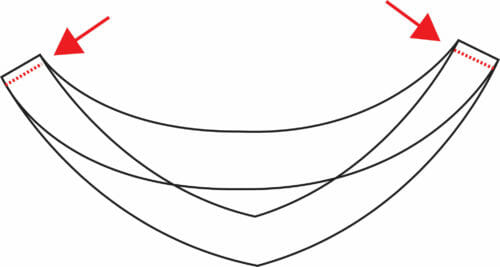
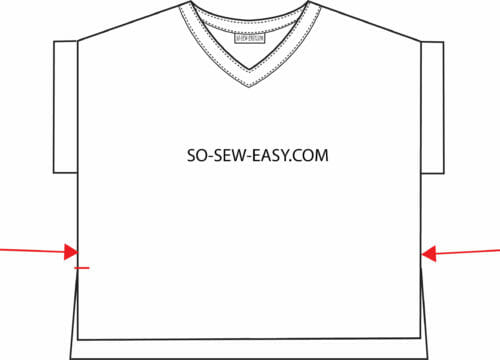
Step Four: Sewing The Sleeves Band
Measure from the shoulder seam to the side seam.
For example if your measurement is 9″ + seam allowance = 9 3/8″. You will multiply this by 2 (9 3/8″ X 2) = 18 3/4″. This is the length of the armband. The width is 6″.
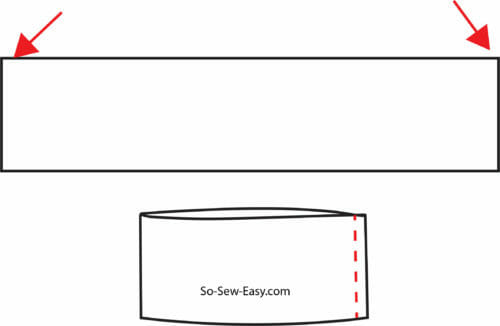
Fold the armband lengthwise. Right side together.
Sew at 3/8″. Iron the seam open.
Fold the arm band width wise, wrong sides touching each other, the seams should be facing each other and right side will be outside.
Insert the band in the sleeve. Sew the armband to the blouse at 1/2″, matching the side seam. Then using your overlocker, reduce the seam allowance to 3/8″. Please notice: the picture below is for illustration purposes, you need to align the raw edge of the band with the serged edge of the armhole.
Use your overlocker to reduce the seam allowance to 3/8″.
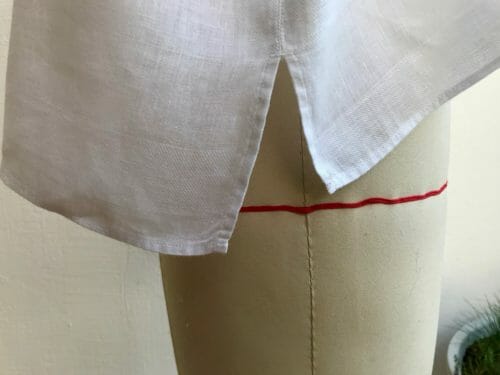
Step Five: Making The Vent And Hemming The Top
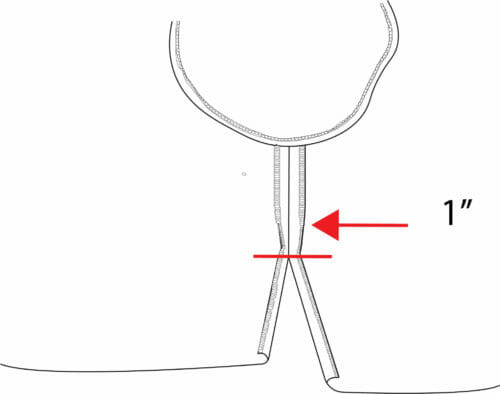
Start by turning under the seam allowance 1″ above the vent.
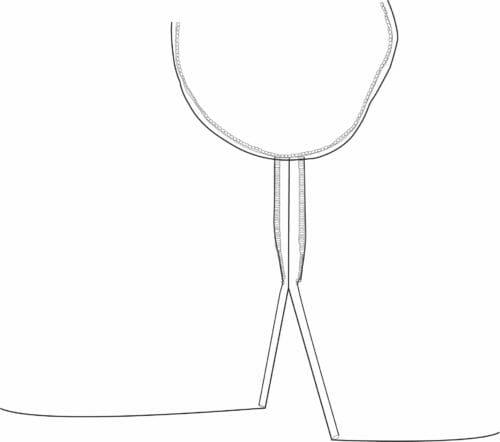
When you reach the vent make sure you have turned under 1/4″.
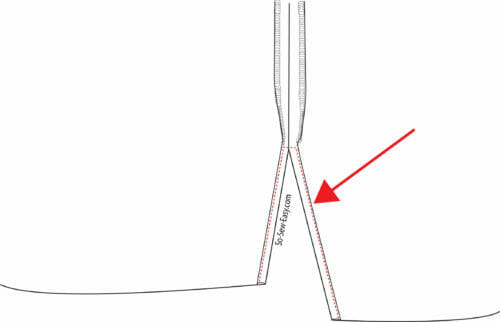
Continue turning the vent 1/4″ until the hemline. Top Stitch the vent using a small stitch very close to the edge.
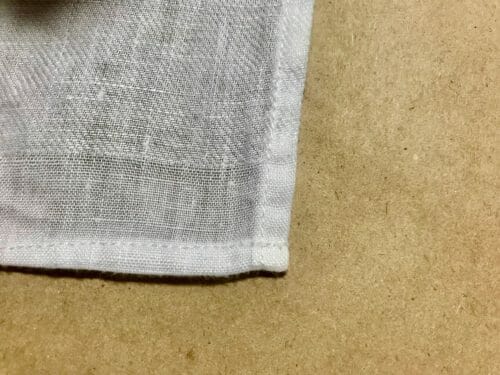
Now it is time to hem the V-neck top. Fold the hem 1/4″. Iron. Then, for the hem another 1/4″. Sew the hem using a small stitch.
Lastly, using a very small zigzag tack the vent opening to avoid it from ripping after wear and washing.

Now you are ready to iron the top and wear it with your favorite shorts, skirt or jeans. This is how I'm planning to wear this top. What do you think?
I wanted to take a few lines to thank all the people that have been donating to the blog. It really helps me keep going and offering the patterns every week. I do read all the names and place you in my VIP list. Come Christmas you will get a special gift from me.
I hope you enjoyed this Linen V-Top Pattern and tutorial, join me next week when I'll be showing you how to paint some flowers to this top with a product I found that has got me very excited. Can you try and guess what it is?
Don't forget to comment or ask your questions in the space below.
Until next week, happy sewing!


I don’t understand the instruction especially the bit about ironing the facing To a square, has anybody made a vide tutorial or this?
I really like this top and was thinking it could also be made with a knit type fabric. I do have some antique/old light weight cotton fabric that would make up beautifully with this pattern also.
You can but make sure the knit is not so thin, or it will look frumpy. By far the best fabric to use is a tight woven such as cotton and linen.
This design reminds me of the classic, simple and very expensive Japanese patterns I was perusing recently! I can’t wait to make this top.I need an excuse to splurge on fabric, so I’m off to seek out that linen! Thanks so much for offering this design to those who are on a fixed income and can’t afford the commercial patterns.
Linen V-Top Pattern I am trying to lay out the pattern. Has anyone done this? It does not tile out easily AT ALL…NOTHING LINES UP!!!
I just finish this pattern with a knit fabric. Works wonderfully. Love this pattern and instructions. Will make it again in linen.
Dear Magda
I’m fairly new to garment sewing & haven’t downloaded any patterns yet but I’m looking forward to download this one in a few days. I’m going fabric buying before I can sort out the pattern & wonder what width of fabric I should be looking for.
Im in Orlando and having problem downloading this pattern of V neck Blouse. Also all your other patterns that you have. Love to sew
Thank you for the pattern. Its wonderful to be able to download. I will post a picture of the finished blouse. Probable next month.
Looking forward to making this blouse for my daughter.
Can you clarify a bit more about the missing seam allowances on the facings? I understand adding 1/4 inch to make them wider, but is that added to the inside (shorter curved edge) or outside (longer curved edge- not really a seam allowance in this case, right?)? Also, do I need to add seam allowance to the short ends where they are sewn together? If so, is that 3/8″?
Is there a video available for this pattern? Sorry if I missed a link.
Thanks in advance for your help!
Audrey
I cannot seem to print the instructions to sew the pattern. I get lots of unwanted images to print with instructions. please help me.
Hi Mary, if you go over to the left side of your screen and click on the green button that looks like a printer, this will generate a printer-friendly version of the tutorial for you. Hope that help. Kind regards, Mayra
May I use another fabric instead of linen? What else would work well? I love your designs and your personal attention to your fans.
I have the same question. I’d like to use a gauze material, which is not as tight a weave as linen. Will this pattern work for gauze?
I like the pattern but had trouble downloading the instructions. I had to copy and paste to my word processor.
But I look forward to your paint demo.
So, this length top is more of a cropped top?
You could make it as long or short as you wish.
Hi Mayra, I don’t have access to much fabric variety so I must purchase linen on line. Do you know the weight of the fabric you used? I am finding anywhere from 2.5 to 4.5 oz. Thanks!
Love the style, wished it included 5x size.
Thank you for your patterns, love them,
Thanks for sharing this beautiful pattern! I was wondering, what are the finished bust measurements for the medium and large sizes? I have a 42″ bust but a small frame, don’t want to be swimming in the final result 🙂
Hi Mayra –
In the blog post you mention seam allowances are not included, then advise adding 1/4″ to only the neck facing pieces. Do the other pattern pieces include seam allowances, or do we need to add them?
Thanks!
Opal
Goodday
I consider myself a honest person no matter how hard. You give beginners shorts and top and because of the free downloads it’s just right to ask for a donation. I would love to contribute. It’s not a way to get out of it, the Lord knows my heart. In South Africa we have daily SMS’e, e mails or what they can find to get your information. I have reported it but the can’t guarantee anything. For me to use my bank card is like commiting suicide just knowing the reason. I have no confidence in our systems and laws. I do not do internet purchases and being sick , have aps and mix connective tissue disorder so I need to get it to you safely. If you have an idea what will work i will look into it. I don’t want to use any of your patterns, it takes a lot of time to develop any new item. I love having the longer crotch and bit longer legs, that I can use because of spending most of my time in bed. To try and do something gives me hope for every day. I will wait for your answer. Even though I might not make it, I will try my best to help my semi paralyzed hands to achieve it. To finish the race. Thank you for being so kind and giving, something the world is missing out a lot. May you be blessed. Regards, Maudé
Maude. Under your circumstances, I think you should use the pattern. Not everyone contributes to the site. I think your joy is “payment” enough for Myra.
I bought the pattern and printed at 100% in landscape. I had adjusted the adobe to 100% also as it went to 73.8 when downloaded. Should I have left it at 73.8 because I’m having a hard time lining it up? Never had this problem before so it baffles me.
Just a suggestion, if you cannot afford linen by the yard, check second hand stores or grandma’s cupboard. If you find a old Irish linen tablecloth that would be PERFECT to reuse and re do as a shirt. ( As long as Grandma is ok with it) I have irish linen tablecloths from great grandma I am NOT willing to part with but found one at a tag sale with stains on one end so I will cut around them!
it’s best to sew facing on before sewing side seams, while the garment is flat.
Hi Mayra,
Any tips to sew the corners of the folded hem? It seems a bit bulky to sew on
Thank you and I love this pattern!
Hi, Melissa walking your foot using your hand at the wheel normally does the trick. If not do use a walking foot.
Hi Mayra,
I think there are missing instructions on the sleeves part. I am stuck there as of now. If you could kindly tell me what to do with the raw edges of the sleeve. Nothing was mentioned about it
Thanks,
Melissa
Hi Melissa thanks for letting me know, I will see if I have more pictures to covered the sleeves more in detail.
Hi! Is there a video tutorial for this?
Hi Mayra, Just about to sew the facing but the V doesn’t seem deep enough for me doing the XL version. Help!
HI Rita, if this is the case for you, could be so many reasons but I would have to see a picture of the pattern. What you can do is to redraft your own facing. Here are the instructions. https://so-sew-easy.com/draft-facings/
P.S. Thanks for letting me know.
Hello! I’m going to make this nice top in silk but I’m a bit confused. It says: “The seam allowance is included; it’s 1/2″ on the sides and armbands, and 1/4″ on the neckline.
NOTE: I want to say thank you to Carie who kindly pointed out that I have forgotten to add the seam allowance to the pattern, please do so.”
I don’t understand; do I have to add seam allowance or not? Thanks!
Hi Mayra – Is the Linen V Top pattern still available?
Hi Mayra, thank you for this lovely pattern! The instructions mention that seam allowance is included, is this also the case for the facings? I didn’t add any seam allowance for these, and when sewing the facings to the neck I’m ending up with suspiciously little fabric.
What seam allowance did you use?
I sewed at 3/8”. This leaves about 5/8” of facing.
I sewed at 3/8”, which leaves about 5/8” of facing.
Indeed, you are right I did not add the seam allowance to the facing I will amend the instructions thanks to you. I would not have found out until I start editing the video, Thank you! Sadly, you could add a bigger facing if you have enough fabric but that would mean you will need to rip off the one you sewn or just serge the edge of the facing without cut off any fabric and stitching the facing down very closed to the edge.
Hi Mayra, I indeed ripped off the facing and started again with a bigger one (seam allowance included). I now notice it is very hard to get the facing to lay flat and look like a continuation of the shirt, even with clipping and understitching. Readjusting the seams between front and back facings helped a little but did not solve it fully. Do you perhaps have some tricks for this? And when sewing the facing down, is the facing folded over just 1/4” or all the way down to the seam with the understitching? The latter nicely hides all the facing backside also on the inside of the shirt, but it does not leave as much facing sticking out from the neck as on the picture.
Hi Carien, yes it is called under stitching, and this technique is precisely for this purpose to help facing lay flat. Dearest girl, Did you read all the instructions before starting the project? 😉
Yes, I read the instructions many times and understitched as described. I don’t fully understand how to sew the facing down, and the facing still doesn’t lay flat, so I’ll finish the neckline with bias binding instead. That is less nice than your design for sure, but after several times trying I don’t have a better plan. Thanks for your help so far
Without a picture it is hard for me to see what went wrong except that I can bet it has to do with the grain of the fabric. I will take this comment into consideration and add it to my video. Thank you!
This is going to be my next project! With wovens, I usually need a forward shoulder adjustment. Can you tell me if there is any forward shoulder slope built into the pattern originally? Thank you for this pattern
Jeanne, I don’t think you will require a forward shoulder adjustment here since the pattern has no sleeves and the front is longer than the back, just as long as you use loose woven linen I think it will drape well on you, however, I do not know where there the v neck will gape on you since I do not know how forward you shoulders are. This is an excellent question, will you please let me know what you ended doing with the pattern and the final result? Looking forward…
The front is longer than the BACK? How odd! I’ll assume that’s a mis-type? Surely the back is longer than the front. Did you fix the PDF to include the seam allowance? Or do we still have to add it?
Thank you,
Hi, I’m new to the site and wanted to try the linen top. Problem is I have a 50” bust and wondered if I can enlarge this pattern or not. Thank you for help!
Cathy I would totally take a shirt that fits you ( in a similar material non stretch) and use as a guide for your bust measurement. Use that as the guide for your width on this pattern.