


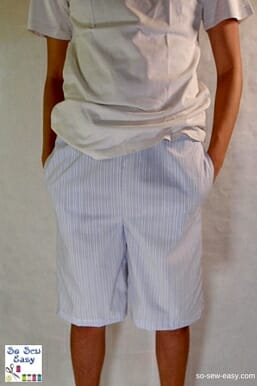
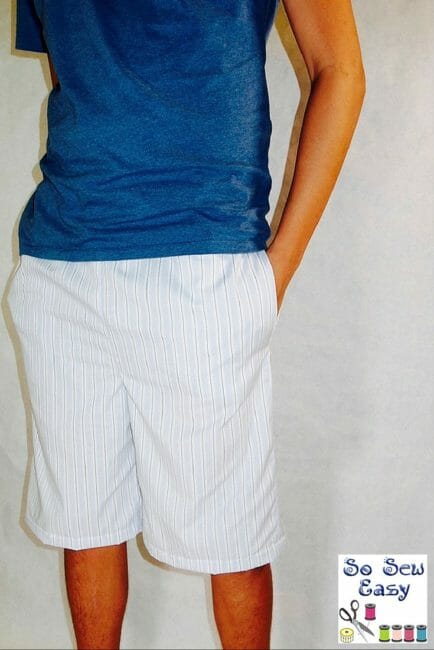
For most men I know, nothing beats a sunny warm morning, a cup of coffee, and some good reading material by the porch, balcony, or in the back yard –but hanging out there cool enough without scaring the neighbors sometimes can be a little challenging. I've got two men living in my house, and because it's quite warm here, they always seem to be walking around the house in their underwear, and as you can imagine, that causes problems from time to time.
I wanted to give the guys an alternative, but it's hard to find store-bought men's pajama shorts that are both comfortable and stylish enough, so I decided to come up with a design that would be both. Here are some men's pajama shorts that no one will know are pajamas and are good enough to go to the supermarket and grab a gallon of milk without having people stare.
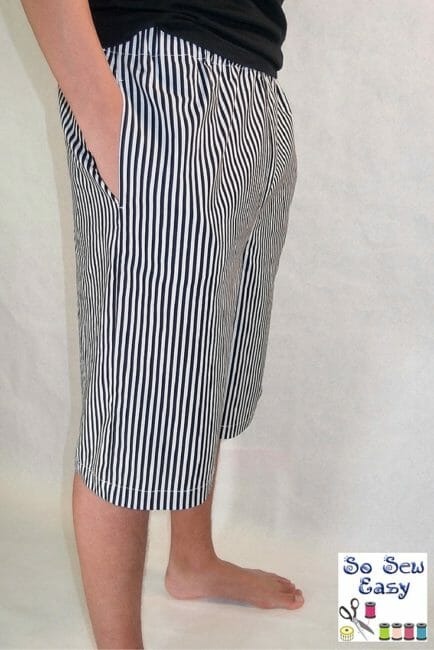
The design is loose-fitting and super comfortable. You should use a super soft 100% cotton which is the perfect fabric for this garment. Make sure you use natural fibers so the shorts remain casual and comfortable for the hot weather.
I think this would make the perfect gift for Father's Day, but the free sewing pattern accommodates waist sizes from 28″ to 44″ so you have a lot of flexibility for both boys and men.
The full video tutorial to guide you through this project is available on our YouTube channel at:
Subscribe to the YouTube channel:
Materials
- 1″ elastic depending on waist measurements (28″ to 42″)and 1″ more
- 1 1/2 to 1 3/4 yards of cotton or linen. Follow the links for some recommended fabrics.
- thread to match your fabric
- free pattern
You can download the pattern for these Mens Pajama Shorts from our account at Payhip.
For help downloading and printing PDF patterns, please CLICK HERE.
Sewing Skills: Intermediate
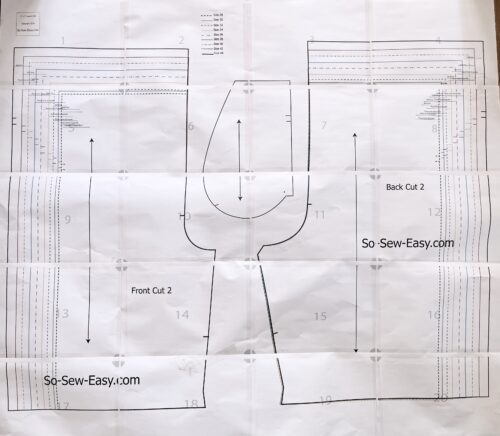
How To Download, Print, And Assemble Your Men's Pajama Shorts
Please use Adobe Reader a (free program), Landscape mode, do not scale. Tape the pattern horizontally from 1-3,4-6, 7-9, Then tape 1-3 on top of 4-6, etc. The small greyed squares are 1″, and the distance between the thin lines is also 1″.
We will continue using the new Payhip web store to distribute our patterns.
Our patterns are still free, but now you can make a small contribution if you like our work! We'd appreciate it, and will help us keep going with new and fun designs like this. Even a dollar or two goes a long way.
Thanks so much in advance for helping us out. You can use any credit card, and you don't need a Paypal account, although you can use one if you have one.
Pattern Layout
It is not the best picture, but I hope it helps.
Tape by rows, 1-4, 5-8, 9-12, 13-16, 17-20. Then stack the rows one on each other, keeping the size of the grey circle at 1″.
Sewing Instructions for your Men's Pajama Shorts
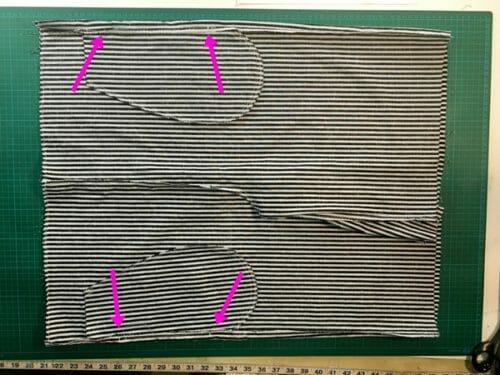
Step One: Cutting the shorts pattern
- Front two pieces
- Back two pieces
- Pockets four pieces
Download the free pattern and print using the latest version of Adobe Reader. Mark all the notches in the pattern, paying particular attention to the notches for the placement of the pockets.
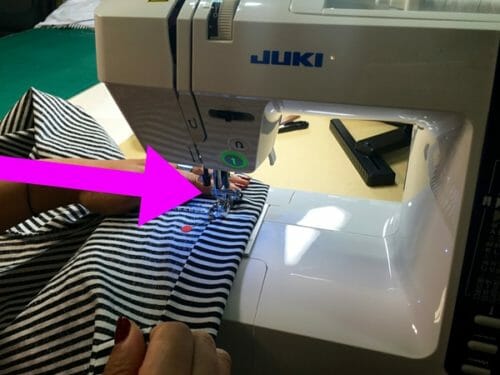
Step Two: Sewing the inner side
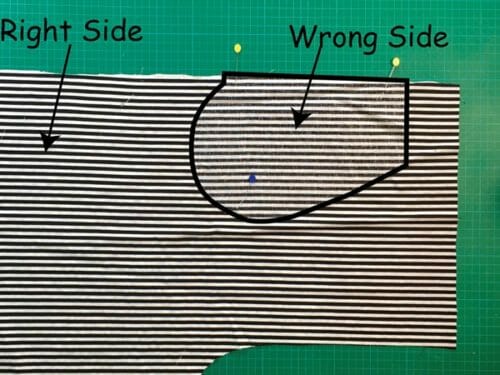
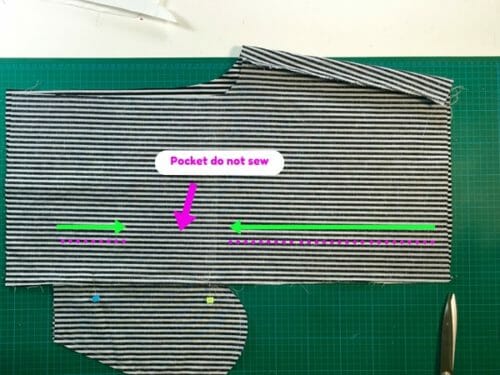
Place the right side or the pockets on the right side of the short pattern pieces. Right sides together. To make sure you are doing it right, please follow the photo.
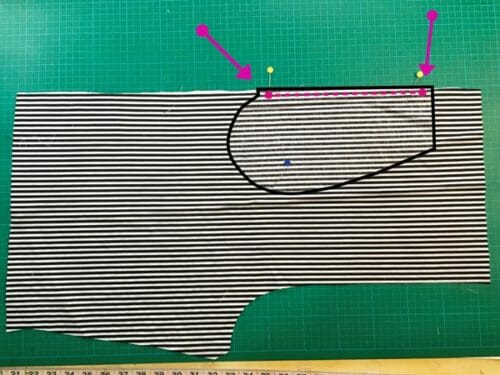
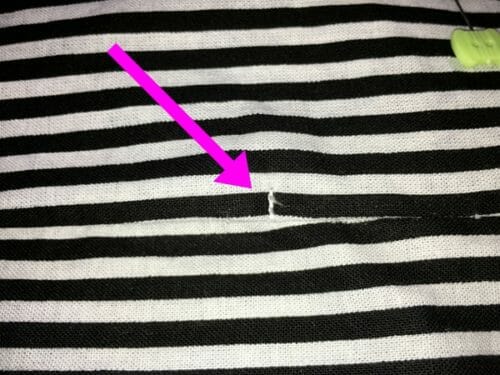
Stay stitch to 1/4″ from the edge. Stop at the point indicated by the pattern. You can notice the pocket pieces do not go all the way to the top of the pants. This is so the waistband does not become thick in that area. It will become clearer as we sew along.
Step Three: Attaching front to back
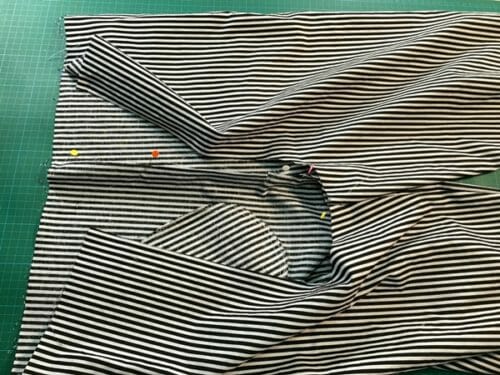
Place front and back right sides facing each other.
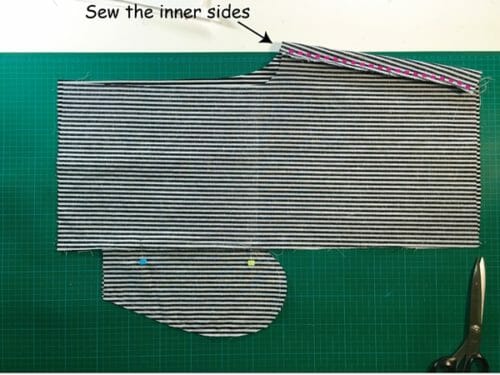
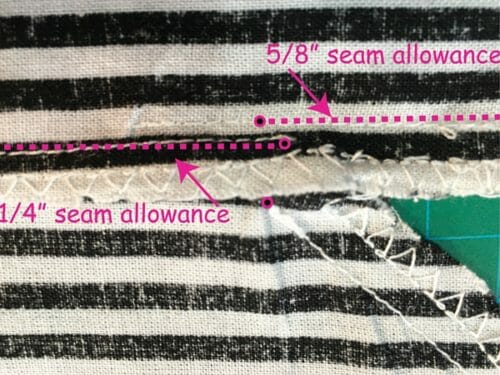
Sew the inside seam at 5/8″
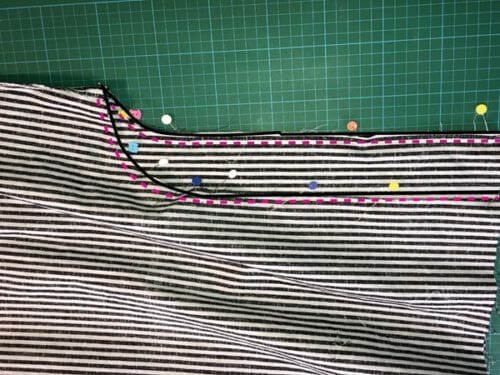
Before we can continue to sew the outer side of the pants, we have to go back to the pockets.
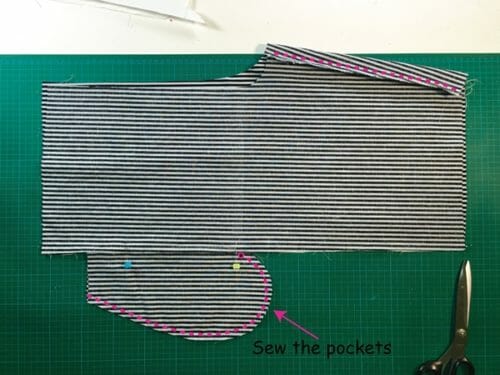
Sew all around the pocket stopping at the mark we have made previously, follow the pattern.
Clean your seam by using zigzag or using our serger.

Now we can continue putting the pants together by sewing from the top to the pocket stop at the notches.
Now sew front the bottom of the pocket to the hem. Do not sew the pocket opening.
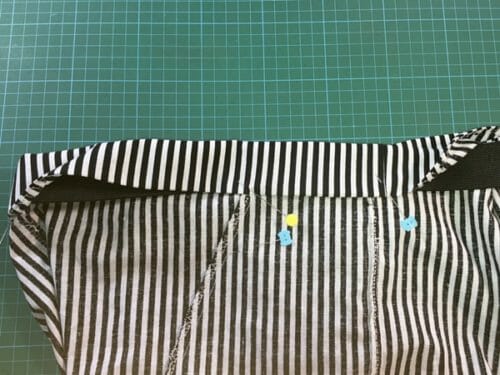
Step Four: Sewing the crotch
Sew the crotch at 5/8″ and clean the seam allowance with your serger or zigzag.
Step Five: Tacking the pockets
Tack the bottom and top of the pockets to make them strong. Make sure the pockets are facing to the front of the pants. Tacking means going back and forth with your sewing machine in the same place. This step is necessary to reenforce the pockets and to make sure the pockets will face forward. With tacking, the opening of the pockets will not break or tear with use.
Step Six: Making the waistband
Fold the waist edge 1/4″ down and iron. I have used zigzag to make it easier for me to fold it.
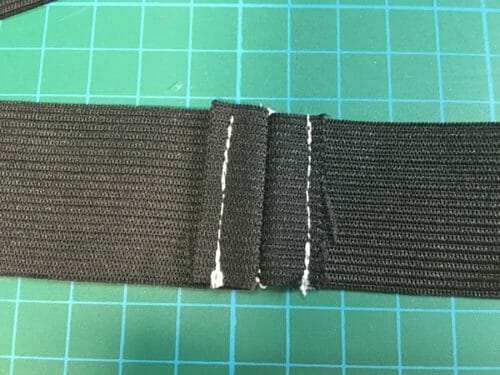
Cut the elastic to the size you need, measuring the waist of the person who is going to wear the short pajama pants, plus one inch. Sew the elastic to 1/2″ seam allowance.
Sew the edges down as shown in the picture so the elastic remains as flat as possible.
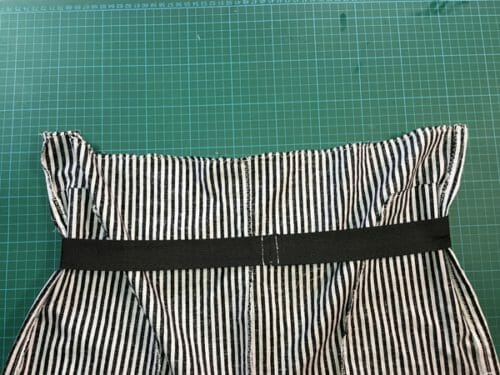
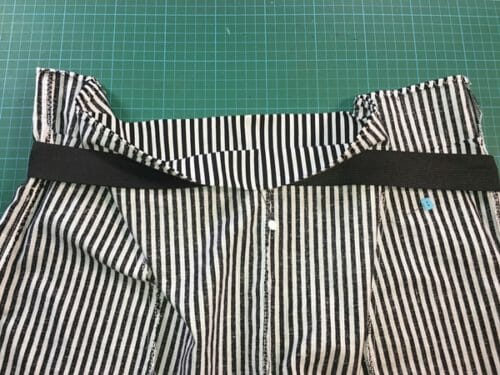
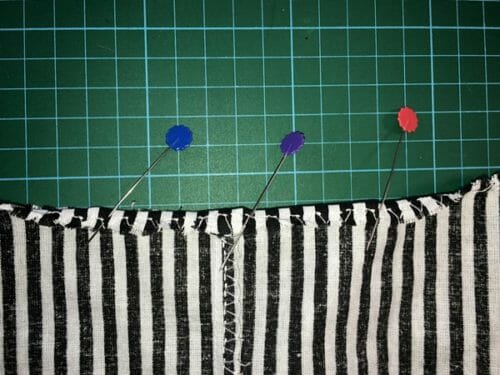
Put the elastic band on the shorts as shown in the picture. Fold and pin down just enough to cover the elastic plus 1/8″ for the seam. Make sure you cover the top of the pockets. Pin the waist in at least four places and sew at 1/8″. Do not catch the elastic inside while sewing. This is so that the elastic can move and provide the elasticity it is supposed to.
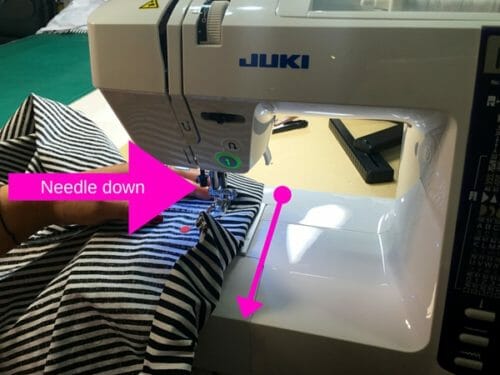
Start by placing your needle down at the back. Tack a couple of times and then sew while pulling and placing the elastic as needed. Before you know it, you have gone around the whole waist. This is the easiest way to attach elastic to a waist.
Step Seven: Making the hem of your short pajama pants
Fold the hem 1/4″ and iron. Just like we did in step six.

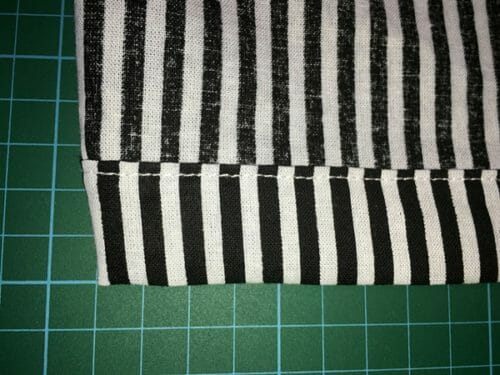
Then fold again 1″ and pin all around the hem. Sew the hem at 1/8″ inside view.
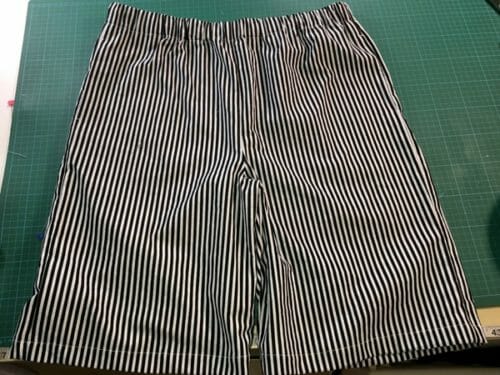
Outside view.Iron and pack your short pajama pants in a pretty box. These are undoubtedly the most straightforward shorts you will make for your man. They are perfect for a lazy Sunday or after-work relaxing time, but good enough to receive your friends for a barbecue.
We are breaking new ground here at So Sew Easy with our first male garment pattern. Well, sort of the truth is that anyone can wear these shorts. Please stay tuned to our YouTube channel, where I will be showing you how to make these shorts, plus how to shorten/lengthen or adjust them to make them larger.
Please check our Star Wars apron article as another idea for a Father's Day present. Until next time! Happy sewing!
If You'd Like To Support Our Site
If you want to help us continue to bring you a wide selection of free sewing patterns and projects, please consider buying us a coffee. We'd really, really appreciate it.


I made this pattern yesterday for my husband and was really confused by the instructions (and the photos since the fabric doesn’t show an obvious right/wrong side), but once I found the link to the video it made a world of a difference! They turned out quite nice, thank you for the pattern! (I did shorten them quite a bit, maybe 4″ or so for my husband who is 6′ tall).
I apologize for being a naysayer, but those are not shorts. Shorts do NOT go halfway down your calves. The ones in the second picture look like they are only about 6 inches from the ankles. Those are closer to long pants than to shorts. (I guess you could call them “knickers” to use an old fashioned term but definitely not shorts!) I don’t know why it has become so hard to find actual short pants. I don’t mean tiny little gym short or anything like that but actual shorts that are 3-4 inches ABOVE the knee so that they don’t look ridiculous. As a suggestion it would be great if you offered patterns for shorts that are actually shorts. There are a lot of men who would appreciate it!
HI TED; Indeed they are long, It will take you five minutes to shorten them before cutting the fabric, but I realize I do not have a tutorial for it. Thank you for the suggestion, I will write it out and share stay tuned.
Need help to assemble the pj pattern. Please help
I need help to assemble the pj shorts pattern.
Im difficulty putting the pattern together, is there a preprint of the pattern showing the numbers. I have been out of the loop of sewing I didnt know about the PDF patterns.
How do I know which size to use? Does it go by waist size? My husband has a big belly so he likes to wear his pants low. I printed out the largest size, but it looks Way too big. I guess I should start by measuring him and comparing the pattern to him.
I appreciate the free pattern and directions, but I can’t for the life of me figure out how to assemble the pattern! I’m experienced with PDF patterns through Ellie and Mac, but this one has me tearing my hair out because there isn’t a pattern assembly diagram. Please, please, provide one!! This should’ve been easy, but I can’t get it assembled in order to make the great looking shorts, and I really want to make them.
Back to trying to figure out how to put this pattern together…
I had a lot of difficulty with adding the pockets. I felt like there weren’t enough details or photos in the instructions.
videohttps://www.youtube.com/watch?v=2P_idySKaiY
When I try to print pattern actual size, it gets all messed up. What should my printer setting be for adobe?
Actual Size and Landscape. No scaling at all.
Thank you for this. Just what I need!
What are the measurement for the men’s shorts? Can this pattern be used for plus-sized women?
I’d start with your measurements and compare them to the pattern to find the size that fits you. Make a muslin first to check the fit. I hope this helps.
Hi Mayra,
I have tried a few times to download the pattern, but, some whatever reason, it comes up a blank page. I do have the latest Adobe Reader, but, still, a blank page. Can you assist with this? Thanks.
Hi Brenda, I can tell you the link is working, you may have a window blocker or you could try to change browsers.
hi Helen i am a long time sewist and have a hard time piecing the pattern together. Wish so much you would have had a pattern layout. I love the pattern for the pant, thought i could begin and finish for fathers day. i there a way you have a layout pic.
Thank you so much for sharing your pattern. Hope i can figure it out somehow.
Regards, Rena
I think this pattern is really hard to use and not user friendly, the pattern is extremely hard to put together for a beginner and the YouTube video doesn’t say anything about how to put it together
HI Jacob, thanks for your feedback I will add a picture of how to put the pattern together, you are right I did forget to add that. Kind Regards,
Where can we find the picture of how to assemble the pattern? I am struggling with putting it together. Any feedback or help would be greatly appreciated. I did watch the youtube video but it does not show how to assemble the pattern.
Thank you
Hi Mayra, is it possible to extend the legs on this and make full length pyjama bottoms? I’ve cut out the fabric using your unisex pyjama pattern but they seem huge, I wonder if this would be a better pattern? My husband has a 32″ waist so the unisex ones seemed way too big. Do you have any advice please?
Please note I have not checked out this pattern but I have the pajamas bottom pattern and I think you have labeled the pants pieces incorrectly. The one labeled as the front… is very clearly the back piece as I’m an experience sewist. I have never seen a front pants piece with that great a curve – although I’m sure a man would be rather … pleased. As I was telling my 4-Hers during the last pj pants project, everyone’s back part is bigger than their front part.
I would have commented on the post for the pj pants if I could have found it….
Hi Linda, thanks there is a note on the post about this. I do make mistakes sometimes and rely on you the readers to set me straight so I appreciate your feedback. Cheers! Kind regards,
I love these shorts but the elastic is too loose. Should I stretch it before I cut it?
You should always fit the pattern to your body, do what you need to do to succeed in this project. So if the elastic is too loose use a smaller amount but make sure it stretches enough to pass through the hips,
How do I get this pattern now craftsy abd blueprint are closed down?
Hi Mayra,
I was really excited to make these and bought fabric and everything. I went to download the pattern but it seems that bluprint shuttered yesterday and I am unable to download it. Will you be uploading your patterns elsewhere?
Thank you
Hi, Melissa please use the site directly, Bluprint no longer allows downloads.
I like the idea of these shorts. My man is 50+ so I will have to modify the pattern. :))
many I missed it but what are the finished sized I have a tween that a 31 inch waist and a 34 inch hip what size can I make for him
Any particular reason you did not include a fly front on the men’s pajamas?
Me too. I am looking for a good jammy pants/shorts pattern with the fly front for the hubcap. It’s even better if they have pockets, cuz pockets. 🙂
As a man, I can say I never use a fly front in casual wear.
I have the pattern printed but don’t know how to put it together. Is there a picture of the pattern put together?
Hi Mayra, quick question for you – The measurements for the waistband/elastic – are they for the hips or waist? I’m trying to figure out which size I should make for the hubs for his birthday (without him knowing which is a pain of course lol). His actual waist is 36″, and that’s the size pants he buys. But his hips, where he actually wears his pants/shorts at, are 39.5″. Could you help me out with this? I’m sure the answer is crazy easy but I’ve been thinking about it for too long and now I can’t see straight! :’D
Hi Shannon, sorry about the late replay. I don’t have the pattern with me, I am traveling visiting my mom in Panama. Choose the size he normally wears and measure the hips to make sure there is enough wearing ease, if there is not then choose a larger size.
In the video the top part of the side seam is sewn to the top of the pocket but in the directions it says to sew to the notches. Please clarify correct way. Thanks.
Hi Audrey, follow the video, thanks for your comment I will update the post.
Thanks for the pattern! I’m trying to make this, but I’m confused with the crotch area. How are the front and back pieces pinned together there before sewing?? I’m a newbie.
Also, would it help if I serge the edges of all pieces before sewing them together?
Thanks!
HI Gina there is a video tutorial please follow it. https://www.youtube.com/watch?v=2P_idySKaiY and no i would not serge everything first, it is not necessary and you might loose the marking you make on the fabrics such as darts and notches.
Dear Mayra,
thank you for this free pattern. I love it, but I don’t find if the seams allowances are included in the pattern. Can you please help me?
Thank you!
Ana
My pleasure and yes of course Ana the seam allowance is 5/8″.
Do we cut mirror image of each pattern piece? Where it says cut 2 of front and back the second is mirror image including pockets?
Hi Helen fold the fabric in half that way you will have two of each.
Thanks! Miirror image it is.
I’m still at the beginner stage where I like it all to be spelled out :). I’ve made pants with other patterns that weren’t cut in half because of the pockets.
HI, Helen, you might want to read this article and all the comments they are really helpful tips for beginners.
Hi, I was wondering if you have a picture of all the pattern pieces put together. I may have missed it somewhere. This newbie is having a hard time solving this puzzle and trying to figure out where to cut.
Can you put up a picture of pattern pieces put together for men’s pajama shorts
I agree! I have put many downloaded, print at home patterns before, and I understand the general layout of this one, but it seems like things do not line up with this one.
When I match up the cut lines for each pattern piece the circles provided at each corner do not line up, if I line up the circles the pattern outlines seem to be slightly “off”. And if I line up so the words/labels/watermarks make the most sense there are gaps in the pattern piece outlines and circles.
Which parts should line up to be correct? (And yes, my test square is perfectly sized).
Thanks!
I would be interested in learning pattern making for girls who are betweeners. Some issues I’ve come across in girl shorts are waists that sit to low (below waist) and short inseams as well. Also, not enough hip and buttocks room. Some girls despite their young age are in their second or third stage of puberty thus beginning to develop an hourglass body shape. I’d like to learn to adjust patterns to accommodate those issues. You’re a wonderful teacher and I appreciate your skills very much. Thank you for sharing them.
hi there
love the pattern of the men shorts, but am finding it a little challenging sticky taping it all together . if there is a picture of pattern all stuck together than it will be much easier. sorry am only a beginner. have completed other patterns without any problems but they did have a picture of completed pattern to view, eg page numbers in correct order etc
thanks in advance
HI Nicole, you need to tape, First Row 1 to 4, Second Row 5-8, Third Row 9-12, Fourth Row 13-16, Fifth Row 17-20. As soon as I can I will load a picture. Kind Regards,
Hi, Mayra,
I’ve been following you for some time, and downloading patterns that catch my eye. THIS pattern looks like it would be a good one for teaching sewing to my granddaughters, with simple techniques and guaranteed success (and WITH POCKETS!!!)…. have you any suggestions for sizing this down to fit slender little girls (sizes 8-10) AND for curvy women of considerably more substantial proportions (16-18W)?? Thank you.
HI, Julie, the grading would be substantial but not impossible. I will have to make a whole new pattern because this one is quite big for a little girl. As for the shorts for a lady, have you seen the walking short series? I made a sew along with all the alterations and the pair of short have a lot of room on the hips. Still, I have not made the videos for that series, the shorts do have pockets. Do send me a reminder on the short for little girls. I have been thinking f making a course on pattern making for children clothing, but not sure on how much interest is there.
Hi! O love this design and have my mats ready but I too am having trouble putting the pieces together. It’s driving me nuts! The video does not show the pattern pieces we print out or any hint how they are suppose to be put together neither do the instruction we print out or the website. Please give me hint. Thank you
There is a step by step instructions with photos above, I am not sure what steps you are not finding here to be able to make the shorts. Do you mean the how to put the pattern together?
This pattern is no longer available, please help! I WANT it!!!! Thank You!
Hi
I can’t seem to download the pattern. Please help! I just get a blank page.
Hi JP, I have tested the pattern link and it works well. Are you using Adobe Reader?
I’ve tried different browsers, still no luck… can you maybe email this to me? Pretty Please? With a cherry on top?
Hi JP, you need to open an account with Craftsy first. Then use Adobe Reader to open and print the pattern. If you are still having trouble please send me an email mayra@so-sew-easy.com
Hi Mayra, thank you so much for the pattern and detailed tutorial. But unfortunately a newbie like me is having difficulty in putting up the pattern pieces together. Could you please add a photo or two on how to put the pattern together.
Hi, I think if you watch the You tube video you will be able to make the project. Let me know if after watching it you still have questions. Kind Regards, Mayra
Can we have more men’s patterns please? Maybe cargo type shorts with a waistband, fly zipper and pleated pockets? Or a shirt? Love the patterns and tutorials. Thank you so much to take the time to bring these to us all for free. You are both so very kind.
Thank You Beverley Tooth, I will sit down and see what I can come up with!
I love this! Your video as well as your photos are so clear and easy to follow! I have never sewn anything for my hubby (poor guy) and I think this is going to be my first project for him!
OMG did you guys overhear the conversation I had with my husband last week? How timely is this post! Huzzy was finally acknowledging that he had officially killed his set and was more than overdue for new ones. Definitely want to try this out.
I have a question about how you install the elastic waist. Is there a reason you are not sewing the casing first and then threading the elastic through the casing? Thank You.
Hi Kathleen, thanks so much for your question. You can actually do it either way. Personally, I think the method in the tutorial is a bit faster and it is the way they would do it in a factory. I also thought many of our readers may not have seen this technique before, so would be good to demonstrate it. But by all means, please use the method you feel most comfortable with. Happy sewing and regards.