


Software for creating sewing patterns is improving all the time. As I invest in some of the new and rather pricey software and the training that goes with it, I'm hoping to create better patterns for you.
One of the improvements you'll see coming up is what's known as a ‘layered PDF file'. In easy terms, this simply means that the different sizes are all within the same file but at the same time, they are separated onto different layers so you can choose to turn them on and off.
I have a new pattern coming out for you tomorrow and this will be the first with the new layered PDF design so it's going to be helpful for me to show you how that works, as you might not have seen one before – and it's cool!
How to print a layered PDF file
Firstly, make sure you are using the latest version of Adobe Reader so you can take advantage of all the super-cool tools. If you need to upgrade, you can do so here.
Then open your PDF file in Adobe Reader. Sometimes you can open a PDF file in your internet browser, but that might look ok on the screen, but usually, you'll end up with some problems when you print – so stick to opening the PDF with Adobe Reader for best results.
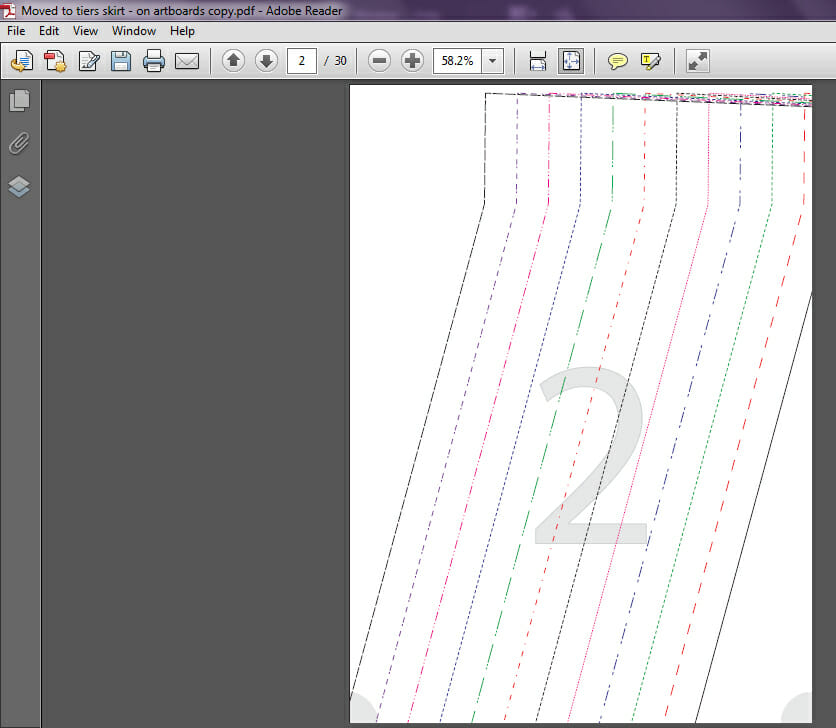
This is what the file looks like. We are looking at page 2 here so you can see all of the pattern lines for the different sizes. Now this pattern has a lot of sizes and where they overlap it can be pretty crazy and hard to follow your right size.
The good news is that with this new improvement you can turn off the sizes you don't need to print and just see the size you need. This saves you eye strain and printer ink and just makes the whole thing a lot easier to see.
To select the layers you want to see and print, go over to the menu with little icons on the left-hand side here.
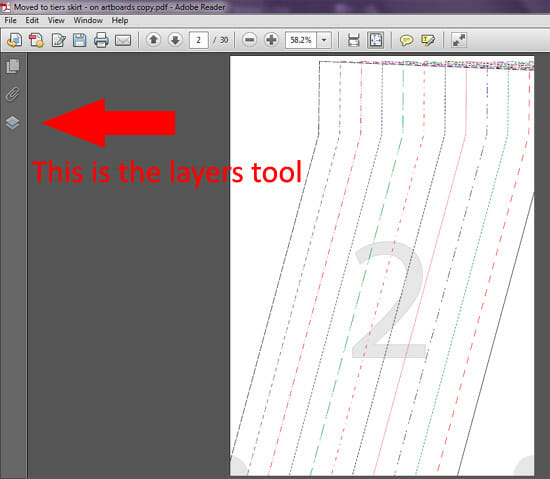
Pick the icon that looks like one sheet of paper on top of the other – that is the layers tool. Now you can see all of the separate layers in your pattern. These will usually correspond to your sizes.
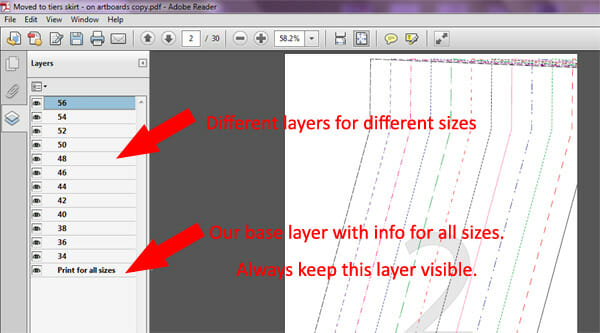
There will usually be one layer that has all of the ‘fixed' information on it, such as the test square, size chart, pattern piece names, descriptions, and so on. In our example, this is called ‘Print for all sizes‘. Then there are the size layers, one layer for each size from 34-56 inches. Next to the layers is a little icon that looks like an eye. You can click here to turn each layer on and off, so you can see it, or not see it.
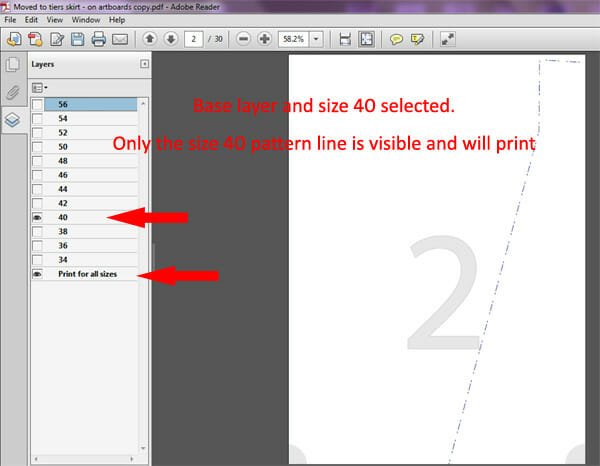
Here is the same page 2. I've kept on the standard layer and also the layer for size 40-inch hips and turned off all the other layers. Look how much easier and cleaner that is!
It really comes into its own when you have lots of pattern grading lines close to each other. This is page 9 before and after. It would be difficult to follow all those close lines to find your correct size on the before, but it's a breeze when you turn off the layers you don't need. A breath of fresh air.

Now you don't have to turn layers on and off, you can of course just print it as standard with all the layers if you want to. But why waste ink and print out that maze of lines if you don't need to!
How to print the layered pattern – only the layers you want
Once you have your layers selected and displayed or not displayed, it's time to print. Up at the top menu, select File, then Print, and up comes the print preview box. Let's scroll through to that page 9 again and check what layers we can see. Perfect, just the size we want and the standard layer with our test square, etc.
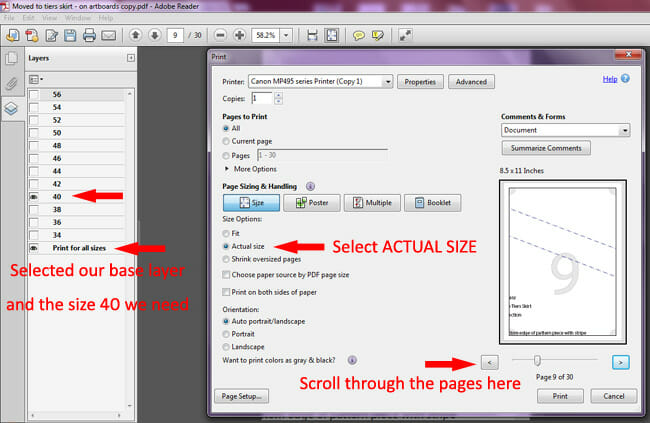
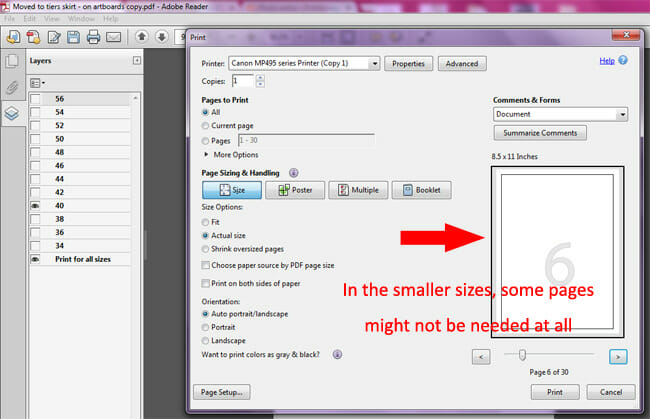
Make sure you have selected Actual Size as the print option so that there isn't any scaling of the pattern. Don't select Fit to page or Shrink Oversized Pages. You can use the arrows under the preview on the right to see all of the pages. If you are printing a smaller size, you might scroll through and find that you don't even need to print all of the pages. See here that the size 40 doesn't have any lines on page 6, although the larger sizes do. So you can choose not to print any pages you don't need, therefore saving you paper and ink.
Hit print, check out the picture of what the assembled pattern should look like, and then trim or fold your edges so the pieces match up. This pattern has circles in the corners. Four pieces of pie make a circle.

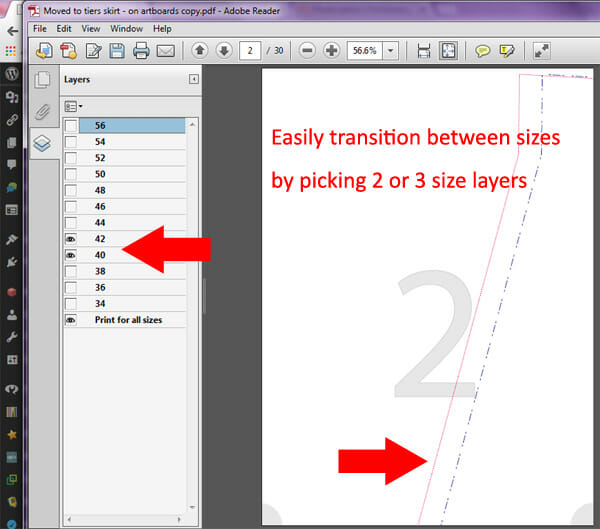
How to grade between sizes
What if you are printing a dress pattern and need to grade between sizes, maybe size C at the bust and size D at the hip. Well, that's easy too. When you select the layers, select the two sizes you need and only those will print off, allowing you to easily see where you need to transition between the sizes.
And that's it. You can now print out the pattern just in the size you need. Earlier patterns don't have this feature, but the future ones should. Every little bit helps.


Can’t thank you enough! Such useful information! Thank you!
Merci, je ne connaissais pas cette fonction, c’est génial.
Wow! Thx a million! After a day of Google searches I finally asked the right question about printing layers and found YOU! Good thing, I was running out of hair to pull out ????.
LOL! Adobe Reader is the key a free software BTW!
thank you for this tutorial, i was googling how to print layers inadobe and this came up. thank-you
So happy you found it useful!
I am using a Mac computer and cannot access layers in Preview. I have searched the internet and haven’t found an answer. If you find out how to show “Layers” in the Preview program for Mac, please email me. Thank you.
Carol, You likely have to download the Adobe Reader for Mac. Many of the features that Adobe offers are exclusive and won’t work in Preview.
Thank you so much for the instructions. I love your patterns because they are more detailed than most free ones. I also like your style. Keep up the good work!
Those layers did not come up for me either! I’m using iPad 5th generation, but the latest Adobe doesn’t show the same menu bar that you have there… Are you using a desktop version?
Also, when I print from Adobe, doesn’t seem to matter which printer choose, but I always end up with about a 1” border around the page, doesn’t seem right…. when I used my Mom’s measurements to the pattern.. it turned out too small for her, & very snug on me (I used size F for the top & D for the bottom, as Mom is rather busty)… we are both petite women… under 5’ & watch our weight as much as possible….. I would like to be able to adjust those borders out to about half inch or even a quarter inch… you don’t need that much space to glue/tape, do you?
I guess what I’d like to know is, how did you originally pattern this to print ? With those large 1” borders?
Yes, for PDF patterns it is better to use a desktop or a laptop. You can also save using a thumbdrive and take it to a print shop for them to print for you. Alternatively, some public libraries can print PDF files cheaply.
I’m not sure if this helps you or may help with questions geared towards the pdf printing from my iPad Pro, I find that when I open the files if I first click the top right to create pdf (yes seems redundant) but if I don’t do this I’m not able to hold the printing to the set specs in your & all others as well,, original pdf File. Because google & Apple get along SO WELL (that’s my attempt at funny) I can’t find a way yet to “print advanced settings/choose printing full scale” I did purchase the Adobe pdf paid app($24/year), in hopes it would help with these issues but for now it’s not alleviating painstaking print jobs for my new projects from So Sew Easy … honestly it’s worth an extra 10min to save the files, renaming and so forth, and then retrieving them from the Adobe cloud or drive to print. Also helpful is to open the file in the iPad Pro hit print, the two fingers swipe outwards with both like to zoom in with your fingers. This will then allow you alternate functions in the upper right “drop down” for saving it then printing and more, while holding the full scale of the .png images or pictures and more. Sorry for writing a book, hope I’m not just confusing pro users but worth trying with std iPads too.
Thank you Angela for writing a book, I will have to try this and share it in the blog because I am sure so many are hoping to be able to use their IPAD to do just what you have done here. After all, an IPAD PRO is more expensive than a MacBook Air.
I cannot thank you enough for this tutorial…..even down to suggesting downloading the most recent Adobe. It was clear and thorough and I was able to separate out my granddaughter’s size from a pattern that goes from size 2-10. I am 72 years old….and consider myself a techie type….but I was truly lost until I found your tutorial. Many Thanks.
I’m 75 years old and I figured out how to print one size instructions, thanks to your wonderful instructions. Thank you!
Wow, it is an honor to have you here!
When I go to the layers mode, I get letters rather than numbers (sizes). What do these correspond to?
Thanks!
A is for Size 2, B for size 4 and so on, please always look at the finished garment measurements, there you will find a more accurate guide for correct sizing. Cheers!
I just succeeded to print the skirt pattern, & eagerly look forward to sew it..thank you so much , for the sharing….
This is awesome, it makes life so much easier.
Thank you for the info on the pdf patterns, you guys are great.
Can I get the pattern in an A0 Format or actual format without being broken down into single pages? I don’t like the cutting and glueing.
Hi Regina, unfortunately that’s really the only way this sort of pattern comes. Most people don’t have large format printers that could print such a large width so the system is designed for home printers. Sorry about that. Just give it a try. It gets pretty easy after the first one.
Excellent tutorial – just one question – I don’t see the pdf layered icon on the left and I’ve updated adobe – any thoughts?
What file are you opening Gis? Not all PDF files have layers so the tool will only appear if the file itself has that option I think.
I am having the same problem and am using a Mac lap top.
This is a great tutorial – I just sent to Staples to have them print on a wide format printer and they could not save the layers to one size to send to the printer software. How do we get this working? I have sent many patterns to them to print but this is the first time for using the layers function, which is very nice.
That is such a great way to get around the multi size patterns. As ever, Debbie at the edge…. of technology… 🙂
Thank you!
This is great! Can’t wait for the first pattern.
Deby this is soooo clever, you are a genius tohave thought of it! Thank you. Hugs Rosemary
Thanks Rosemary, wasn’t me who came up with the idea, but I’m happy to adopt it.
I just love technology! Thank you for sharing this with me!
Love the feature Thank you for the write up Deby
Excellent tutorial. Thank you so much.
Amazing. Love technology and sewing. This can be really useful. Thank you. Ps. Just made a flouncy bouncy skirt this afternoon K xXx