


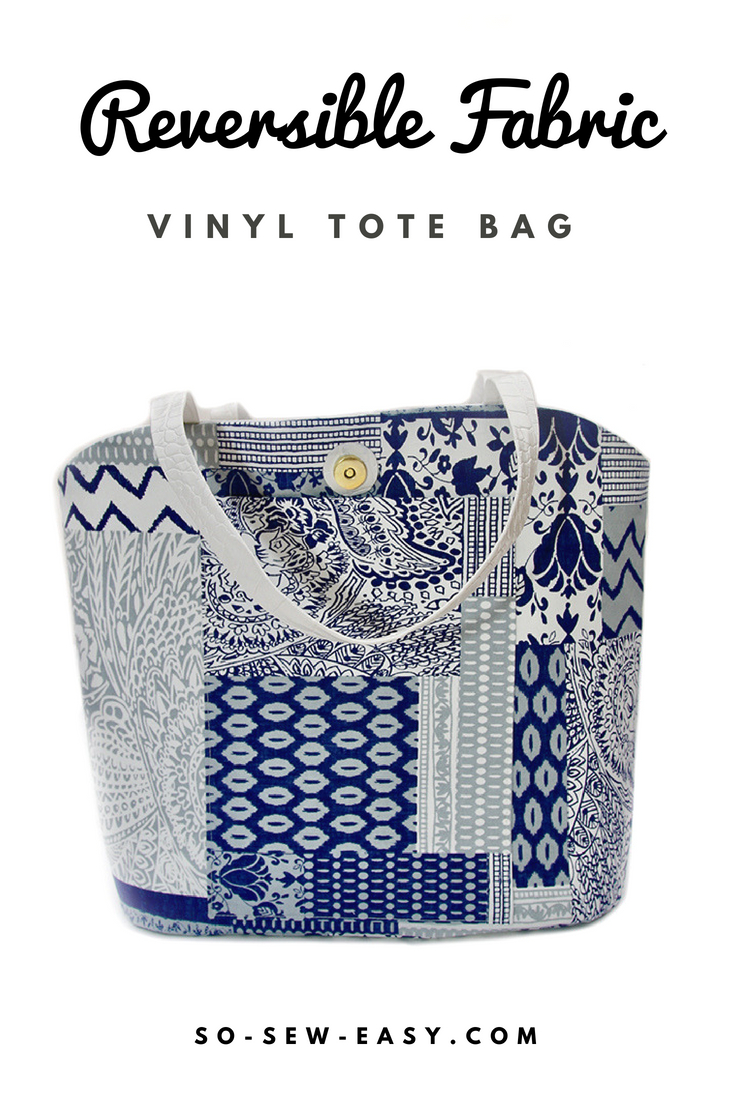
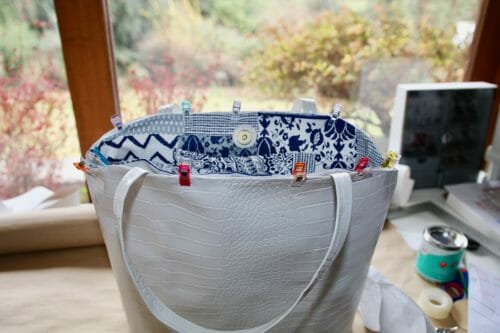
 This week we are going to make a reversible fabric vinyl tote bag from a new free pattern. I had planned to make a new skirt pattern but I just didn't have the right fabric. After our recent house move, this is the state of my sewing/art room at the moment…
 However, I was able to find some vinyl and a nice print fabric from the part of my stash I can locate. I will have to go with what I have on hand and force myself to stay put and not run to the fabric store, much, I'm sure, to the satisfaction of my husband.
So here we go. This project is for the temperamental person like me who gets bored with the same bag but is running out space in the closet so should not make another one.
Ideally, this project is for the confident beginner who has made other simple bags and it is looking to expand her technique. The ability to sew a straight stitch and cut fabric in a straight line is imperative since all the seams need to match.
Tote bags are super functional and there are a plethora of fashionable styles. I prefer the kind I can change according to my mood and outfit.
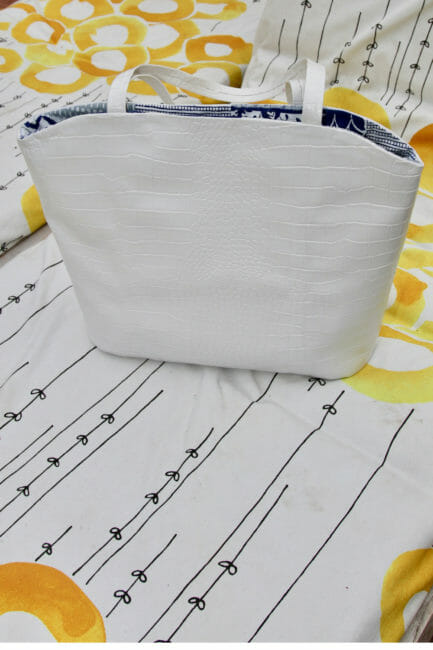
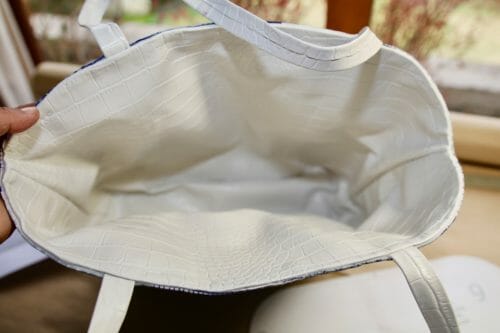
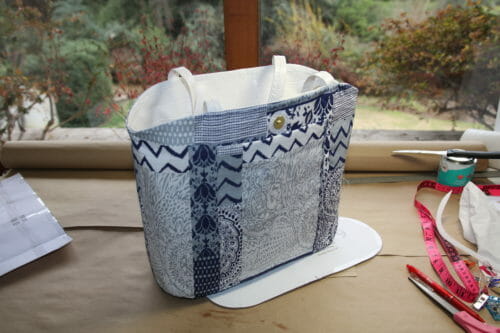
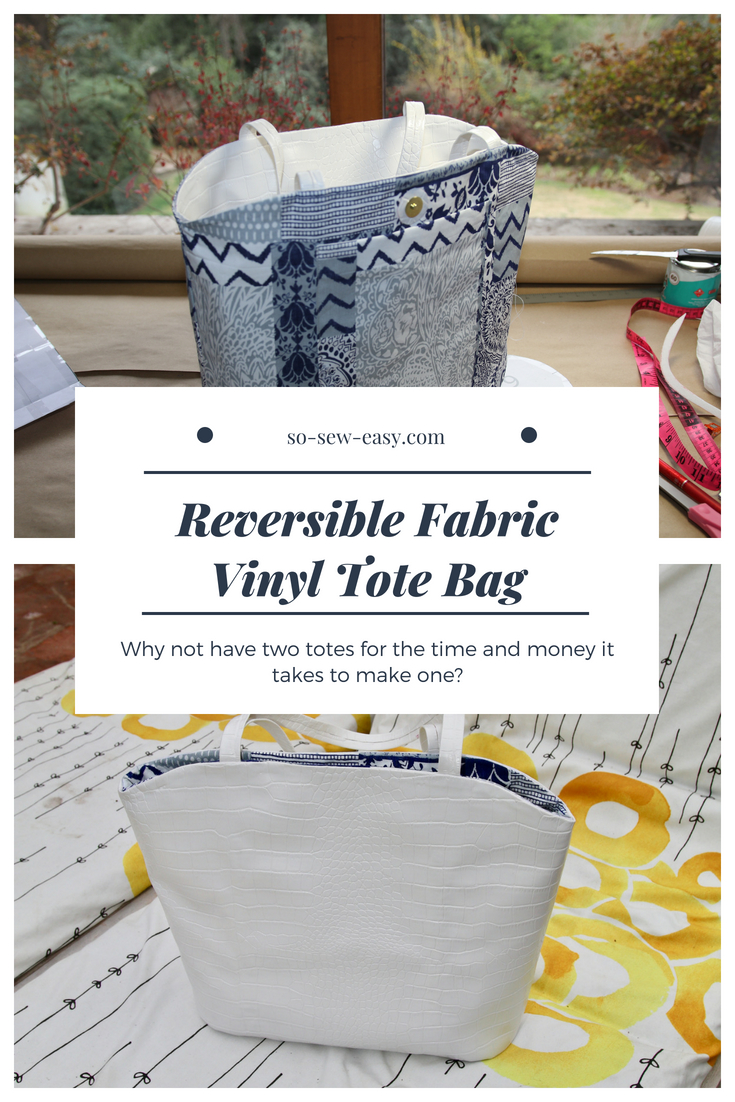
A reversible fabric vinyl tote bag is my way to go. The vinyl side for a more upscale look and the fabric side for a more relaxed outfit. On either side, there is a bag you can use with confidence and style.
Materials
- One yard of vinyl
- One yard of lining fabric
- One yard of sew-in interfacing
- Thread to match
- One metal snap fastener 12.5mm(1/2″)
- Glue for vinyl
- Quilting clips, wired clips or easel clips
Fabric Recommendations from Fabric.com
Pattern Download
You can download the pattern for this Reversible Fabric Vinyl Tote Bag Pattern from our account at Payhip.
For help downloading and printing PDF patterns, please CLICK HERE.
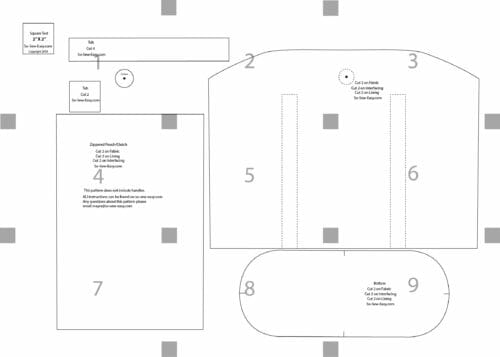
Pattern Layout Sewing Your Reversible Fabric Vinyl Tote Bag
 Sewing Your Reversible Fabric Vinyl Tote Bag
THIS IS THE FIRST PART OF THIS BAG there are another two tutorials coming soon.
We are going to start this fabric/vinyl tote bag by making the handles. See my self-critique on the handles at the end of this tutorial before you start. We will sew the bag in stages, first the fabric and interfacing, then the vinyl. Lastly, we will put it all together.
Sewing The Handles
Cut two strips of fabric that are 44″ (112cm) by 1 1/2″ (4cm) wide.
Make three lines 3/8″ apart, use the first and third ones as fold lines. Bring the edges of the handle to meet at the center by applying glue.
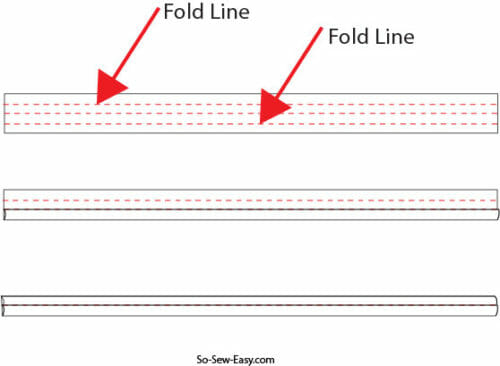
Put the handles aside. I have left them overnight to dry.
Attaching The Handles To The Vinyl
Mark the stitching/glue lines of the handles using your pattern. I have used an erasable pen. 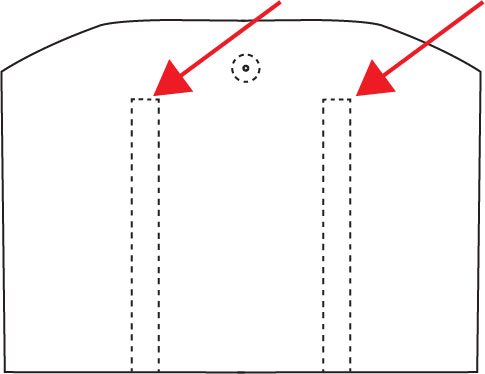
Sewing The Strap
Apply glue to the wrong side of the vinyl along the area that is shown as a stitching line on your pattern. Leave the glue dry for about 5 minutes.
Attach the strap to the glued area. 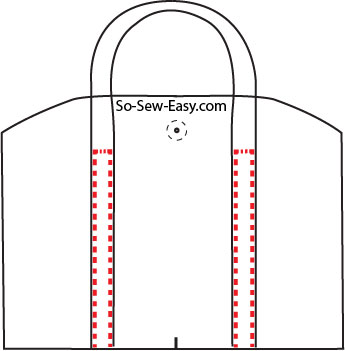
Sewing The Fabric
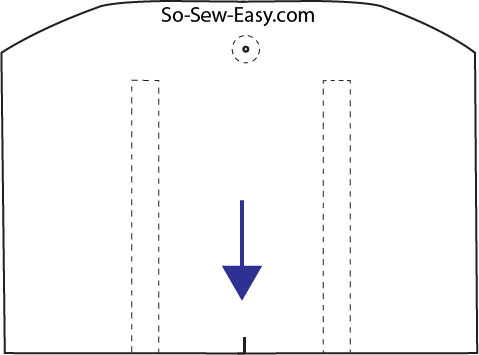
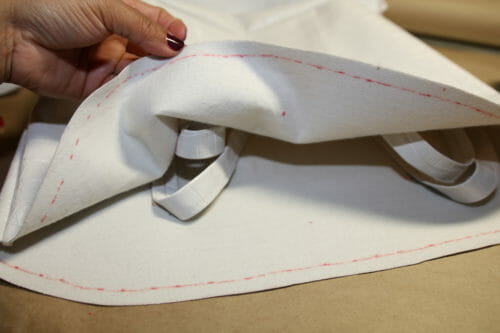
Mark the middle of the front and back of the bag as shown in the picture below marked by the blue arrow.
Place the right sides together and sew the sides at 3/8″ (1cm). Leaving a gap of 6″ (15cm) to be able to turn the fabric print side out.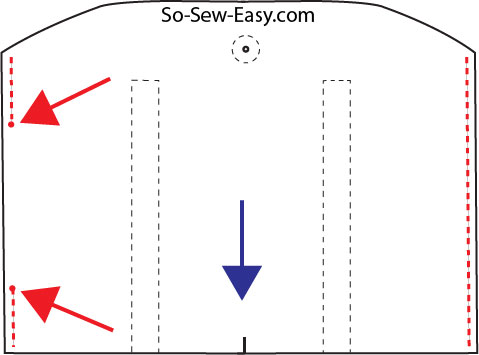
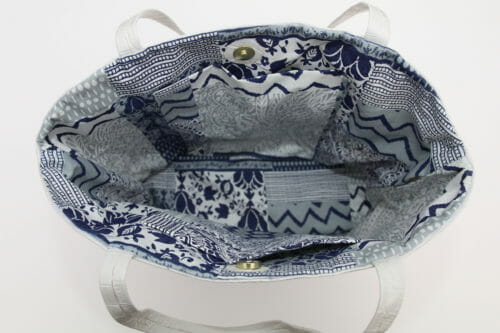
Attaching The Snaps
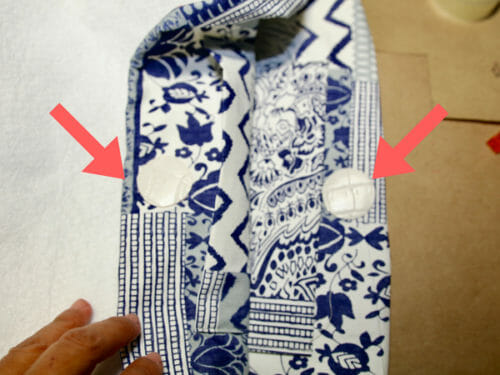
Glue the round vinyl pieces to the lining.
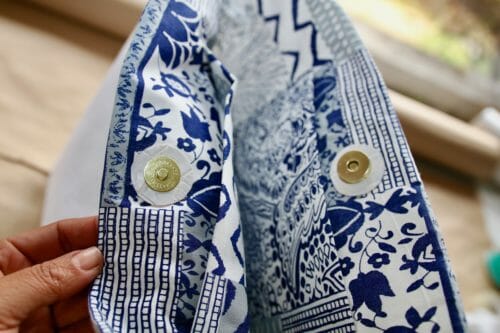
 Open a hole in the middle and attach the snap using a kam tool.
If you do not know how to do it, follow this tutorial on how to apply snap fasteners:
If you don't have a traditional snap fastener, you can also use a magnetic snap. Here's a tutorial for placing this type of closure:
If you are using a magnetic snap, wait until the lining and the interfacing is sewn together to apply it.
Sewing The Vinyl And Stabilizer
Mark the middle of the front and back piece as it was done in the lining. Shown below in the picture below with the blue arrow.
Sew the sides at 3/8″ (1cm).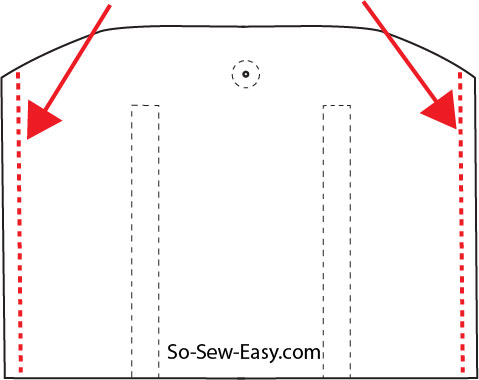
Sew the bottom at 3/8″ (1cm). This part is tricky for the beginner so I suggest you read through the tips I have given you on this post to successfully sew a curved piece.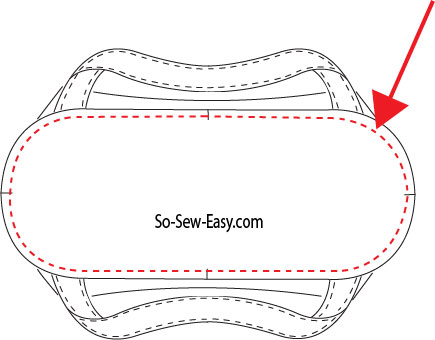
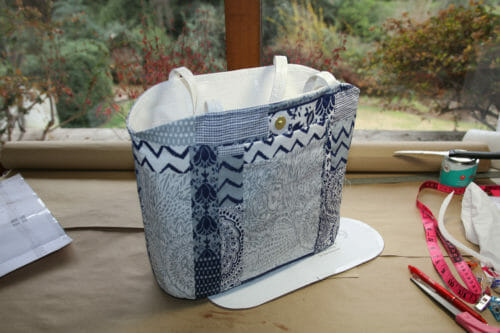
Cut another bottom piece but take away the seam allowance and glue it to the wrong side of the bottom of the vinyl part.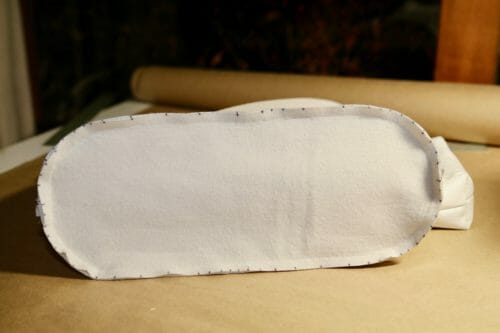 This step is so that the bag can stand on its own. It's optional but it will improve the look of your bag.
Repeat with the stabilizer. We will have three layers of material that we will put together in the next step in a slightly different way.
Assembling The Reversible Fabric Vinyl Tote Bag
Turn and glue the edge of the bag 3/8″ (1cm).
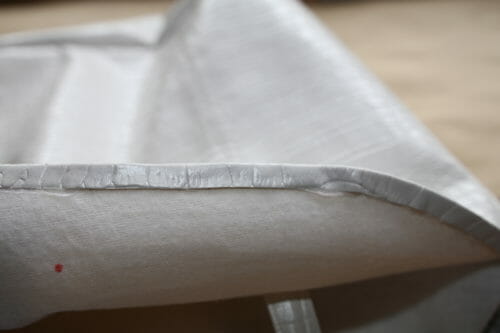 Finger press the edge to make sure the glue has taken both sides. Leave to dry for a few hours.
In the meantime, we can sew the interfacing and the fabric together.
Mark the placement of the magnetic snap over the small vinyl circle you have glued previously.
Place the right side of both fabric and interfacing together.
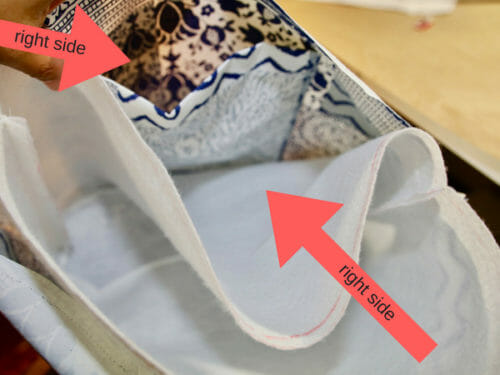
Sew the top edge will be sewn at 3/8″(1cm) making sure you will maintain strict seam allowance or the bag will not fit together. Reduce the seam allowance and turn the lining right side out through the gap you left on one of the sides.
Iron the fabric and interfacing together making sure you leave a crisp top edge.
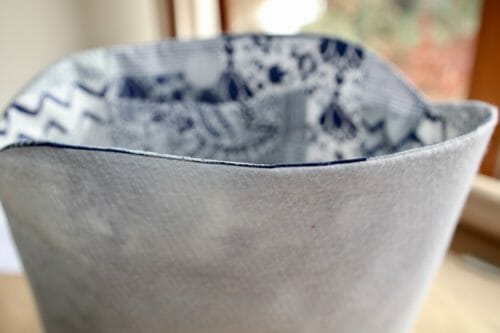
Insert the fabric and interfacing inside the vinyl part. Use quilting, wired or easel clips to hold the layers together.
Apply glue to the vinyl layer limiting the amount to 3/8″ (1cm) then press the fabric/interfacing on top. This part will go slowly but it will join both sides together.
Let the reversible fabric/vinyl tote bag dry for at least an hour before topstitching.
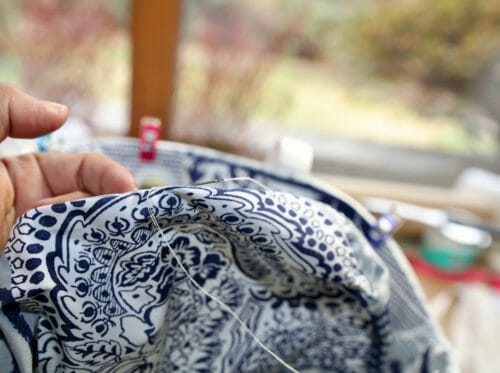
Finally, close the gap in the fabric by using a running stitch with a needle and thread.
Self Critique
 Self Critique
There are three things I would change to make the bag more interesting and better looking. Admittedly the weak spot in this bag are the handles. I would make the handles 3/8″ (1cm) wider and sew and glue a strip of the fabric on the side where the sides meet.
I would also like to explore the use of patchwork on the vinyl side to make it more attractive and tie in the lining with the vinyl. So I am giving myself a B- but since this is my sample I will go back to the working table and improve on my observations.
Do you agree with this critique?
Join me next week when I will be showing you.
- How to turn any bag into a crossbody bag.
- How to make an adjustable strap for any bag.
- How to make a reversible clutch.
- And I will be sharing my favorite blouse in the world (in the last decade)
I have to admit I am looking forward to your reversible fabric vinyl tote bag pictures on Instagram. I hope you take on the challenge and share your pictures with me using #soseweasyoffical, #soseweasypatterns #soseweasy. I'm very curious to see what interesting combinations everyone will come up with.
What other bag and combinations would you like to see? What would you add to the bag? Do let me know in the comments below. Happy Sewing!


I love this tote and I would like to make it. Reading through the construction I do have a few questions.
There is a pattern piece labeled “Zippered Pouch/Clutch” but there is nothing in the instructions about this. Where does it go, what is if for?
Right below the layout diagram it says “THIS IS THE FIRST PART OF THIS BAG there are another two tutorials coming soon.” I am unable the find the other two tutorials. Did they happen?
Thank you for all your wonderful patterns and instuctions!
Teresa
I love your Sunday emails. I look forward to them every week. I have learned so much from you over the years, and I am so grateful that you are willing to share your talent, knowledge and experiences. I tried sewing with vinyl once and it was a nightmare, so all my my bags are fabric. Do u have a post to direct us to with starter suggestions and guidance?
Hi Susan, thank you for looking forward to the Sunday email this makes me very happy indeed! the trick with vinyl is very simple use a needle for leather work, polyester thread intended for jeans or leather and perhaps the most important bit is the teflon foot. This is what I do and it never fails me. Yes we have an article that goes in a little further here is the link for you too read.https://so-sew-easy.com/tips-for-sewing-with-vinyl/ I will write an article on what to do if you mess up the stitch what to do if you need to recover a fail project, there are alternatives and all is not lost or at least not all of it. Happy sewing!
Definitely want to try this. I’m not sure what you mean about glue and sew strip on sides. I too just move and I’m suffering from box mislabeling by hubby and friends. Gotta take the good with the bad when someone helps you move…lol
Hi Terry, the strips are to fold in in order to do that you must glue the sides and fold towards the center, if you glue the whole strip you will have surplus glue and it will look messy. I have made this mistake it is very hard to rectify.
Thank you for your tutorials and patterns. I really don’t have any intention of making this tote, but this weekend, I was making a bag to hold a baby play mat gift I just finished. I had decided that since the quilt was scrap denim, I would use one of the jean “tops” to make the bag. The right size jeans were not long enough (I’d already chopped the legs off), so I used your bag bottom to make a bottom for my bag. Since your bag was 4″ narrower than my jeans and I wanted my bottom a bit deeper, I cut up your bottom piece adding 3″ in length and 1/2″ in width. I didn’t do all your careful measuring before sewing, I just pinned it closely; the denim was more forgiving (stretchy) than your vinyl. It worked perfectly!!! Seeing your pattern Sunday morning gave me the vision I needed to get my gift finished. Thanks again.
Hi Cathy, thank you for your comment. The intention of this blog is to inspire, mission accomplished! Would love to see your bag, do you have Instagram if you use #soseweasy #soseweasypatterns or #soseweasyoffcial I and everyone else who follows this # can see your bag. Kind Regards,
I added tags to my Instagram post. #canadiancathy
I agree.
Great tote Idea, I will be using the pattern when things settle down here.
I commiserate about the move!!
Impossible to find squat in one’s sewing room after a move…
I had the same experience not that many days ago.
Still have somewhere between 4 and 12 boxes to unpack and investigate!!
Don’t know about you, but when we moved, my sewing room shrank at least 2-3 feet in both width and length.
My old sewing room had one wall that was nothing but UV glass windows!!
The new sewing new room has horrible lighting…
I hate “daylight” lighting fixtures. It changes the color of everything, blacks look blue, reds look scarlet, white looks beige…
My new sewing room has a skylight, but I can’t use it as the glass in the skylight is NOT UV FILTERED.
Even my husband realizes that opening the skylight would damage somewhere around $5,000++ worth of fabric.
Much of which is re-replaceable.
I am currently sitting in my living room which has 4 clear sliding glass doors and looking at the “can lights” in the ceiling. NO WAY Is daylight lighting the same as real daylight!!
Unfortunately, my “new” sewing room has only “daylight” lighting, i.e. yellow, yellow, yellow…
My husband has promised to install bright white (but non-UV) lights to replace the “daylight” ones, but (of course) that was about 2 weeks ago…
Now I take my fabrics into the living room, the bathroom, or outside on the deck to actually see if the colors of these fabrics co-ordinate or clash!!
(The bathroom usually as it is closer to my sewing room and has a skylight!)
Much sympathy and wishes for good luck in the re-establishment of your new sewing room!!
And thanks for letting me rant about my similar situation!!!
All the best,
Marcia
I know your pain Marcia, not a rant when you have empathy all around, I do chase natural light all year around.
Thank you – brilliant idea
Just a few questions on the PDF pattern page:
1. It calls for these items, but their use isn’t mentioned in the instructions.
Two 1″ D rings
Two 1″ lobsters claws
One 1″ buckle
2. There are 2 Tab pieces spelled out, but also not mentioned in the instructions.
3. What are we to do with these items?
4. Lastly, in the pictures it looks like there’s a pocket on the lining piece. Does it have a pattern piece as well, or perhaps it’s an illusion with the patchwork lining fabric?
Many Thanks,
Cheryl W
HI Cheryl, thanks for the update, the file must have gotten messed up when transferring to the App, hopefully everyone will read your comment or arrived to the same conclusion.
What glue do you recommend?
I recommend E6000 it is very versatile and you can use it in many different materials.
As you said, the handles are the weakest part. What if you had handles that went under the bag as well? If you wanted to you could make the handles of material that matches the cloth side.
What a great idea!
Yes! Or possibly navy nylon webbing.
Enjoy your weekly e-mails. Just like letters from a friend. I want you to know that I have made several tees from your free pattern. The fit is perfect, even better that designs from the big 4! You are so generous with all the freebies and I do appreciate (Limited budget) but I am pleased that we can now slip you a $ or more for a pattern. Good luck and thanks.
PS the shorts from a couple weeks ago should come with a warning, make for girly figures-not womanly figures. Way to skinny in the fit. Okay though since I make a sample first so not a loss. will donate to clothe drive where they will be much loved.
I agree. I love your site, your emails and appreciate your generosity. I get your emails Sunday mornings and it’s such a nice way to start Sundays, which are busy for us.
Thank you for taking the time to share your talents. I sent an email asking a question about the free cowl neck top several weeks ago. When I didn’t receive an answer, I also asked the same question on that specific pattern page. I still have not received an answer. Is there another way I can receive an answer to my questions about a pattern?
I like the simplicity of this tote! I haven’t tried vinyl yet so this may be my first. Thank you for sharing your talent and time to put these things together for others.
I love this reversible tote. I think you are correct in your self-assessment of the strap width: a little wider would be better. Perhaps a strip of another fabric covering the side where both edges meet would enhance the look. A strip of grosgrain ribbon or a fancy ribbon would add a secret “wow” factor. I wonder if iron-on vinyl would work for one side? Also, do you think that a foam-type stabilizer would add anything to the structure? Thank you for all the creative ideas you give us!
I’ve made several of your patterns and they always come out great! However, I’ve never sewn vinyl, do you use a particular kind of needle and thread? What about stitch length? I imagine if the stitch length was too small it would tend to cut the vinyl as it ages.
Thank you for sharing the pattern, you are very talented!
Judi
I’m so happy I came across your page, you’re super talented . And the fact that you take the time to upload so many beautiful designs and basically give them away is just heart warming in a way. Not a lot of companies do this.
I also read some comments on here and I don’t think they understand they can take away from your designs whatever they want. They critique your work like they were forced to make their work by your design and your design only. It’s comical to me and I hope you don’t take the comments as harshly as they came across to me, but hey i’m also just new here.
Anyways, when I finally gather the material and time to learn how to sew I will DEFINITLEY be visiting your page.
Best,
Xitlaly Martinez
Thank you for taking the time to express your gratitude, It makes me happy this page makes you happy. Would it surprise you that there are far more grateful joyous woman like you than there are mean ones? This is what keeps me going. So yes thank you for stopping by and hope to see you around here, kind Regards, MC
????(thumbs up)
Trying to find the next part of this tutorial and have had no luck! Is there a link please?
hello, can you tell me what is the room 1 (tab) and the square below drawn on the pattern. Is the interface composed of a simple cotton voile?. Thank you in advance for your response and thank you for sharing your sewing patterns.
Hi Laurence you will not need it for this tutorial but you will when I will show how to make this bag using leather, just save it or put aside.
Can’t work out what parts 4 and 7 are there for. I love the look of this bag, but wish your instructions were clearer. I’ve been sewing for years, but can’t make head nor tail of them
Hi Kate, you are absolutly right! I forgor to adress that, it is an internal optional pocket. I will adress that on the video and thanks for taking the time to coment otherwise I might have forgotten it. Cheers!
I made this bag, not reversible could be if i wanted it too, but used thick vinyl for the outside, nice bag and just made slightly smaller. The base dimensions still worked which was good. It’s a lovely bag made my straps wider, and inserted a pocket. I like zippers also, and have many bags with zips. I find the bag is quite deep and the magnetic strap works fine. Thanks and am now considering making it in all fabric.
Would probably be less structured, but fine with me and use a zipper closure. Sometimes when you use vinyl which i did and made the straps wider you do find the straps can be too heavy for the bag. With fabric if they are wider you don’t have that problem.
Hi Cindy, I have to thank you for the fact that you took the trouble to describe what you did, my first impression about making the handles wider was that they would be too heavy for the bag and you have confrmed this. Thank you! I like your bag I think it will be very handy. I am loking froward to the fabric one. Kind Regards,
do you cut out the part on the template where the straps are supposed to go to mark the fabric?
Hi Kristin, those lines are there just so you know where the straps go. Do not cut that material there please.
Thank you so much for the detailed, well written tute! I read it forward and back 3 times and feel confident enough now to construct a bag like yours. Successfully. Pix may follow.
I learn so much from you folks! Thanks for the excellent blog.
You are most welcome Jane. Would love to see a picture when ever you are ready.
Thank you love your patterns. This looks great.
Love this reversable tote and the colours! blue & white is so clasic. Love the top shape of your bag, looks so professional. Only problem for someone like me those a lots of pockets person, didn’t notice you had any,. I suppose a bag organizer could be used here.
I made a reversable bag as a gift in a hurry the other day. Have two long panels on both sides of fabric side of bag for lots of pockets , and it’s not too noticeable because it’s of the same fabric. ( On fabric side)
This is one I made that’s reversable.
Hi Sharon, there are two pockets, but a clutch is coming that is supposed to go inside the bag coming soon, stay tuned.
Love this reversable tote and colours, blue & white is so clasic. Love the top shape of your bag, looks so professional. Only problem for someone like me those a lots of pockets person, didn’t notice you had any,. I suppose a bag organizer could be used here
I made a reversable bag as a gift in a hurry the other day. Have two long panels on both sides of fabric side of bag for lots of pockets , and it’s not too noticeable because it’s of the same fabric.
This is one I made that’s reversable.
I think I will try the bag with some leather I have in place of the vinyl. Thanks for the pattern.
yes I think the use of leather would be ideal. Do post a picture when you are done it would be so nice to see.
This is an attractive bag. I like the shape of it and I agree the handles could be a bit wider. I haven’t yet made anything with vinyl but would give this a go.
My favorite bag from your site is the Cross Body Bag, I love it! I’ve made it twice and plan to make another soon. I’ve also made the Lucy Tote. I purchased the Carry-All pattern but haven’t made it as yet. Great patterns from a great site. Having the videos to follow are an added bonus and are VERY helpful for when you need a good visual!
Looking forward to your pictures.
This bag is adorable. What is the finished size?
HI Nancy, the bag is Height 12″(30.48cm), wide 16.75″ (42.55cm), depth 5″(12.7cm).
I think I would have also used an “Invisible” magnetic snap – the kind with the square of plastic around it, that are sewn inside the lining, so they can’t be seen, which should also make them so they’d work on both sides. It’s a great bag, though! (Would the D rings and lobster claws have been for a removable shoulder strap?)
HI Terra, great suggestion, my bag is not finished yet…but I think you idea is superb!
I have not sewn vinyl before. Is there a particular sewing machine needle you recommend? Any change to thread type or stitch length, or other tips?
Hi Dawn, vinyl is not complicated and the tips and tricks can be found in this tutorial.
https://so-sew-easy.com/tips-for-sewing-with-vinyl/
I’m not fond of the snap pieces showing on the fabric side. Is there some way to cover them? Would rather not have a reversible than to have a bag that looks like I turned it inside out.
But I do like the pattern and shape of the bag.
Very nice! I agree with LadyD about a zipper closure. I would love to see a beach tote using mesh pet screen and fabric. I see lots on line but no how to’s and I need the how to!
Love you stuff !
I just love your bag as is! The thin straps remind me of all the Luis Vuitton bags I see people with, which all have skinny straps. I think yours is perfect, from the elegant white alligator look on the one side and the tasteful patchwork fabric on the other. If I were to make it I would recreate yours because I don’t think it could be s improved ?. What is the adorable white fabric with yellow rings that you photographed the bag on & where did you buy it?
Hi Akane it is from Ikea, I bought it to cover the lounge chairs and had some left over to make the small backpack.
A very pretty bag & I like the versatility of it being reversible. I agree the straps should be wider and there should be fabric sewn to their unfinished sides. I would also want a zippered pocket added to the fabric side.
HI Nandine thank you for your feed back:)
I love this bag!
The link to the lobster claws actually goes to d-rings.
Thank you I will look into it.
In reading through the materials list and then looking through the instructions. I’m confused as to why lobster claws, a buckle, and two d rings are on the list?
My thoughts as well!
I wondered the same thing. A goof, I’m assuming?
No it is not a goof, if you read at the end of the post, there is more coming to this bag than this post.
I wondered the same and kept looking at the pics before deciding it was just an oops to include them
That’s my question, too.
Because I am human and I do make mistakes. Also, there is second part to this bag, a clutch, some decoration, more hardware added to it and a long adjustable strap where the lobster claws will be used. Hope that answers your question 🙂
I agree, the handles should be wider. And, I would add an additional snap closure to the top. One snap is too insecure. I actually prefer a zip closure over snaps for security reasons.
This bag is adorable! For those not confident in matching seams it could be made without being reversible. The only thing I would change is the width of the handles. I give you an A.