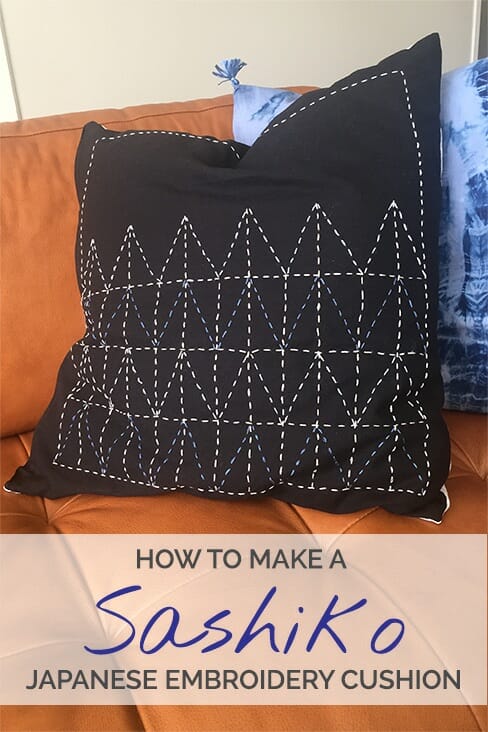
Hello! I'm Rin from Sew in Love and owner of Hana Patterns. I'm back with another free sewing pattern for you, inspired by my Japanese heritage. You can make this embroidered pillow to add a touch of ethnic and bohemian style to your home.
What's Sashiko?
Sashiko is a type of traditional Japanese embroidery. It started out as a way to strengthen cotton and linen fabrics, but these days, we enjoy its repetitive patterns for decoration. Once you get started, sashiko embroidery is a really calming and relaxing activity. I love how my sashiko pillow enhances my other handmade pillows to bring a boho vibe to my living room (see my room tour here). Let's get started!
MATERIALS
I've designed this sashiko embroidery pattern so it can be be adapted to any pillow size. But for your reference, my pillow is 50cm x 50cm (20″ x 20″).
For the embroidered panel:
- 55cm x 55cm (22″ x 22″) of dark natural fabric (eg. linen, hemp, organic cotton)
- Contrasting embroidery thread and needle
To complete the pillow:
- 55cm x 55cm (22″ x 22″) of fabric for the back of the cushion (I used a gingham check fabric for contrast)
- 45cm (17.5″) Zipper
SASHIKO QUILTING TUTORIAL
Step 1: Draw the Guidelines
Draw a square at the centre of your fabric, which is 5cm (2″) smaller than the finished pillow size. For my 55cm x 55cm (22″x22″) pillow, I drew a 50cm x 50cm (20″x20″) square (see Image A). Draw vertical guidelines as per Image A, at 1/2, 1/4 and then 1/12 of the width. Then, draw horizontal guidelines, at 1/2 and then 1/6 of the vertical length.


Step 2: Draw the Pattern
Draw the sashiko pattern, as shown in Image B in RED. I used yellow chalk on my black linen fabric to make it really stand out.
Step 3: Start Stitching
Now that the hard part is over, it's time for the fun to begin! Image C shows the lines to embroider in BLUE. A simple running stitch is all you need to do sashiko embroidery. I started with the outer square border, followed by the vertical and horizontal lines, all in white thread. The diagonal lines were stitched using two different shades of blue thread. The only rule to try to follow is to keep the stitches slightly longer than the gaps between the stitches. The ideal ratio is 3:2, so that means the gap between stitches should be 1/3 of the length of the stitches themselves.


Step 4: Finish the Pillow
Stitch the pillow together and attach the zipper as you would with any standard pillow. And that's it! Admire your beautiful stitches and the unique pillow you've just created.
If you're curious about Japanese style sewing and patterns, come on over to my blog, Sew in Love or browse my Japanese inspired fashion sewing patterns at Hana Patterns. You can also see my Boho Kimono and Baby Kimono Onesie tutorials right here on this site!


If You'd Like To Support Our Site
If you want to help us continue to bring you a wide selection of free sewing patterns and projects, please consider buying us a coffee. We'd really, really appreciate it.


I love how the Sashiko quilting looks, thanks for this tutorial, it helped me to start doing my first Sashiko project.
Admire your loving comments about your grandmother. Often the women who helped shape who we are today are sadly forgotten or deemed unimportant. Well done for your supportive roles. Your grandmother must have been a classy and impressive woman
[…] to try something new and different? Why not make a sashiko cushion? Sashiko is a type of traditional Japanese embroidery that is very calming and relaxing to do and […]
“The ideal ratio is 3:2, so that means the gap between stitches should be 1/3 of the length of the stitches themselves.”
I don’t understand this. If the gap between the stitches is 1/3 of the length of the stitch, the ratio is 3:1. If the ratio is 3:2, the gap is 2/3 the length of the stitch. Which is it?
Hi, Lovely patterns. Thanks for the instructions and ideas. I read instructions from someone else and everything was the same as your instructions, but this person said to print the pattern on the back of the material? Is that another way to do Sashiko?
WOW!! Beautiful!! This is like Swedish weaving without the holes!! Love this!
I had to google swedish weaving, I think I am in love:)
Merci beaucoup
too good ! it resembles Indian “kantha”work !
[…] guest blogging over at So Sew Easy to share my free sashiko embroidery […]