


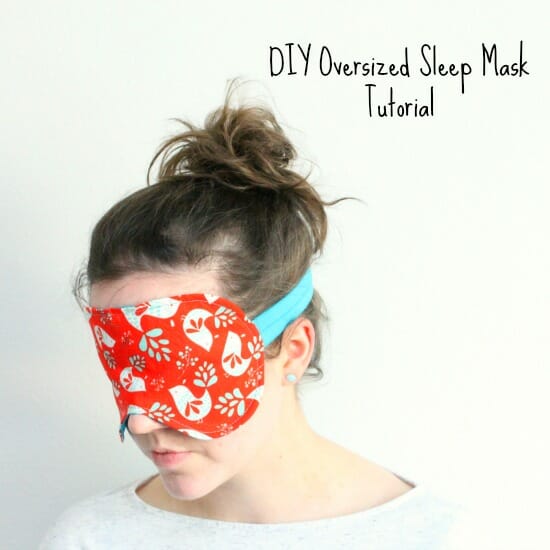
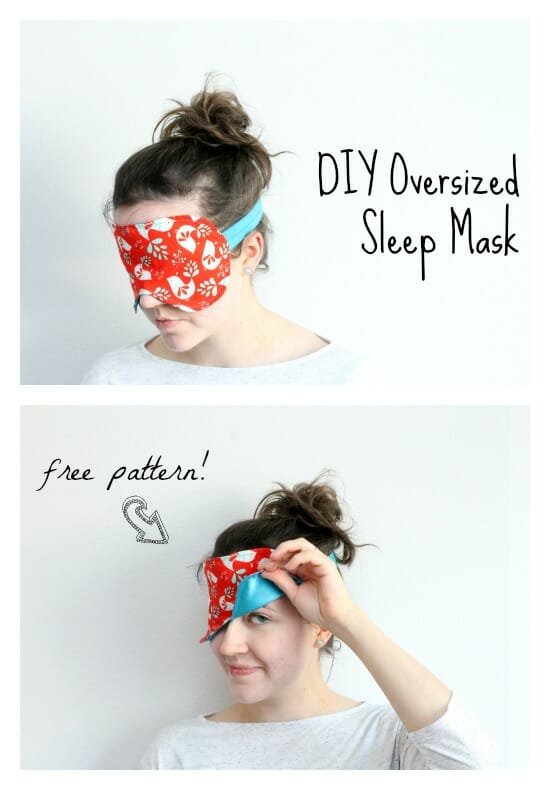
Since I last shared a post here at So Sew Easy, I had a baby girl! With my toddler son running around too, it's safe to say sleep is a rarity in our house. The sleep mask I have is too small and lets light in around the edges, defeating the purpose entirely. Today I'm sharing a simple pattern for an over-sized sleep mask – perfect to block the world out for a quick nap or while traveling!
Supplies
- 15″ of fold over elastic (FOE)
- 1/4 yd or scrap of Woven cotton
- 1/4 yd or scrap of Satin
Fabric recommendations
How To Download
We will continue using the new Payhip web store to distribute our patterns.
Our patterns are still free, but now you have the option of making a small contribution if you like our work! We'd appreciate it, and it will help us keep going with new and fun designs like this. Even a dollar or two goes a long way.
Thanks so much in advance for helping us out. You can use any credit card, and you don't need a Paypal account, although you can use one if you have one.
How To Sew Your Simple Oversized Sleep Mask
Step One
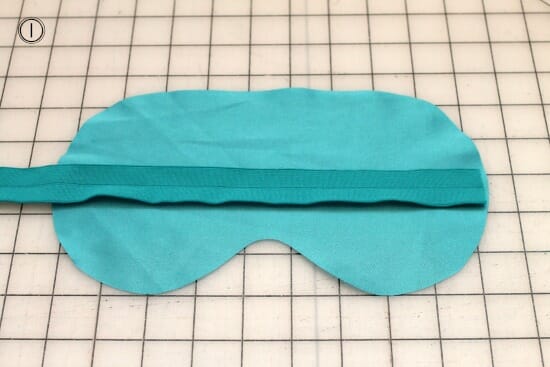
Cut 1 pattern piece from satin and one from your woven cotton. Baste your FOE right sides together (RST), centered on one short end. Place on your face and stretch the FOE around, checking that you like the placement and length before trimming and basting the other side. I preferred a tighter fit, with 13″ of FOE, and placed the bottom edge of the FOE about 2.5″ up from the bottom of the pattern.
Step Two
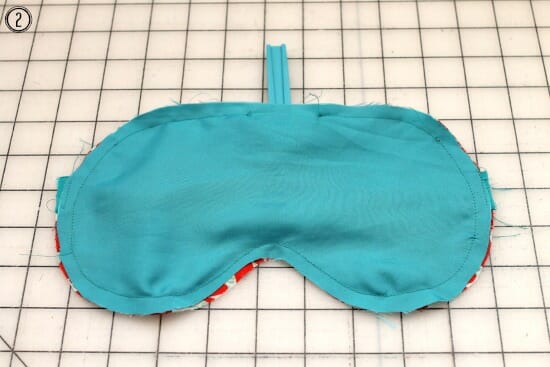
Place the woven main piece RST with the satin piece, making sure the FOE band is tucked inside neatly. Sew around the edges with 3/8″ seam allowance, leaving a 2″ gap at the top for turning.
Step Three
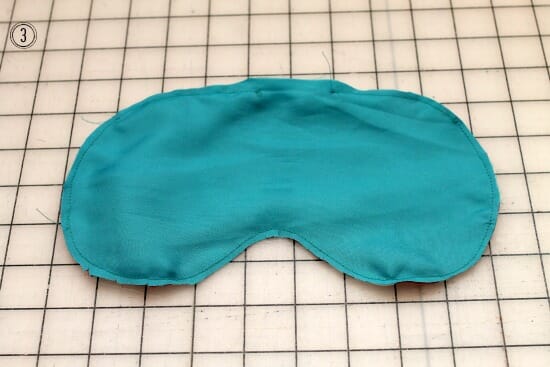
Trim your seam allowance down to 1/8″, except over where your gap was left. If you really want it to press nicely, you can cut tiny triangles out of the concave curves and tiny slits in the convex curve where your nose goes.
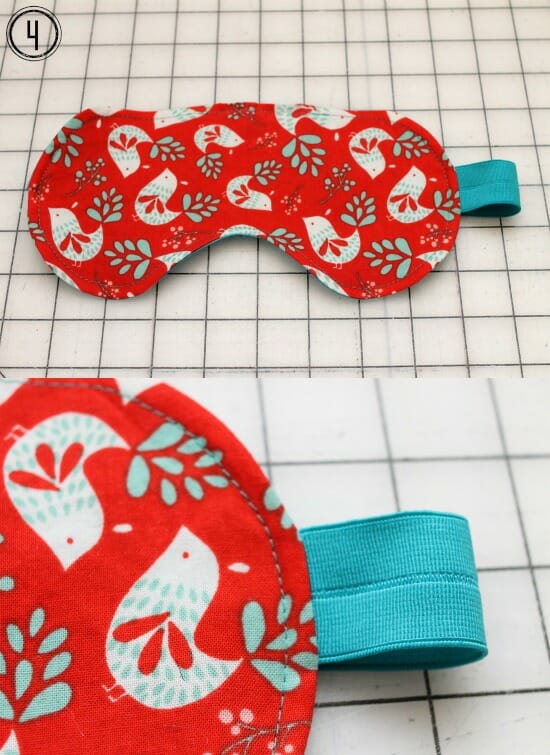
Step Four
Pull the mask right side out through the gap you left and press well, tucking the seam allowances down into the opening. Topstitch 1/4″ from the edge all the way around, taking care to not stitch through your FOE! Ta-da. You can shut the world out in style now.
The super soft satin side feels like a luxury, as does sleep at any time right now!
If You'd Like To Support Our Site
If you want to help us continue to bring you a wide selection of free sewing patterns and projects, please consider buying us a coffee. We'd really, really appreciate it.


a Much easier mask can be made by sewing two socks together. Cut off the toe area which has holes in it to make it square and sew the tops together. The heel area goes over the nose and keeps the light out. Much softer than other masks and fits tightly because of the give.Oh be sure to wash the socks first!!!
I’m not going to lie, I could not for the life of me figure out what to do with the FOE in step 1. I eventually gave up trying to put the FOE in between the satin and cotton and just settled with sewing the ends to the sides of the mask. It turned out fine! Using the mask, paired with my earplugs, allowed for me to have the best sleep of my life. Goodness. I just wish I could have understood what the instructions meant with the FOE. Thank you for the free pattern nonetheless!
At first I was confused too. But I kept trying, and finally figured it out.
[…] Pet Leash Tutorial Sew Cute Quilted Desk Cups Ribbon Lanyard Tutorial Reversible Head Band Oversized Sleep Mask Scrap Happy Table Runner Tutorial Scrappy Hand Made Hot Pad […]
[…] Oversized Sleep Mask […]
[…] First grab a sleeping mask template and then some woven cotton fabric, satin and elastic in required lengths to clone this sleep mask! Step by step instructions here so-sew-easy […]
This is great and just what I need, thanks so much!
When you fill with rice, does it go into the microwave for heat to help your sinuses??? Thanks.
Thanks for posting about the silk eye mask that help to sleep better. Its really helpful for me.
Thanks for posting about the silk eye mask that help to sleep better. Its really
helpful for me.
Great tutorial! What is thr finished size ?
I just love this pattern..Mine is going to become a rice filled sinus mask and this will fit nicely..it’l cover all of my sinuses
I like the idea of an over-sized sleep mask. Having made several of a traditional size, I wonder why it never occurred to me to make them larger and more functional. The oversize sleep mask tutorial was very clear and it is easy to sew.
I’m not sure I understand the instruction completely. Why would the elastic go through the mask instead of just attaching it at the sides to stretch around your head? Also, I teach young girls to sew by hand and I thought this might be a cute project; will it hold if they sew by hand and not machine?
I can see how that could be confusing. But it does work out!
When the elastic is inside the mask, the layers of the mask are right sides together. When you turn the mask inside out through the opening at the top, the elastic is on the outside. It’s firmly attached and sandwiched between the layers of fabric.
If you add the elastic after sewing the mask, then it has to be attached on the underside of the mask (where it’s against your skin) or on the outside (and is visible).
It could definitely be sewn by hand; I will probably make mine that way. (I can sew it on the bus that way!) I would sew back over the attachment point. I will probably leave a little extra seam allowance where the elastic is attached, just to be on the safe side.
Elastic goes through the middle so it will be in the right place once you turn it right side out.
By stitching the elastic inside while stitching the actual mask front sides together, your edges are captured ‘inside’ the mask when you turn right side out it looks neater and there are no thick seams when you wear it. Does that help?
I like the idea of an oversized sleep mask. Having made several of a traditional size, I wonder why it never occurred to me to make them larger and more functional. The oversize sleep mask tutorial was very clear and it is easy to sew.
[…] I don’t want any light at all. It was time to supersize my sleep mask. I found another free pattern on So Sew Easy. I found the instructions so thorough from the first pattern that I used them again […]
Thanks for this very useful tutorial, I have been looking for months for a nice and a simple present for my aunt who has eye problems, hope it likes it as well.
Thank you so much. I have needed this for the past 32 years. Better late than never
Indeed Toby, enjoy!
I love the idea… thank you so much.
why do you use fold over elastic instead of regular elastic
I think Stephanie used the fold over because its nice and soft and smooth and very stretchy, so its comfortable. Some of the regular elastics aren’t as nice.
Thank you for the pattern. Question: In photo #2, what is that sticking out the top?
That is just there to show that there has been an open gap left in the sewing around the perimeter so you can turn the right way. Its not part of the project 🙂
Okay, that makes sense. Thank, you, Deby!
I need this. I have the same problem with my sleep mask, on top of stretching it out every month and having to replace it too often. Thank you and Congratulations on your new baby!
thank you for the free pattern for the over size sleep mask