


We've been looking at sewing tools recently and asking if you can get better sewing results, save time in the sewing room or just have more fun if you spend more money, or if the budget versions of your favorite tools are “good enough”.
Covered so far:
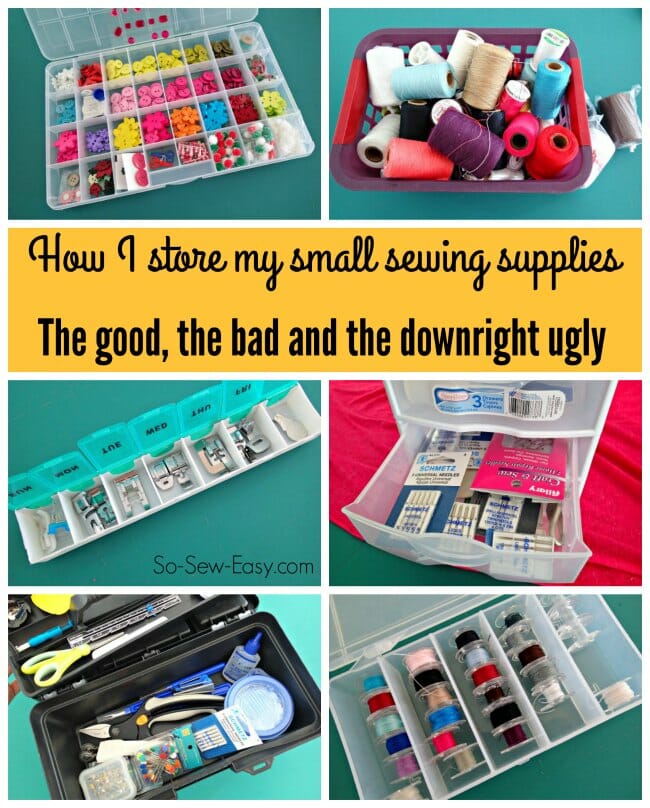
Sewing Storage Ideas – Small Tools And Things
Today I'm looking at basic sewing room storage for your tools and equipment. Do you like something custom designed for sewing, or do you keep everything in a big cardboard box and rummage about, or something in between? Maybe you have a custom-designed sewing space with peg boards or dedicated sewing storage. Is your storage also a decorative item, and are there practical reasons why spending more is going to get you better organized and save you time?
Why Have Organised Storage Anyway?
The biggest reasons I can think of to invest in good storage are really two-fold. Save time by making things easier to find – we all need more sewing time so if it takes 10 minutes to find that zipper foot you know you have somewhere, well then that's 10 minutes less sewing time. The second reason is monetary. If you can't find something you might have to go and buy another one, and by proper storage, you can also prevent damage or rust too and keep your tools in tip-top condition.
Let's Have A Look At Some Of My Sewing Storage
I live on a small island so I use what I can get locally to keep my sewing supplies in order. You don't need specialist storage solutions for your sewing room, but OK, let's admit it, there is nothing nicer than seeing things all neatly set out and beautifully organized, and given the choice, we'd all go for perfection.
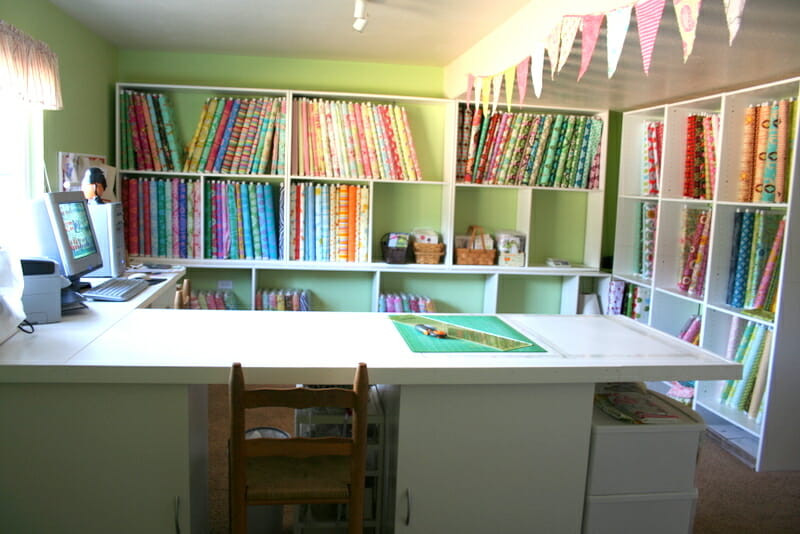
Yep, this is NOT my sewing room, not even remotely like it I can assure you. This is pretty darned nice to look at and practical too – check out some more pictures from I have to say… Let's leave me sewing dreams and get back to the practical reality of my own sewing storage.
Bobbin And Tool Storage
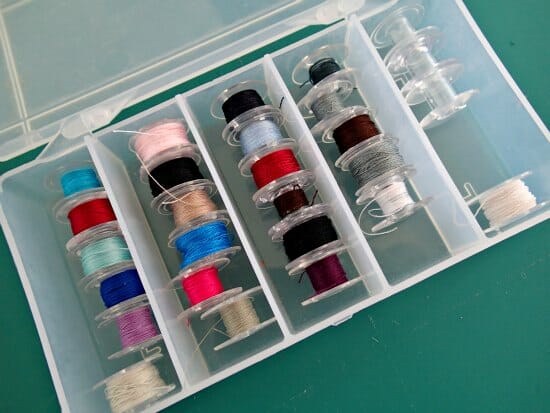
I don't actually have a lot of bobbins to organize simply because my local sewing shop only has a very limited stock of thread colors anyway. The ones I have are in this small box. It's designed specifically to be a bobbin box and it works OK. It's perfectly adequate. This is what it looks like when it's all neat and organized.
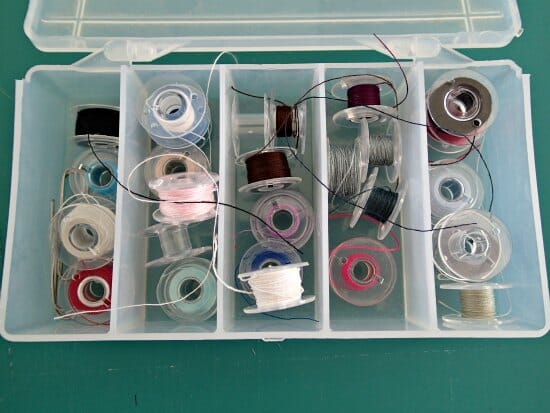
But this is what it actually looks like most of the time 🙁 The bobbins are all loose and rolling about, the threads come undone and get tangled, and I fish about making it worse when I want to get something out. I can do better!
There are SO many ways to organize and store your bobbins, maybe I should write a fun article about that (coming soon). I've treated myself and have something new on order just because I felt like a treat and this looked so pretty as well as interesting! Again, it's not here yet so I'll write about it when I get a chance to try it out in real life later on. This is the Nancy Zieman Stack and Store Bobbin Tower.
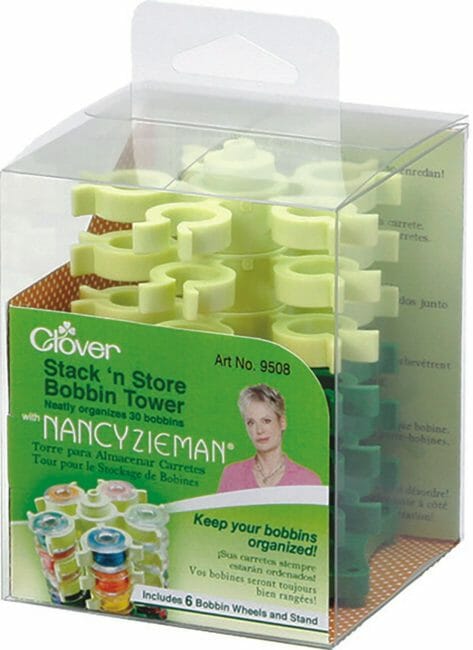
This looks really funky and interesting and obviously, anything with Nancy's name on it has to be worth considering. You can get one of these fancy bobbin storage towers at Amazon US or Amazon UK.
This is one place you really don't need to spend a lot of money to store your bobbins, but it can be fun if you do!
Sewing Feet Storage
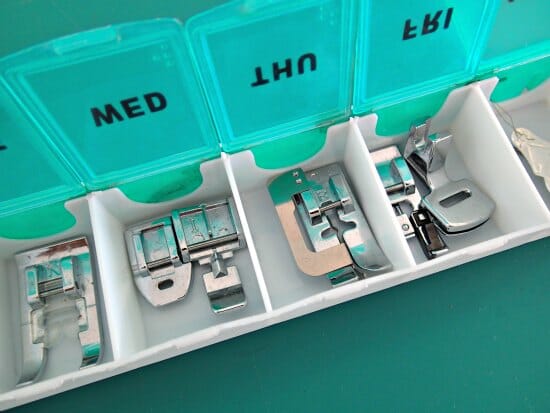
One of my “make do with what you can find” examples. In this case, a weekly pill reminder case has little spaces which are perfect for storing my sewing presser feet! Who would have thought it, but everything other than the automatic buttonhole foot will fit in here nicely. You can even get 3 or 4 feet per section if you want to.
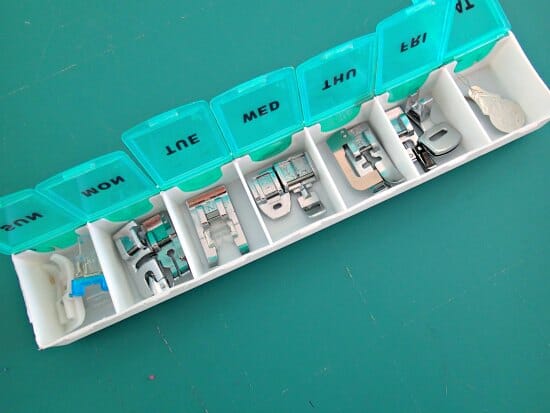
The last section I keep for my needles so as I change from a Universal to a stretch needle or a twin needle, I swap them out in that end section.
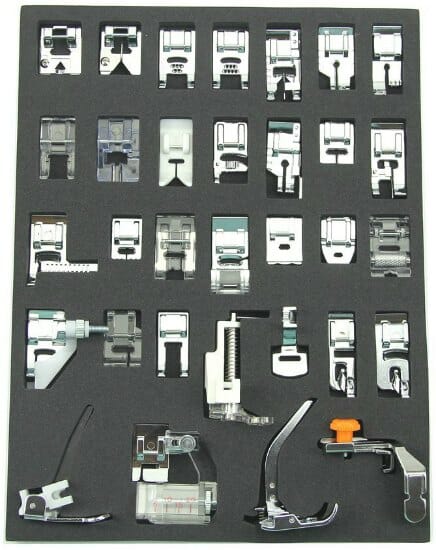
While we talk about sewing feet, let me give you a little sneak peek of something else I have on order and am very much looking forward to receiving. All the presser feet I will ever need I should think, and some I will probably never need. There will be some duplicates with what I already have, but well worth it for the price I paid. More on this great box when I get it.
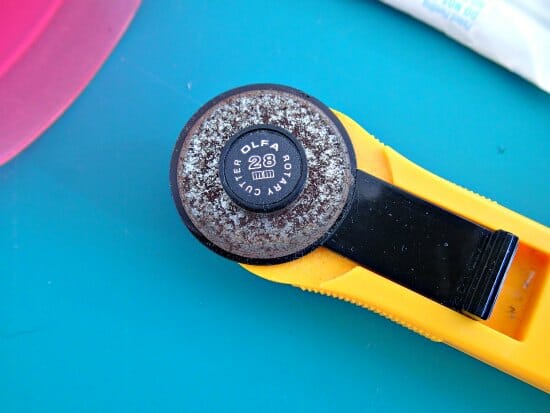
Rotary Cutter Storage – FAIL
My sewing room is almost right on the beach. When I look outside my window I see the sea right there. Lovely, except with the humid and salty environment and the breeze coming right in the window off the sea here in Cayman, rusting is a real issue, and certain of my sewing tools are no exception. I've tried all sorts of solutions for my rotary cutter from zip-loc bags to pelican cases and everything in between.

This is how I currently store my rotary cutter – in this plastic case filled with silica gel sachets from the camera shop that are supposed to absorb moisture. Basically, it's not working. This is how the blade looks within 2 weeks of opening it, even if I've only used it once. It no longer cuts anything, so I have to consider my rotary blades as almost single-use!
As soon as I've finished using it, it goes back in the pink case with the silica gel and gets put in my sewing toolbox with the lid closed. More on that next.
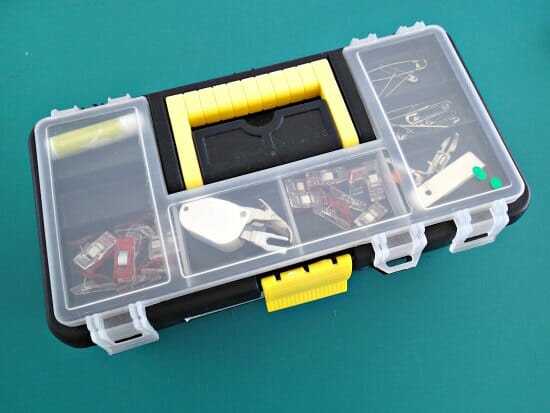
Storing Other Sewing Tools
My sewing toolbox is just that – a toolbox from the DIY Store. It's not pretty, nor designed for sewing items but it works for me. Room in the top for clips, walking foot, seam ripper, lip balm, etc.
Then there is a removable tray on the inside for other seam rippers, yes I have too many (see the previous article), small scissors, tape measures, seam gauge, needle threaders, marking tools and pens, etc. I admit, I tidied it a bit before taking the picture.
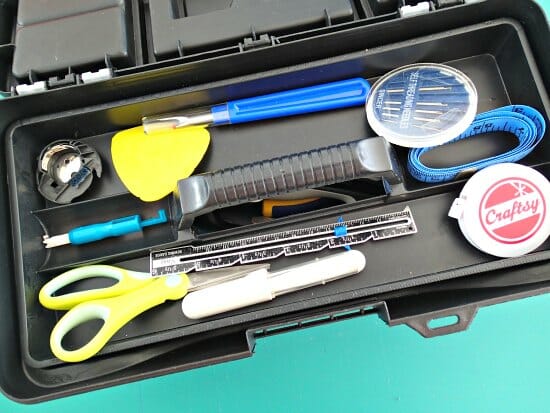
In the bottom layer are the bulkier tools such as scissors, rag quilting snips, pins, more seam rippers, small bottles, pins, needles, and other stuff. I admit I tidied this too.

I also try to keep rusting here to a minimum too.
Combating Rust As Best I Can
See that little blue pot in the bottom right-hand corner? That's my homemade humidity remover. I use a product called Damp Rid. I buy the refill packs of the basic granules and have made a small humidity collector out of a couple of plastic ramekins.
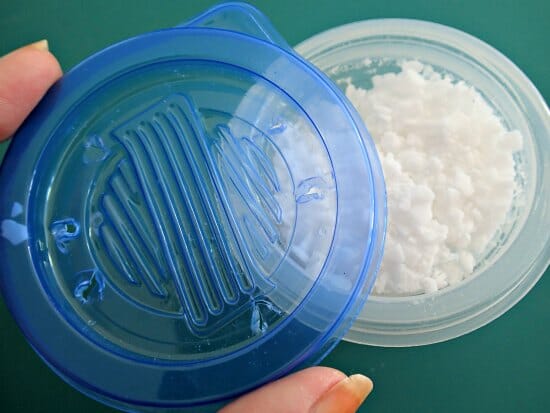
The top has holes in it so that the granules inside can ‘suck' the moisture out of the air inside the toolbox and into the granules inside. Then that inner container has holes in the bottom and the moisture collects and drains down into the outer / lower plastic container where I can pour it away.
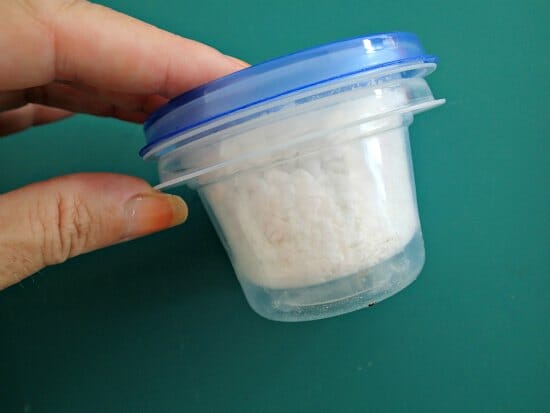
Over time, the granules dissolve as they collect all that moisture from the air. I empty this about once a week and change out the granules infrequently, I'd say about every 3 months. So it's easy to use, economical and it does keep the rust away from all of my other sewing tools – works well. Shame about the rotary cutter!
Storing Sewing Thread
Let's take a look at my embarrassing ‘ thread storage system'. Yep, it's a plastic tray from the dollar store that I keep in a drawer. Again, my local store doesn't have a lot of thread color choices anyway so I only have a few reels to store. It looks a bit sad though.

There are far more attractive thread storage and organization gadgets and racks out there. Check out some of these examples.
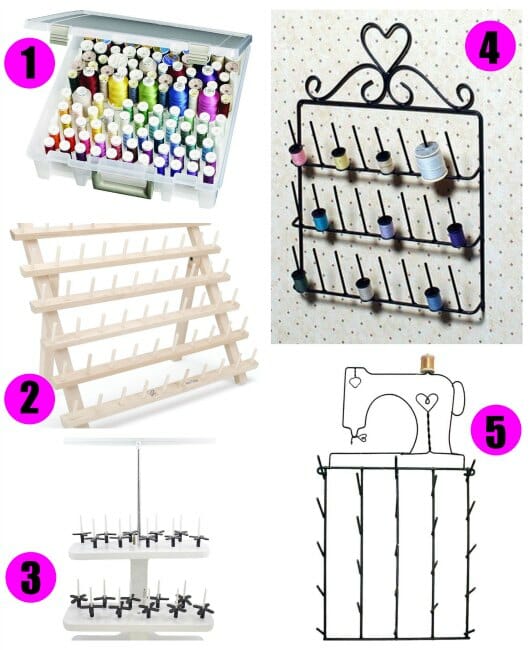
- Art Bin Super Satchel Box with Removable Thread Trays
- Traditional wooden thread rack in a multitude of sizes
- ingenius idea that holds all of your threads at the machine, and you just leave them there and thread the one you want to use. SewTech 20 Spool Thread Stand
- Wire Black Spool Thread Holder Rack Victorian Heart Top
- Sewing machine spool rack
Other Bits And Pieces
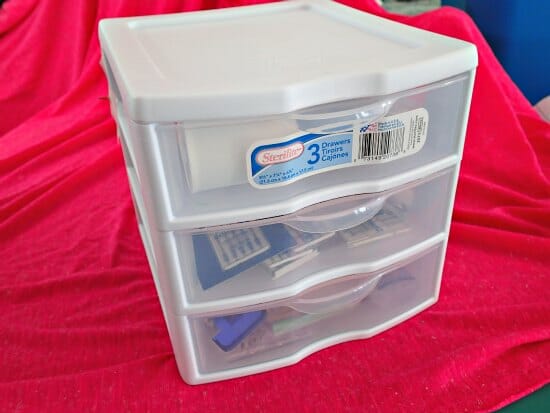
We often collect up lots of other small tools, bits, and pieces that need to be kept tidy and organized. I use one of these small desktop 3-drawer units for all the small things. They stack too and you can buy them in sets of 4 if you have a lot of ‘stuff' to organize.
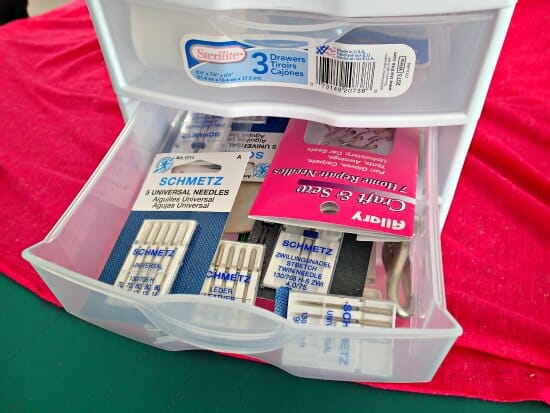
In here you'll find all of my needles, more than likely more blunt seam rippers, small rolls of elastic, knit stay tape, bias tape makers, Frixion marking pens, my thermal thimbles for pressing (I swear by these), dental floss for gathering, and usually a few bits of bag hardware such as magnetic snaps or rectangle rings.
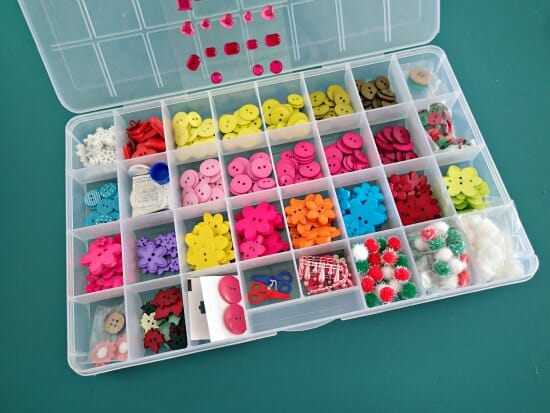
I also have a thing for buttons it seems, but just for collecting and sorting them instead of actually ever using them. Check out my nice bright button collection – I can't think that I have ever used a single one of them – except for on my Spring applique pillow cover which I do adore. Shame on me for being so wasteful. They do look nice though. If anyone has any ideas for how to use them, please let me know!
So I think that's everything. All the little bits and pieces are carefully stored away and organized into their own little spaces. You've had just a little peek into my sewing space. It's by no means a dream sewing space, and it's usually messy so I don't think I'll be revealing any sewing room pictures any day soon.
I have dreams though of the perfect sewing space one day. I'm collecting inspiration and ideas on my Sewing Spaces Pinterest Board. Check it out below and prepare to drool and be green with envy. How amazing to have room/spaces/custom furniture etc like some of these…
Follow Deby at So Sew Easy's board Sewing spaces on Pinterest.
Fancy splurging on some fun additions to your sewing room? Here are some ideas for you from my own wishlist:
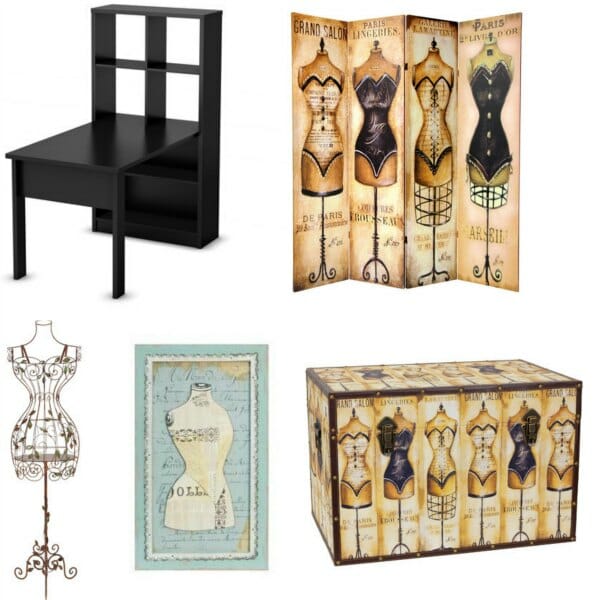
- Mannequin room divider
- Sewing/cutting work table and storage
- Decorative dress form
- Dress form art
- Mannequin storage trunk
One day my dream sewing room will come…


I had the same problem/solution as Linda. I had so many different dark blues, but which bobbin was poly thread and which was poly/cotton and which was cotton?? Then I found a box at a craft supplier some years ago (company does not seem to exist any more, sorry- manufacturer of box may) The words on the top of the box is “Knit & Sew Solutions”.
The thread and bobbin are put on the same post and best of all when the lid is closed the bobbins do not fall off the post when I tip it upside down when going to class or a friend’s home.
The box either slips into a drawer or sits on my sewing table. I change thread an awful lot while sewing. I have this ‘thing’ about always matching my thread to my fabric.
Great tool tips! I use a label maker so I can tell what’s in the plastic storage drawers without out having to open each one. There are a bunch of those little drawer units in my sewing room!
Buttons: I saw byAnnie put them on the bottom of a purse/bag for feet. It looked like a brilliant idea and I plan on doing that with some of the buttons in my collection.
I got one of the Stack ‘n Store bobbin holders – it didn’t work for me as it’s hard to get the bobbins out without the stack falling apart. It’s pretty fiddly.
Thread storage is an issue for me because I have so many spools of different sizes, shapes, and types of thread. I have several different plastic containers, peg boards, tins, etc. of thread – it would be great to have it all in one highly organized area of the sewing room. Hmmm, today’s project?
Thank you for all the patterns, ideas, encouragement, tutorials, sourcing, etc.! You make sewing more fun!
I put my bobbin on thread holder peg first then I have correct color bobbin to go with thread. No tangled bobbin thread and correct color matching bobbin and top thread every time.
A friend showed me their golf tees. I put the bobbin on top of the spool of thread that ir matches and put a tee through the bobbin and into the spool…….works great and easy to use. Good luck !!
You could also try putting a thin layer of Vaseline on your rotary cutter blades between use.
I thought about mineral oil. Either way, you’d have to be very sure to wipe it off thoroughly before each use.
I use a pill organizer for my pressure feet also. I ordered a 3XL pill organizer on Amazon that holds all my machine needles. I can organize they by size and they fit into the compartments. I also used a bit of Goof Off graffiti remover to take the letters off. Now I have a clear view of what is inside.
I use the “pill” containers from Joann’s for my pressure feet, needles and clips. U can usually get then with a 50% off coupon
My rotary blades have a thin coat of ‘oil’ on them when i buy them, maybe something like silicone spray could help extend their life. I am sure a can of spray would be cheaper than single use blades 🙂
Hey my craft room has no wonderful sea side view, but I do have chook’s running up and down through the fruit trees in a small family garden, its lovely in summer but cold in winter burr.
I wish my craft room looked like the one in the picture but I when I am in the middle of three or four projects I wouldn’t want to photograph it either. I think its great with the ideas for storage you came up with that work for you.
My double side bench is made up of two wood benches legs are two saw horses. Sewing machines one side other side is crafting bench for the messy jobs. Spinning corner and other side belongs to mum with her knitting machines and my restored wood sided board which holds all our yarns and accessories. So good luck with your crafting room sounds dreamy.
Hi Chris, thanks for sharing. Your craft room sounds great!
Are your blades not stainless steel? I thought they pretty much all were, If not, look into that, because stainless isn’t suppose to be able to rust out like that, even on the beach. I live right next to the ocean too, no issues with my blades.
Good luck! and great article!
I have the wood dowl thread holders for my serger tread as well as my regular thread. My husband attached them to the wall with screws. The wall behind the door is covered with them top to bottom.
My girlfriends husband put them on the wall next to her sewing table.
I organized all the colors together making it easy to find the shade I want.
Sounds like heaven Valerie, must be a joy to work in your room.
I moved into my parents old house and didn’t need a formal living room so I’m turning it into my sewing/craft room. I’m in the process of making a thread/bobbin storage piece for my wall. I bought a large piece of peg board and lots of 1/4″ wooden dowels that fit into the peg board holes. I plan to hang the peg board on the wall and trim it out with molding then paint everything white. I can cut the dowels to length so the spools of thread and corresponding bobbin fit on it together. It can hold cones for my serger as well. Once I have the configuration the way I want I can put a little glue on the end of the dowel so it won’t come out of the peg board.
Oh, how I envy your use of the living room as a craft room!
You might find these ideas helpful when building your thread storage:
My husband used white paint to finish two rather large pieces of peg board to hold thread – about 300 spools or so. Before attaching the boards to the wall, he set the pegs/dowels in at a very slight upward angle. He used a strip of wood to line up the pegs as he set them. He put glue in each hole, then the pegs, working row-by-row. I made “curtains” to keep the dust off the thread. They are heavy gauge clear vinyl fastened across the top of the pegboard with sticky-back Velcro. I can see all the colors and reach under the vinyl very easily.
Great ideas here!
Now that’s a great idea,I just got married and moved into a large home. But to my project from been allover the house we purchased a building just for me. Now to get it finished with walls,electronic and more shelves I be posting pictures. Love your ideal
Definitely need the curtain. I had my threads on a wooden board. The dust was awful and so hard to move. I seem to live near main roads so always have a lot of really duty dust.
i thank you for all the good ideas and would like to offer you one in exchange. i used to live on the coast too. to keep your rotary cutter from rusting, get a quart jar, fill it with plain uncooked white rice. when you open your rotary cutter and after each use keep your rotary cutter in the jar with the lid on. it will not rust, or t least mine didn’t. good luck.
The pink case that you are storing your rotary cutter in (pictured above)…..where did you get it? I have one that I bought a while back and have now decided I need about 3 more and the store I bought it at no longer sells them…I’m stumped 🙂
I got mine in the dollar section of my local supermarket. Was sold as an eye-glasses case. Very handy for this little tool.
I’m currently using buttons that have been hand down to me through our maternal line. My nan was a very crafty lady. I am using them as eyes for my happy when door stops.
I have that same sewing foot set! It’s great. I’m still new at sewing, but I’m pretty sure I won’t ever have to buy a sewing foot again. 🙂
I’m curious as to what you use the lip balm for?
No mystery there – I used to make my own lip balms and have a huge bag in all sorts of flavors. I’ve become rather addicted and they come with me everywhere. If I don’t have lip balm on, my lips feel dry, so I apply it often. You never know when Johnny Depp might come calling and want a kiss 😉 I need to be prepared.
Try storing your rotary cutters in a container with rice. Works like a charm. I also purchased a rotary blade sharpener. It gets the rust off and sharpens the blade. I HATE having to replace blades!
For your rotary cutter I would try vacuum sealing it, I have a nice electric kitchen one but you may be able to find small bags with a hand pump. The one thing with doing blades is that you need to whip up a cover so they don’t nick the bag, I like wool for this.
For you button collection, I have one too, I use them as decoration on all sorts of things using either my button foot or glue. I don’t have a picture handy but for the 100th day of school my daughter and I made a shirt by gluing 100 buttons in the shape of a tree.
How about storing them in a ziplock in the fridge-a refrigerator is a giant dehumidifier.
I like that idea! Going to try it. I know we store our spices there for the same reason, so it should work for the blade too. Although it may get wet with condensation when it comes out, but so long as I make sure it’s properly dry when it goes in, this idea could be a winner.
You’re going to love that set of presser feet! I got the same collection a few months ago, and they’re A+.
BUTTONS BUTTONS BUTTONS!!
When I was a child, my dad was in the army; we moved alot…
But we always visited my aunt in the process of moving.
She had no kids toys. But. She did have, you guessed it, BUTTONS!
She kept them in an old cookie tin, with a dulled needle and thick embroidery thread.
I would sit for hours stringing the buttons.
All one color, all one size, a mixture and on and on.
For hours.
Having now a 3yo grandson I am collecting buttons for him to play with in a couple of years.
Best use of a large button collection that I know of, and if no small children come visit, try taking them to quilt alongs, or shows.
I bet some little person would LOVE BUTTONS lol!!
Sincerely
Pat
Deby:
The idea of storing your blades in oil is good but that might make the blade difficult to handle. I was in the US Army and when they trained us on how to fire a weapon (rifle), we had to clean the rifle after every use. It might be easier to try coating the blade with oil instead of dropping it in oil. Also, you need to use an oil that will not stain your fabric. I hope that helps!
can you not put your rotary cutter in with the other sewing tools?
Yes I do, I keep it inside the pink box, with the silica sachets and then keep the pink box inside the sewing tool box along with the damp rid. It’s still not enough! Something about those blades that loves to rust.
Have you tried the oil and greaser proof paper yet? I asked my son who is a welder and works with all types of metal, he said to put the blade just in a pot of oil or grease when no in use. You need to block out the air then with a wipe it is ready to go.
So take it apart every time and drop the blade into a pot of oil, then take it out, wipe it off, put it back together, good to go…with the price of getting blades sent over it could just be worth it. I need to look for a little glass jar with screw lid so I can store my blade. Thanks for the tip.
You’re welcome, let us know if it works
I live in Hawai’i and I wrap the blade end in a paper towel and keep my rotary cutter in a ziplock bag and it works great. I do the same with my blades once I open them.
Get yourself a magnet – the fellows have some that are thin and extendable for picking up things they drop when working on engines and such like – then you can easily grab your blade out of the oil that you are keeping it in without risking cutting your hand
Air conditioning? A dehumidifier?
The house doesn’t have any A/C (it’s rented) so we have to keep all the windows open to keep it bareable and therefore a dehumidifier sadly wouldn’t work either. I’m sure that yes, if we could keep the windows closed it would make a big difference, but sadly not.
Heroic!
Here are some ideas for your buttons:
Use them to create a bib-style necklace
Eyes for stuffed animals for older children (not safe for infants!)
“ornaments” on Christmas tree wall hangings
Use them to make earrings, necklaces, or bracelets
Do an simple flower, then use a button as the center. This can be used on tote bags, sweatshirts, home dec pillows, etc.
Deby, I remember reading that manufaturers used to ship guns packed in oil, then in crates (wood). Decades later, the crates were found, opened and the guns were inJ pristine condition and worked beautifully. This was in Greece, post 2nd world war. Jennifer’s suggestion seems like a good possibility. Just remove the oil with alcohol and cotton waste or paper towels when you want to use the blade. It is a nuisance but a small jar (with any type of oil) would not be expensive to do, and if it gives your rotary blades a longer working life, it would justify the trouble. Should try anything, at least once.
Hi Deby, For cotton storage I use the empty Ferrero Rocher boxes, for example: guiterman cottons stand on end and I can get 23 in one box, ideal! These are free to me, because someone else bought them. Love the weekly tablet box for sewing machine feet. Linda
I use empty Ferraro Rocher boxes too!!! I love how they are clear and sturdy! I have many different sizes of them and use them for many different things, like: sewing machine feet; tools like seam riper, marking pencils, small scissors, and seam guide; pins; etc. When I go to a class, they all fit in a bin and I’m able to see everything.
In the 70’s and 80’s I sewed custom clothing for a living and am still using most of the organizers I bought then. Threads (100 of spools from professional days) go in a 6-drawer organizer with each color group in a different bin. Thread cones for the serger are jumbled in a bin like yours. I have an old dresser filled with fabric and small tools (tools are organized in the top drawer in small interlocking plastic bins), notions are in an 8-drawer unit of shoe box sized bins. A rolling metal cart designed for office files sits next to the machine for commonly used sewing tools and fabric storage for current projects. All in all, pretty basic, but it works for me. I don’t want one of those fancy everything-in-its-place sewing rooms, because nothing would stay in its place for very long. I feel I’m basically organized in my sewing room, which is more than I can say for my closet!
My mother in law was a boater who used her microwave as airtight bread storage. Maybe an small -unplugged!- microwave would protect your rust prone tools?!?
You should see my microwave – that rusts too! Thanks for the tip.
In my years of sewing, everything has always been practical. I always had a sewing area with everything within reach and clear view. Now as I am older, I mainly teach sewing so more things have to me mobile. I like having my essentials all in one (pretty) train case. In it I have small jars with pretty pink supplies (pink pins, pink wonder clips). I also carry only a few spools of thread (black, white, cream). See my case that I got at Forever 21: http://www.thelostapron.com/2015/06/learn-to-sew-supplies.html
About your nice buttons, there’s no need to use them just for sewing. Just do a quick search for button crafts and something you will find will strike your fancy. There’s nothing wrong to dabble with another craft for a while
A cost effective way to combat humidity in a small environment, i.e. a closed storage box is to fill a sock or tights with Silica cat litter. It absorbs water and might fight the rust on the cutter.
I recently bought the same presser feet you have ordered. They are great, but they came in a flimsy box and the labels were not in English. I bought a couple of the inexpensive plastic boxes used for embroidery thread, then I made labels using cardstock . I cut the labels apart and placed one in each section, then placed the feet on the labels. It works great. Even my buttonhole and walking feet fit in the larger sections. I LOVE your patterns, tutorials, and your blog. Thank you for being so generous.
I’m planning that at least I will need to create a cheat sheet for them when they arrive. Seems to be pot-luck which container you get with each set so fingers crossed mine is useable.
Bobbin storage I use toe separators, buy them from the pound shop useful when going to a workshop.
I bought a foot of plastic tubing and cut it the width of the bobbin and then slit it to fit over the thread on bobbin…works great!
I have a knife for slicing parma ham and it can get rust spots easily, I just smear a little olive oil on it after every use and it is fine. Got me to thinking maybe if you took the blade out of the cutter, rub a little oil on it and fold it into oiled waxed paper then in an airtight box or bag, you will just need to give it a wipe before use. Worth a try.
have you thought using “lock n lock” box for your blades? like they totally seal the box, i used that for my brown sugar and the brown sugar never ever turned hard.
I use the cheap plastic pencil boxes for storage. they usually cost less than a dollar during back to school sales.
I made a thread organizer that I found here: http://www.favecrafts.com/Storage-and-Organization/Thread-Organizer. I found a white frame and used fabric to match my sewing area. I made the dowels long enough to hold both the spool of thread and bobbin. I love it!
I’ve seen a lot of resorts put dry rice in Salt shakers to prevent moisture clumping the salt and have heard to submerge cell phones in rice if they are exposed to water, have you tried having a big jar of rice that you keep your rotary cutter (blade down) sitting in?
I’ve not tried that, I wonder if it would work. I’ll give it a try 🙂 Thanks for the suggestion.
Bobbin storage was always an issue for me too. I use the tiny knit hair elastics to cover the bobbins when I remove them from the machine. It keeps the bobbin from unraveling when not in use. You can usually find them by the bagful at the dollar stores. Also last year I bought a wooden rack for spool storage and have found that I can fit the corresponding bobbin under the spool on the pegs. Now I don’t have to do the detective work to figure out which bobbin goes with which spool.
Brilliant!! I have about 8 plastic thread boxes that I store color coded rainbow style and labeled. They stand like books and very handy. White black grey in one box, brown, cream, tan in one box. Then reds pinks, oranges yellows, greens, blues etc. Did the same thing with bobbin boxes. Seems smart right? Wrong! Go to the blue box for thread…find the right one, then go to blue bobbins. Wow! So close in match, but which one came from that spool? Spend more time than care to getting a match! Am going to your plan and will find something else creative to do with those boxes! So smart thank you for the “lightbulb” !!