


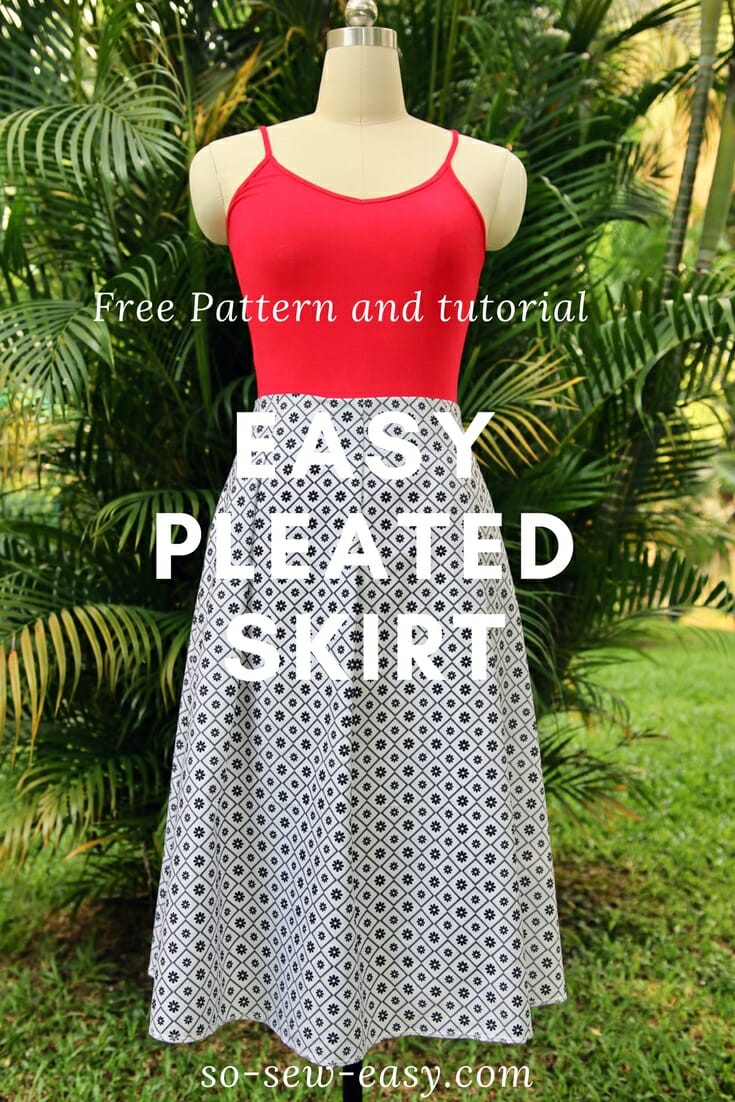
I have a new, easy pleated skirt pattern to share with you that will help streamline your figure and look great. This A-line shaped skirt style is so easy to sew that you’ll want to make a few skirts and they should last you for many years.
Warning: This is a sew-along where you will learn how to handle this pattern to fit it to any waist size, how to shorten and lengthen the skirt. Therefore, sizes are limited.
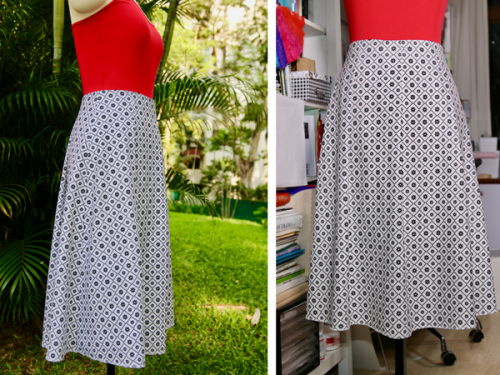
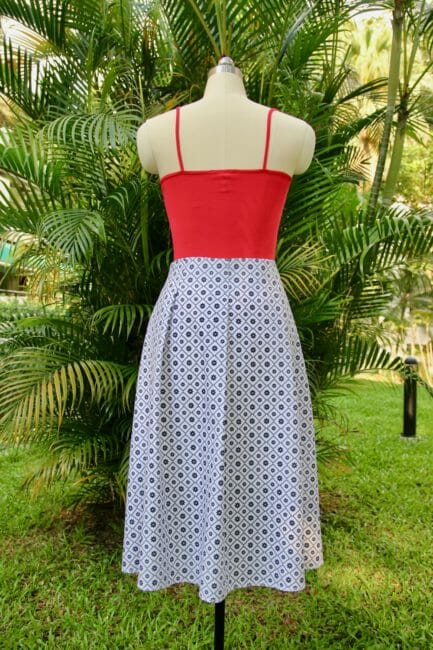
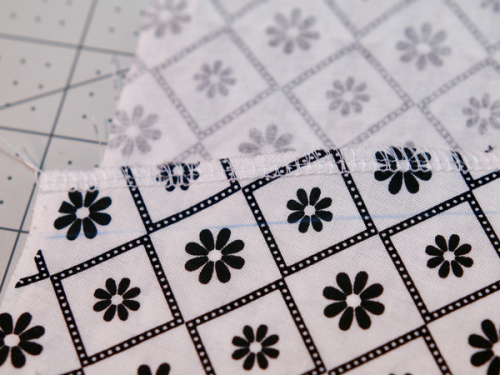
Made of linen, cotton, light wool or other fabrics with a bit of body, this skirt will give you an effortlessly classy and elegant look. This skirt has three pleats in the front and three in the back.
Lately, I have had a few requests and since there are a few that relate to each other I thought a sew-along showing how to do alterations and customizations would cover many of the questions and requests you guys sometimes send my way.
I must say that I do enjoy getting mail and comments from everyone and, believe it or not, requests make my life easier since I don’t have to wonder what am I going to write about next. So thank you and keep them coming!
I have divided this tutorial and sew-along into four parts so I can share with you a few details that will make this an easy and valuable learning experience. I really want you to end up with a great finished product!
- Part One: Print, cut and sew the skirt and pleats.
- Part Two: How to sew a skirt lining with an invisible zipper.
- Part Three: How to hem a pleated skirt.
- Part Four: How to fit and alter the pattern to make the skirt bigger or smaller.
Materials
- two (2) yards of medium weight fabric at least 44″ wide (cotton, quilting cotton, linen, or light wool)
- 3/4 yard of lining soft cotton (lawn or batiste), silk or satin.
- 1/4 yard of woven or non-woven fusible interfacing
- one (1) invisible zipper 10″ long
- thread to match.
Tools
- Sewing needle #70, #11
- Rotary cutter
- Sewing machine
- Serger or overlocker
- Invisible and normal zipper feet
- Tailor’s chalk
Fabric recommendations
Please note: Do not attempt to make this skirt until you have read all the instructions. You should know how to read a pattern, how to layout fabric and have made at least one skirt before attempting this tutorial.
Advanced sewers or those that do not require instructions can proceed.
For confident beginners and intermediates, after following the four parts of the tutorial you will be able to:
- Attach an invisible zipper
- Sew pleats
- Hem a skirt with pleats in two ways
- Alter a skirt with your own measurements
- Pattern transformation using the same pattern
Finished Measurements
| Size | Waist | Length of Skirt | Width at hem |
| Medium | 30″ | 29″ | 90″ |
| Large | 34″ | 29″ | 94″ |
| X-Large | 38″ | 29″ | 98″ |
Pattern Layout
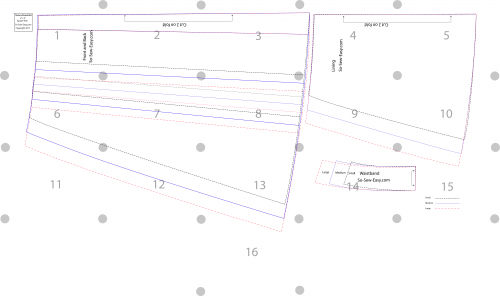
Pattern Download
You can download the pattern for this Easy Pleated Skirt from our account at Payhip.
For help downloading and printing PDF patterns, please CLICK HERE.
Step One: Print the pattern
Use the latest version of Adobe Reader and print in Landscape mode. Your pattern does not contain seam allowances. Add 5/8″. The hem of this easy pleated skirt pattern is 1″ and the lining of the skirt is 3/4″.
Step Two: How to layout the easy pleated skirt pattern
I folded the fabric lengthwise and used both ends. There will be some leftover in the center, but I know I can use it to make a small handbag with the rest of the fabric.
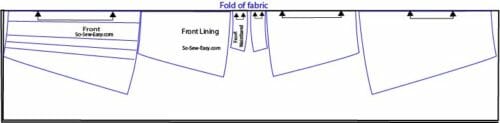
The same pattern is good for the front as it is for the back. In other words, we need to cut the pattern as a mirror image. All the pleats will be folded toward the left. Make a notch on the waist seam allowance to mark the pleats. Make sure you have five notches, one will be in the fold of the fabric. The tendency is to forget this fold, but you will need it because this notch will mark the center of the skirt and the depth of the second pleat.
All the pleats will be folded toward the left. Make a notch on the waist seam allowance to mark the pleats. Make sure you have five notches, one will be in the fold of the fabric. The tendency is to forget this fold, but you will need it because this notch will mark the center of the skirt and the depth of the second pleat.
Pattern placement for the front.
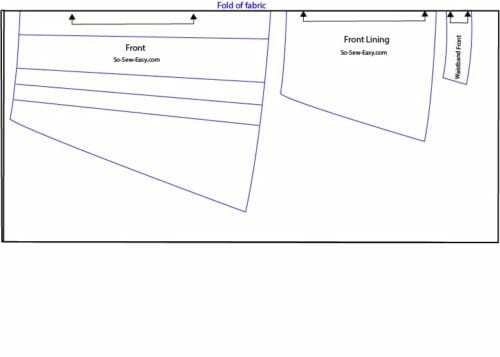
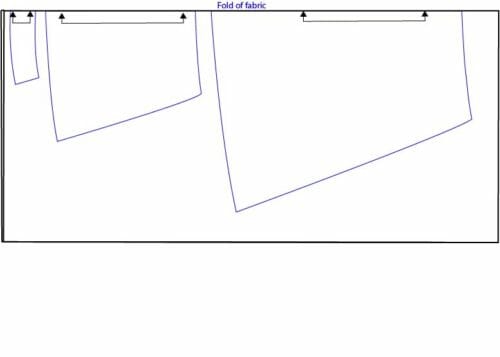
Pattern placement for the back. Flip the pattern upside down to get the pleats going in the same direction.
Step Three: Sewing the zipper and sides of the skirt
I’m using a 10″ zipper because I am recycling one from an old blouse and it also fits this design perfectly.
Sew the zipper using the invisible zipper foot. For a detailed explanation of this step please visit this tutorial about how to attach an invisible zipper. The method below is a little different, but both ways are going to give you the same result.
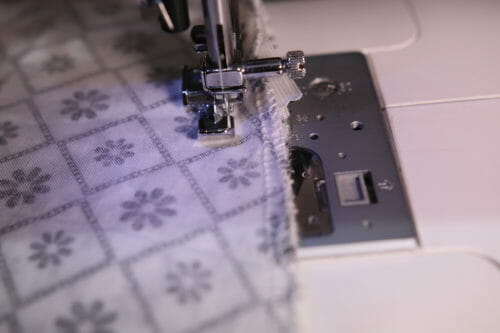
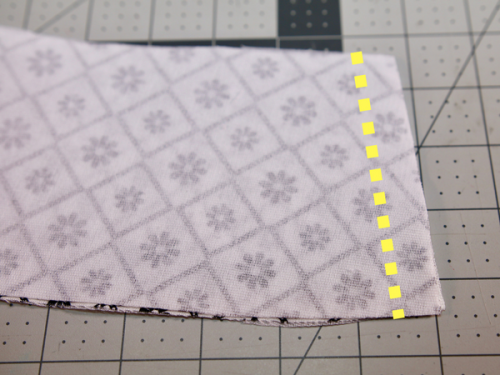
Mark the seam allowance using tailor’s chalk. I’m using blue and I have only made a very faint line but I still can see it.
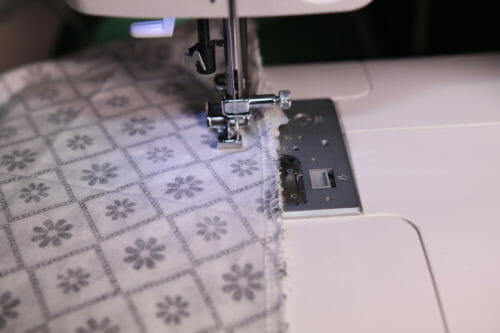
Use your overlocker to finish the seam allowance but don’t use the knife unless you have to so we don’t reduce the size of fabric before fitting. I prefer to do this before I sew the zipper because I find it hard to do it at the end when the zipper is already in place. The lining will not cover to the hem of the skirt so the side seam will need to be zigzagged or serged.
Align the top of the zipper face down with the top of the skirt and pin the zipper, aligning the zipper teeth with the tailor’s chalk marking you have done previously (see picture above).
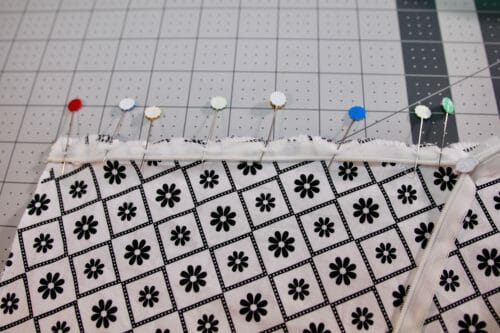
Using your invisible zipper foot, sew the zipper in place using the left-hand groove of the zipper foot. For more information on how to use your zipper foot, please check out this article.
Still working with the zipper right side down, place the fabric upside down and align the teeth with the tailor’s chalk. Pin the zipper and sew.
Use the right groove of the invisible zipper foot.

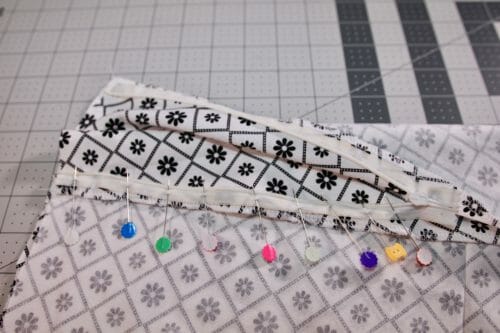
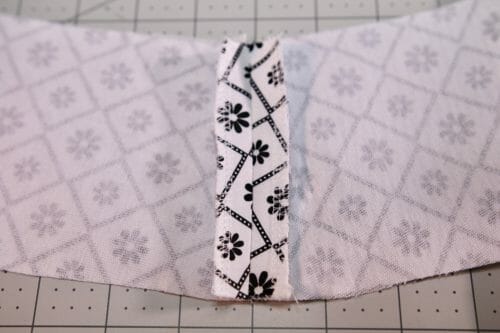
Change your machine to a normal zipper foot. This is necessary so we can get as close as possible to the zipper and still sew the side using the chosen seam allowance. In my case, the seam allowance is 5/8″. Right sides together fold and sew the side starting where you had to stop sewing the zipper. (see picture above)
Sew all the way to the hem and then iron with the seam open.
Sew the other side of the skirt and iron seams open as well.
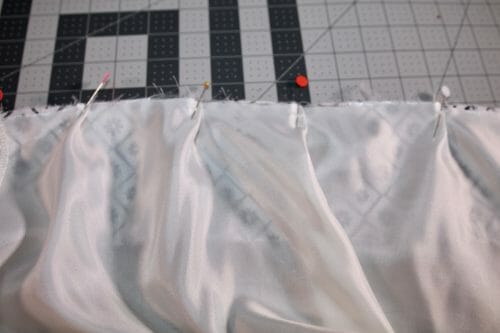
Step Four: Making the pleats
There are 6 pleats on the skirt, three in the front and three in the back.
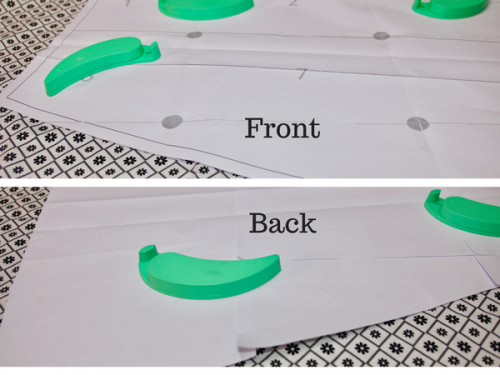
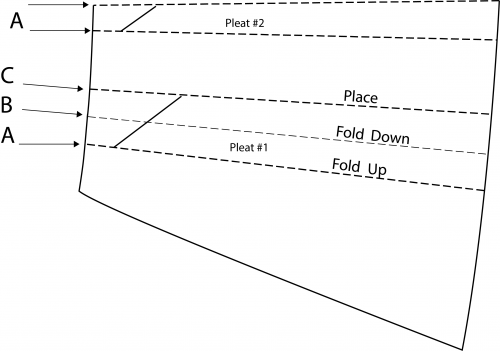
The picture below shows you the skirt on the fold. Starting on the right-hand side of the zipper. Fold line A up to line B, (B becomes under pleat). Place A/B on top of C.
This is when you will be making the first fitting. I will explain in more detail in Part Four.
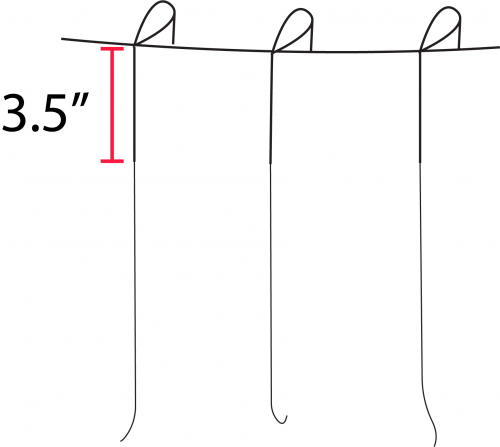
Sew the pleats down 3.5″ from the waistband.
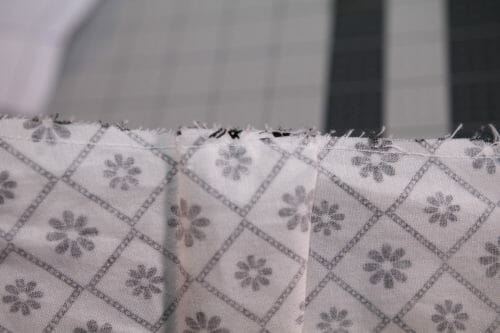
Fold the pleats from left to right and topstitch at 1/4″ to keep in place.

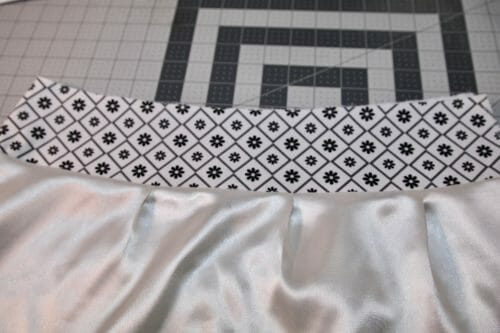
Step Five: Sewing the waistband to the lining
Apply woven or non-woven fusible interfacing. If you are using woven interfacing cut the interfacing following the same gain line as the facing.

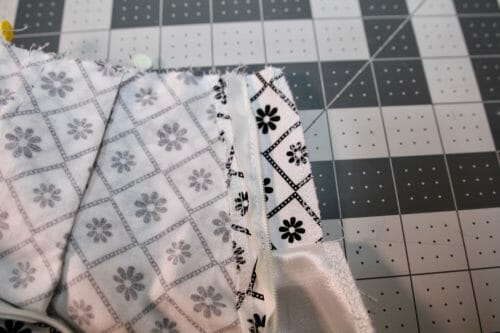
Place the print sides together, sew the right-hand side of the facing.
Open the seam and serge the seam edges open. Iron.
We will work on the lining now and you will have to join right sides together and sew the left side of the lining at 5/8″. In other words, don’t sew where the zipper is supposed to go. Serge with open seams, then iron.
Join the facing to the lining by first pinning the side seam, right sides together.
Pin the other end of the lining and the facing together. You will notice the lining of the skirt is a fair bit bigger than the facing, this is so when you sit down the lining will not crawl up your thighs.
Make a few pleats between the side seam and the zipper on both front and back of the lining and sew at 5/8″.
Serge the seam allowance and iron the facing and the lining.
Step Six: Attaching the lining to the skirt
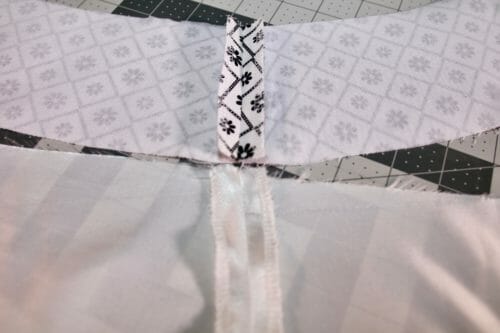
We will work with the skirt right side out (print) and the lining wrong side out, or right sides skirt and lining facing each other as shown in the picture below.
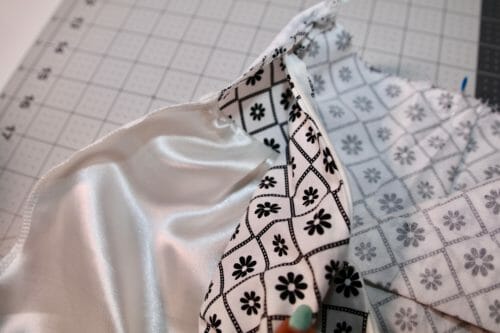
As before, we will start by aligning the side seams of the skirt with the side seam of the lining. Continue pinning from the side to the zipper.
When you get to the zipper, wrap the facing around the zipper.

Sew at 5/8″. Keep a strict seam allowance at the ends where the zipper and the facing meet since this will be visible once you turn the lining inside.
End of Part One of the Easy Pleated Skirt sew-along. Check out the rest of the parts by clicking the links below.
- Part One: Print, cut and sew the skirt and pleats.
- Part Two: How to sew a skirt lining with an invisible zipper.
- Part Three: How to make pleats and hem a pleated skirt.
- Part Four: How to fit and alter the pattern to make the skirt bigger or smaller.
If You'd Like To Support Our Site
If you want to help us continue to bring you a wide selection of free sewing patterns and projects, please consider buying us a coffee. We'd really, really appreciate it.
I don’t really understand where the smaller pieces should go?
I don’t really understand where the smaller pieces should go?
I don’t really understand where the smaller pieces should go?
Thank you so much for the diagram showing how to assemble the pattern pages, I don’t think I would have been able to put it together otherwise! I do have a question about layout instructions. You advise reversing the skirt back pattern, but this seems to mean a non-directional layout. I prefer to lay all my pattern pieces as if the fabric is directional. Even a solid color fabric can be directional, for example napped (velvet, corduroy or a satin might take the light differently). Any suggestions?
I too have a problem with the pleats on this skirt. I just don’t understand how to fold the pleats. If someone could help me with this, I would appreciate it. Also, why is the lining so short?
Lovely pattern. I’m planning to combine it with a bodice to make into a long dress, but will sew up just the skirt first to see if it works – looks good on me and can be adapted to my satisfaction. Question: if you reverse the back pattern, the fabric for front and back will be in two different directions. I always lay out the pieces one-directional so the nap or shading (if there is any) will go in the same direction, top to bottom, on all parts of the garment. Is this reversal absolutely necessary or can it be avoided by being very aware and careful in construction? It should make more sense once I’m actually working on the test skirt.
I’m looking at the direction for the pleats: Do I understand that each of those lines A and B actually create 2 pleats, B being a half size pleat that gets hidden when AB gets folded over to line C?
I tend not to make anything; but I sure like to understand the directions because I teach sewing. That little piece is a facing; I’d use a lining no matter what fabric I used (much better body/protection for the main fabric); one presses the seams open, not irons them open–big difference!
Hi Carolyn English is not my mother tongue, so i thank you for your corrections, Kind regards, MC
Hello, I’m looking to sew a cute skirt like the one here. I have a question, a quick one. I haven’t downloaded the pattern yet but am wondering if there are any “ease” measurement built in to the pattern? If I use the medium and it has some sort of ease built in, it may swim on me. Not that I’m a slim person all over, but that might be sticky point for me. I would need to downgrade it, so to speak, but knowing the ease might help. Thanks!
Hi there, I LOVE this skirt pattern and used to wear it when much younger in my 20s and 30s. Problem is I’m much older now, in my 50s and (still) super short. I also easily look chubby plus the added weight acquired over winter/covid.
Will this still suit me? What pattern would you suggest and would you suggest full length or shorter?
I just made this over the weekend as the very first skirt/clothing item I’ve ever sewn and it turned out adorable!!! I know you recommend not doing this as a very beginner project but I decided to take a stab at it and I am so happy I did. Going through this taught me a lot and I am so much more confident now with reading basic patterns and my general sewing skills. Thanks for this awesome sew along 🙂
APRIL I have learned over the years of blogging not to assume anything so I do not recommend it for beginners because some people just don’t like to figure things out and rather have everything done for them, you clearly are on the other side of the fence I encourage you to continue to challenge yourself you will go far…I have not dought you have the right attitude if you have Instagram do a #soseweasyoffical and I am sure to follow you and take a look at your skirt. It would make my day!
Thank you for this! I am wanting to make a linen-viscose summer dress and wondered whether I could use this, but do like the opposite of slash and spread to get rid of the pleats? They really don’t suit me… And also I’m a size xs so I could use some advice on how to make it smaller. Thanks ❤️
Hi Mathi, I am afraid I do not understand your question. You want a skirt with no pleats?
Yes, but I liked the silhouette of it. I’m thinking I might just do a 3/8 or half circle skirt instead. Thank you for your time
No thank you! I will add your suggestion the list of things to do. The important thing is that you know what works for your body.
Fantastic! Thank you. Looking forward to trying this out this week.
Show me how it turns out, got Instagram? use #soseweasy and I am sure to follow you.
I really like this pattern but as always I am between pattern sizes and I have never been confident to make a skirt with a zipper because of that. Either too small or too large. I lost my sewing buddy and miss throwing questions off her. Suggestions?
Being between sizes is not a major issue. I myself and that way, all you have to do is take the two sizes and trace between them, that is all. Make the skirt in a cheap fabric to test the fit make all the changes then transfer then to the pattern. I have to say it is a bit of work, but in the end, you will have a skirt that will fit you and you will be able to make many more in different prints.
Too, I like pattern piecing to check sizes. I tape the edges of my pattern with dollar store tape, pin the pattern pieces, put them on/against my body and figure things out before cutting fabric.
Love this pattern. Can’t wait to try it. Thank you.
Love the easy instructions,can’t wait to try it out
Wanting to thank you for sharing this nifty skirt pattern. I look forward to putting it together.
Now, to get these instructions printed out without off the extra fluff. 🙂
It is my pleasure!
I find that skirts and pants suit me best (apple shape) if they are slightly below my natural waist, and just under my belly button. Any higher I look pregnant (when I’m not) and lower, muffin top. :- So would I be able to adjust this and lower the waist band by measuring where I would like it to sit and hemming the length?
Indeed you can, and Kudos on knowing your body, it is the key to looking chic, french woman do this so well.
Love the looks AND instructions for this skirt. So, I will figure out how to adjust the size to be able to have it.
That would be a great series btw. Even using simpler patterns — A-line skirts instead of pleats, lol.
Meanwhile, I should be able to get this delightful looking one under the needle.
Bonjour
Merci pour ce partage ;
J’aimerai savoir si on peut realiser ce patron sans les plis ; juste en jupe un peu evasée ? merci pour votre réponse
Mamilou
Salut Mamilou, Oui, je crois. Mais il ne sera pas aussi large à l’ourlet que sur l’image.
The pattern layout for the lining shows it being cut out of the same material as the skirt, but the listing of materials required shows 2 types of material to purchase – one for the skirt material and one for the lining material.
I am having difficulty cutting the lining from 3/4 of a yard and will have to piece it. I wonder, as well, if I’m going to have lots of leftover skirt material.
Am I misreading this?
HI Anne, the smaller skirt at the bottom of the skirt is the lining. Use the lining material for it.
Mayra, this is fantastic! Thank you so very much for being willing to help us..free of charge. I really appreciate your generosity! 🙂
Hi – I wanted to make this skirt with a couple of fellow sewists but we are a little confused. Step 3 begins with “Sewing the zipper and sides of the skirt”. There is no mention of a waistband but later pictures show the zipper attached to the waistband.
Also the pattern indicates that the waistband should be cut on the fold but your pictures show four pieces of waistband.
I would be grateful for some clarification
Jax
Hi, Jax, Kudos for trying this sew along in a group! so much more fun like that! do you have all the parts of the sew along? If you do not need to alter the pattern go ahead and use the ones I have provided. if you need to alter the pattern you need to make a new waistband. The waistband I used for this skirt is a facing. Perhaps you guys are confused with the terminology?
I love this skirt. Are you putting the zipper on the side?
Yes Trish, it is on the left side.
Lovely skirt. Have done sewing before but having problems with the pleats.
Just not getting it.
Would help if you could indicate how many pleats the skirt should have in total.
Also would help having diagram of complete skirt front and back with placement of pleats indicated.Made the notches but seem to have an extra one. Is the centre front notch used only to indicate the centre or its it also to be a pleat notch?
Is skirt right side out or inside out when making pleats? Hard to tell.
I’ve been working on the skirt for 2 weeks and can’t seems to get past the pleats.
Would really appreciate help to I can finish the skirt. It’s just what I wanted.
Thanks so much.?
HI Suzanne, I have an annoying habit of assuming people know what I am talking about, so I thank you for your questions. On picture (technical drawing) number two, I have indicated that the fabric is on fold, so is the pattern this is indicated by the long line with the two arrowheads. Do not forget the notch there (on the fold) because you will need it to make the second pleat. So on the fold there is half a pleat. There are three pleats on the front and three in the back. On Picture 14 I show you I am working on the inside of the fabric. After folding the pleats and before you do anything else topstitch the waist to make sure the pleats do not come away and fit the skirt to your body. Hope that helps, you can always send me an email at mayra@so-sew-easy.com Let me know how you go.
Cute, but WAY too small. If you want to illustrate how a style looks great on all body types, it would be good to make your pattern for all body types…
I agree. I am not good at figuring out how to make it a 2X size. I need the pattern for the size.
Would love to see a YouTube tutorial video thanks.
Shooting it, will be up when done editing, stay tuned 🙂
Oh, having the Youtube video would be so awesome…..looking forward to it….thank you so much!!
Yes Lynette, working on it as we speak.
Hey there
I was wondering if you could send me the link to the YouTube video as I cannot seem to find it
thank you for the free tutorial and pattern. but when i open the link i cannot download the pattern. plaese help
Are you using Adobe Reader? send me an email if you are still having troubles mayra@so-sew-easy.com
This skirt can be made without the lining if the fabric is not see through right.
I agree, however if you are using fabric medium to light cotton such as quilting cotton, a lining will make it look expensive.
Thanks for the pattern! If you are using a mid-weight cotton, is there a need to line the skirt?
Hi Marjorie, if it is not see through, not necessary.
This is a great pattern staple! Thank you! I have an idea, you have so many good patterns; in the future, could you please share some ideas in a post on incorporating them into a wardrobe capsule for year round? thanks!
Thank you Laura for your idea. I must say an excellent one. I will do this, I am missing some palazzo pants, shorts and evening dress and a swimsuit though….
love it, but wish it had pockets. I’ll add them when I make this.
HI Cynthia, I will cover this, at on a different post.
please
Fabulous skirt and instructions, so very much looking forward to the pattern for waist 24 inches.
Yes, I will show you how to alter the pattern to get there, stay tuned:)
I am very thick waisted, will we be able to alter this a bit larger in the waist?
Sure thing!
Wow! Thanks for the free pattern!
I’m going to make this….but for your next project how about how to make pants or a nice pair of walking shorts.
Hi Frances, thanks for the suggestion, they are both in the pile line!
I love this pattern,Mayra.Can’t wait to see next week’s tutorial!
This is not available in small?
I will teach you how to do it. Stay tuned 🙂
Oh thank you! This will be my first skirt. I can’t wait!! (^_^)
Thank you so much…what a generous thing to do! i am so excited to be sewing along with you. I have some beautiful linen that I’ve been saving for just the right project.
Linen would ne my first choice!