


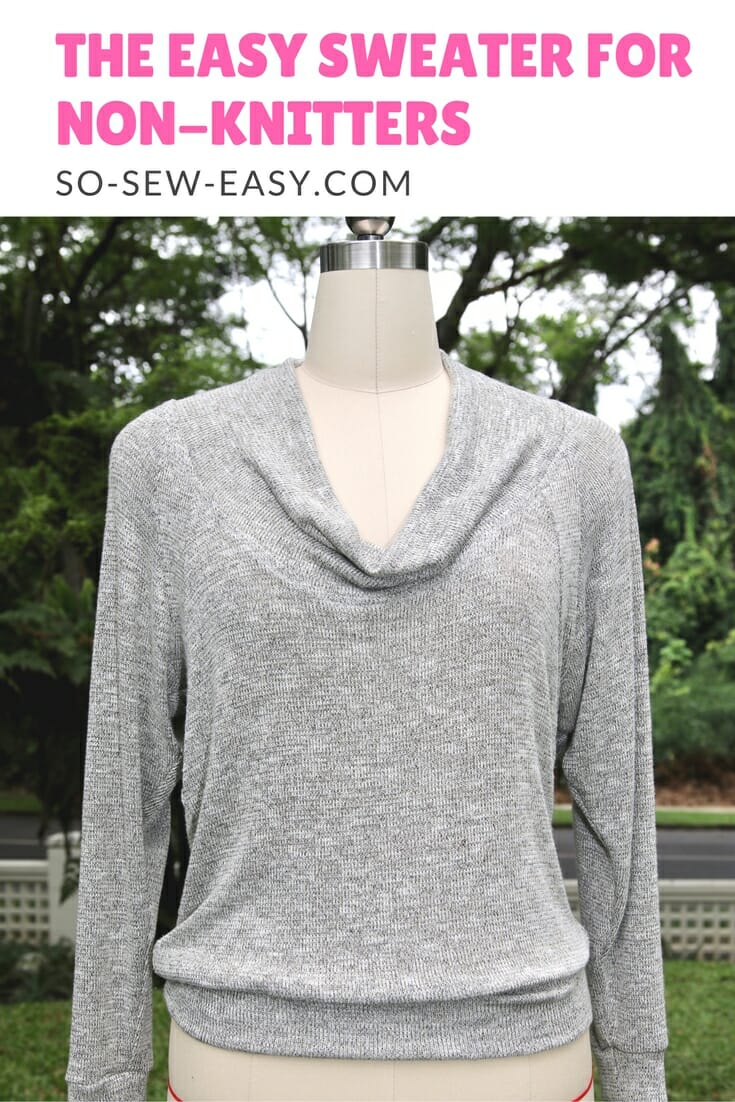
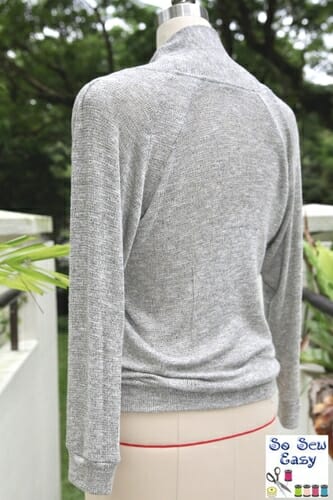
After many reader requests, I wanted to come up with a design for an easy sweater pattern for non-knitters. Knitting is one of my passions but, since I started designing at So-Sew-Easy.com I have had no time for it at all. But I do miss knitting. Often, I think of a dress or a top and I could picture it in my mind on a knitted kaleidoscope of colors. I love the fresh look of a soft cotton long-sleeve knitted top, even in summer you can pull this look. But winter is a special time to wrap yourself in a comfortable but elegant knitted top that won't break the bank. If you are lacking in time like me, here is an easy sweater pattern for non-knitters.
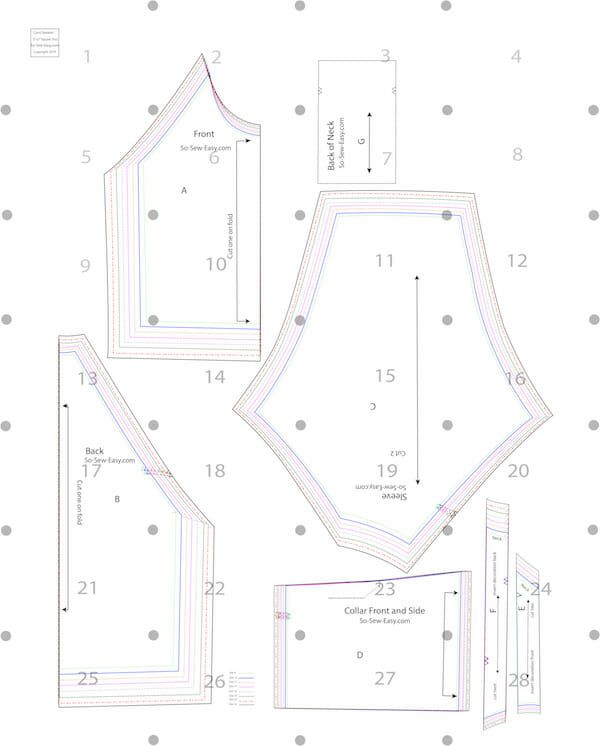
This is an easy sweater to make, however, you do have to pay special attention to the pattern markings and the symbols on the pattern. There are seven pattern pieces, plus two more you'll need to draft yourself depending on your size. To save paper and time I have not done this for you. These pieces are rectangles that will become the ribbing added to the cuffs and to the hemline. These pattern pieces are very simple to make and would be good practice if you're just starting out in sewing and patternmaking.
Key Features of the Easy Sweater Pattern:
- Easy to wear and make, yet elegant.
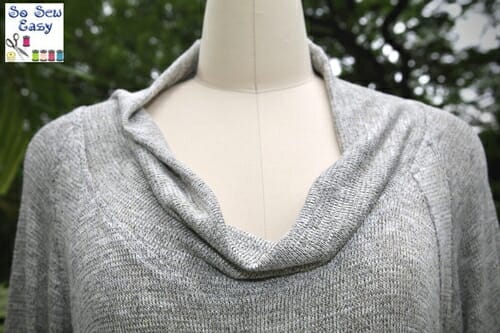
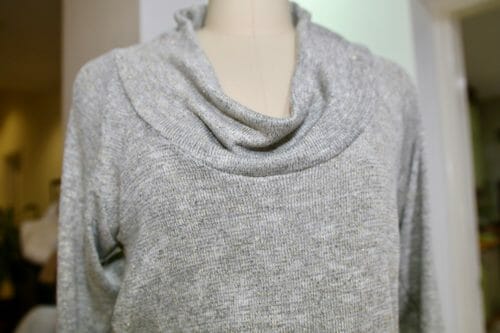
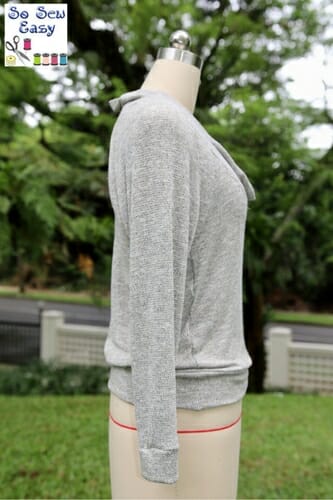
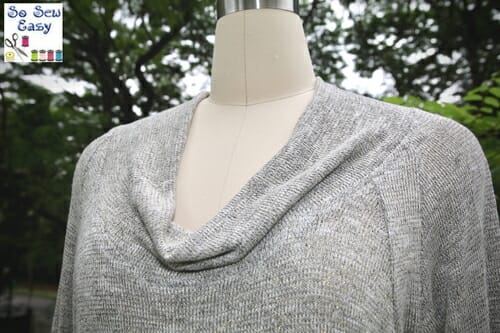
- Casual kimono style sleeves and a draped neckline that is easily adjustable should you require a more modest cleavage.
- Can be worn off the shoulders.
- Perfect for a stroll in the park or tea with friends.
- Drapes well hugging your curves but not adding any bulk.
Materials
- Sweater knit fabric (1 1/2 to 2 1/4 yards 60″ wide depending on size.)
- Thread to match
Tools
- Sewing machine
- Ruler
- Pencil
- Ball point sewing needle #9
- Scissors
Sizing Measurements

Recommended Fabrics
Pattern Download
You can download the pattern for this Easy Sweater Pattern for Non-Knitters from our account at Payhip.
For help downloading and printing PDF patterns, please CLICK HERE.
Pattern Pieces
Please note: There is no seam allowance for the pattern. I recommend a 3/8″ seam allowance if you are using a 4-thread overlocker and a 1/4″ for the ribbing.
- A: Front -Cut on fold
- B: Back -Cut on fold
- C: Sleeve -Cut two (2)
- D: Collar -Cut on fold
- E: Insert front -Cut two (2)
- F: Insert back -Cut two (2)
- G: Back Collar
- Ribbing for hipline -Cut two (2)
- Ribbing for cuffs -Cut one (1)
Pattern Layout
Step One: Sew the inserts
The inserts are two pieces. One insert is shorter for the front and one longer for the back.
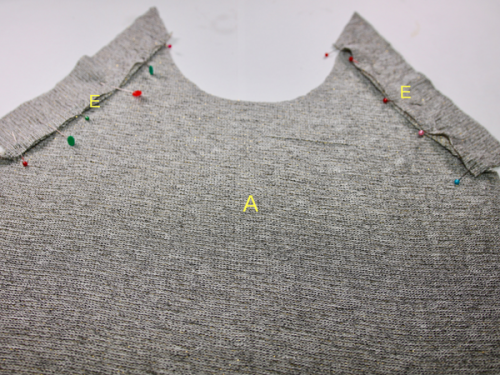
Take pieces A (Front) and E (insert) and pin right sides together. I have marked the pattern piece so you know what way goes to the neckline. Sew at 3/8″.
Take pieces B and F, pin to both sides and sew as you did previously. Use your serger or if you want, zigzag the seam allowance. Put aside.
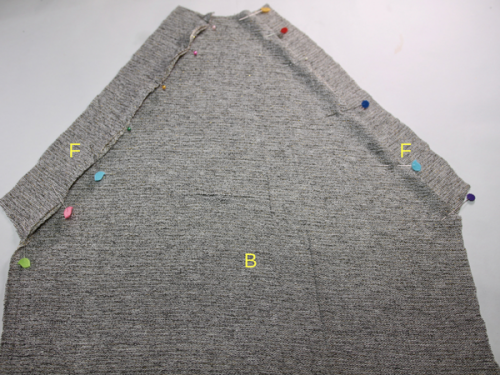
Step Two: Sew the sleeves and sides.
I recommend you pin both sleeves first then sew both at the same time. This is to reduce the risk of the fabric unraveling or losing shape due to excessive handling.
Place the back wrong side up. You will know you have it right because you can see the seam allowance. Pin the front of the sweater to the other side of the sleeves.
Sew the sleeves to the back and front inserts.

Pin the sweater right sides together and sew at 3/8″.
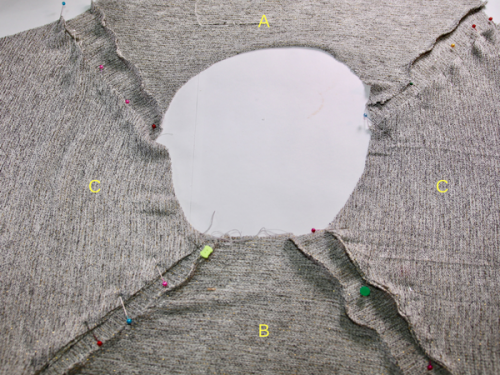
Step Three: Sew the collar
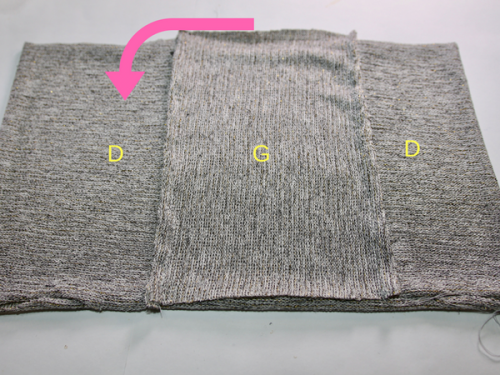
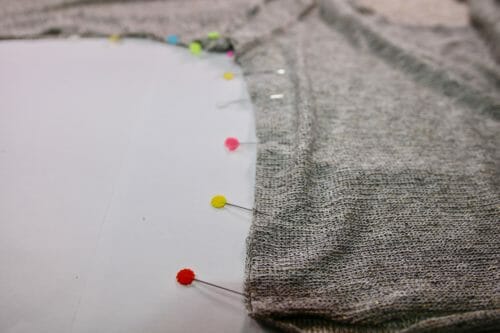
Pattern piece D represents the collar. It is cut on fold which makes a piece long enough to be attached from the front all the way to the back insert (F) and the sleeve seam. Take pattern pieces D and G and sew at 3/8″. It is now a band. Keep seam allowances open. There is a notch on the pattern to let you know where the halfway mark is. Fold the collar in half. Remember to keep the seam allowances open.

Mark the front and back. Align the front and back and the notches provided on the pattern. Align the front of the collar with the front of the sweater.
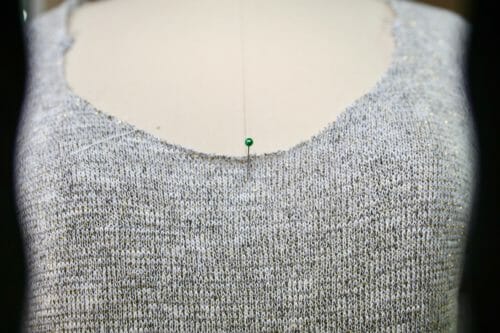
At first, the neckline will appear to be too big. Mark the middle of the front of the sweater.
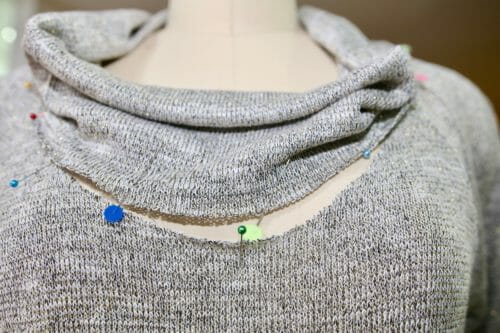

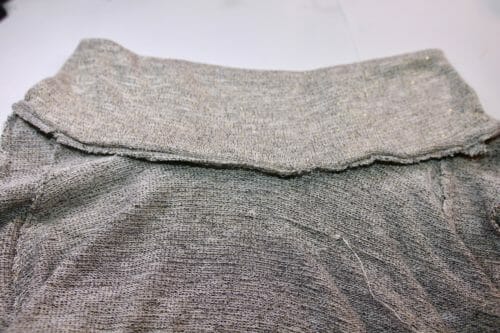
Align the notch on the collar to the front insert (E) and sleeve (C).
You may have to pull the collar to fit the neckline opening just a bit. Zigzag or serge the seam allowance.
If you find the seam allowance standing up just stay stitch it to lay flat.
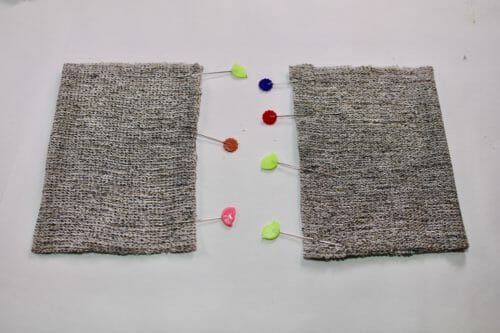
Step Four: Make the ribbing for the easy sweater
Hipline ribbing: The hipline ribbing is composed of two pieces: front and back. When we sew these pieces together the seams will match the sides seams of the sweater.
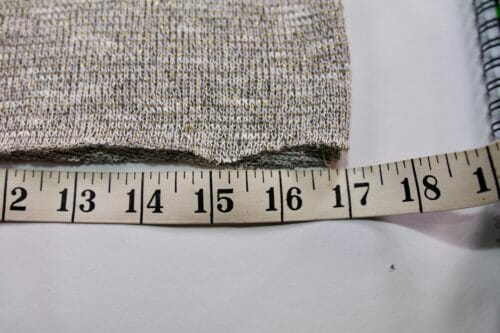
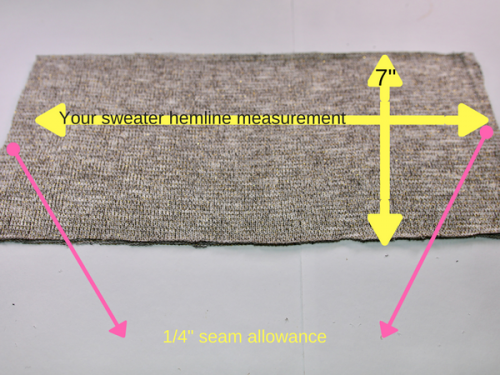
Measure the hemline of the sweater. Create a rectangle that is 7″ x measurement of the hemline – minus 2″= hemline ribbing. Please add seam allowance on each side. In my case, it is 34″ plus the seam allowance of 1/4 x 2 = 34 1/2″. My rectangle then will be 34 1/2″ x 7″.
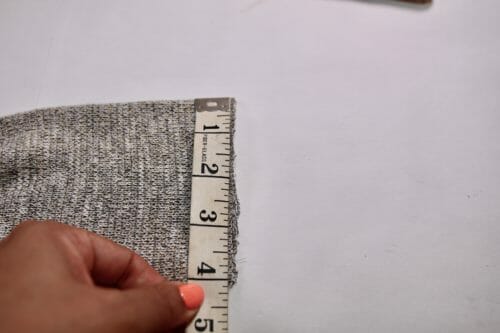
Cuff ribbing: We need two pieces for the cuff ribbing. Measure the hem of the sleeve. Draw a rectangle that is 5″ x the measurement of the sleeve – 1″= cuff ribbing.

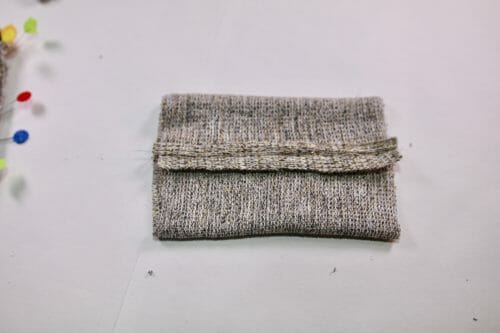
Step Five: Attach the ribbing

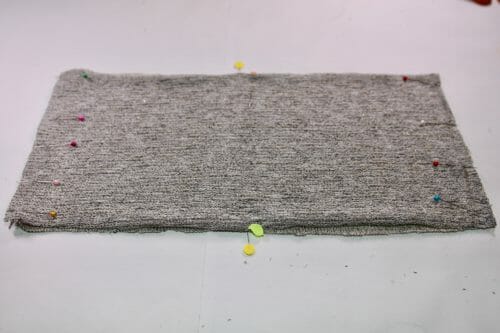

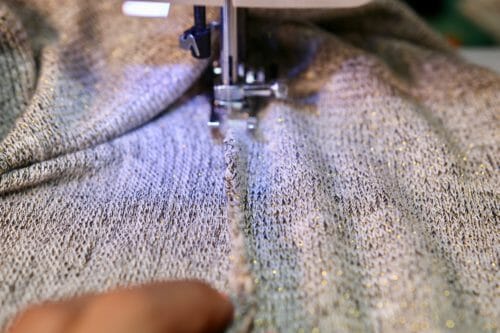
After cutting the ribbing sides, mark the center on both sides. Sew the ribbing band at 1/4″. Open the seam allowance and fold in half. Lay the sweater and align the sides seams of the sweater and front and back of the sweater and ribbing.
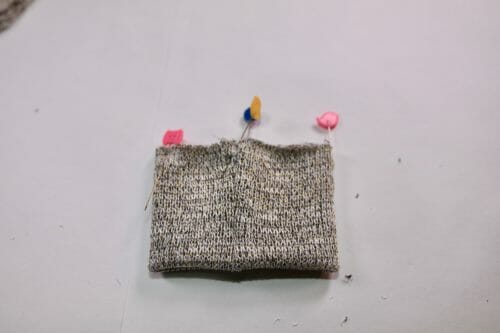
Pin the side seams of the ribbing to the side seams of the sweater. Pin the middle front of the sweater and the middle back of the sweater. You will have to stretch the ribbing to meet the four points. Sew at 3/8″. Zigzag or use your serger.
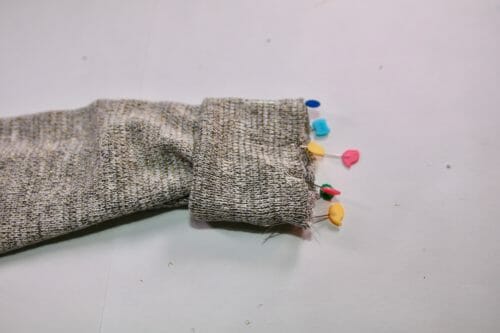
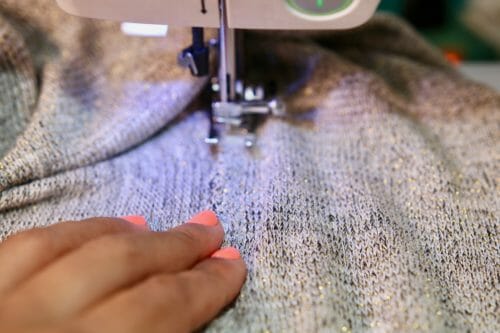
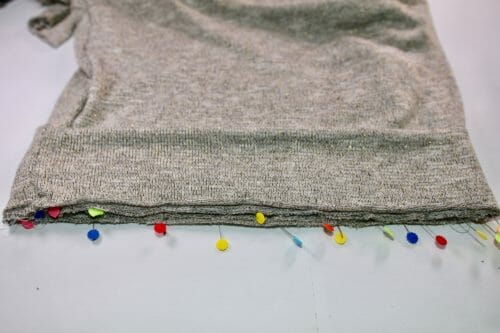
Repeat the same procedure to the sleeves. Sew at 3/8″.Open the seams. Fold the cuff keeping the seams open. Align the side seam of the ribbing to the sleeve.
Sew at 3/8″. Zigzag or serge the seam allowance.
I think this easy sweater pattern will answer a few of the requests I've received recently. It is casual, yet elegant and good enough to wear with a nice skirt and boots or a pair of jeans and sneakers, jeans and heels, heels and shorts. It is one of those tops that can be a great traveling piece. Hope you enjoy it, let me know how you find the tutorial. Until next time!
If you have a couple of rectangles of fabric left over? Why not try to make a headband that will only take you 15 minutes to sew.


Loving it all.
Definitely a thigh long sweater to wear overojeans
I love the style and apparent ease in making it! I’ll give it a try.
I think this will be a slam dunk for anyone I don’t have a gift for. Was looking for a pretty easy “sweater/sweatshirt” but this actually is dressier and will be perfect. I am going to stash bust right now. Thank you for this freebie it is a dream.
Love this!! It’s just what I was looking for!! Do you think this pattern would work well for a stretch velvet too? I may give it a try. Thanks for so many lovely, free patterns – I’m having a great time practicing my skills. Happy Holidays! Anne
I agree with Cheryl, and thank you for sharing your talent with us. A couple questions about the pattern, please. 1. Is the chart of sizes and measurements: body messurements or finished sweater measurements? 2. Is the equation, for the hip ribbing, pattern piece length—sweater hem measurement, minus 2″, plus seam allowance. (for your example 34″- 2″=32″+ 1/4″+1/4″=32.5″. Or have I misunderstood your example and am confused? At any rate–enjoy the holiday season and may God bless all of you!
It looks to me like it should be 34 – 2 = 32 +1/4 inch hem x4 (seam on each side) = 33 inches.
This is what I was looking for. Ladies you are awesome !
Thank you. It’s looks like a great sweater to add to my favorite things to weare. I am going to have to give this a try.
This looks so easy I can’t wait to try it, thank you.
Thank you very much for that pattern! It looks fabulous! Can it also be sewn with a thin jersey? I don’t have a knit fabric on hand, but this looks so great I would like to try it right away!
Thank you again
All the best Dana
Thank you, so pretty. Isn’t that hard to work with?
Thank you, ladies, for taking the time to post this wonderful collection right in what’s got to be a really busy time for you. May your holidays be filled with laughter and love, Merry Christmas and a fabulous New Year. Cheryl
Last update: made the Easy Sweater for non-knitters again wider on the hips AND made an insert in the neck, because I only wear sweaters when it’s colder. It’s so much better now!
Very Beautiful! I like the insert great touch!
Thanks Mayra, I’m now very happy with it!
Ouf, after quite some frustrations I finished my easy sweater for non-knitters. After being warned about the low neckline I made it a bit higher, but I still think it’s too deep. The biggest problem was the size of the hips. Mine are 112 cm. which is (after several times of checking) 44″. That would mean that even US-size 14 is bigger. I choose to use 12 for the upper part and almost 16 for the hips, but it still was much too narrow. I made some extra pencil-shaped insert from under the arm till the hipline from 6 cm (ca. 2,5 inch) but it still is quite narrow in my eyes. Nevertheless: it’s wearable now. I’m sorry, I can post only one picture.
Hi Marion, you look fantastic! Love the fabric!
Hallo Mayra (what a nice name!), I just printed out your nice pattern, but I wonderd about the collar: is the neckside double or just another part cut out in another direction?
Hi Marion, we have almost the same name I believe both mean the same 🙂 The back piece is cut in a different direction, that was a mistake I made when cutting the pattern and I realised I did not have enough fabric to make a band that went around the whole neckline, so I cut the pattern instead to accommodate for an extra piece. Like my teacher used to say there are no mistakes in designing just change the drawing, feel free to tape the pieces together and create one band that goes around the entire neckline. Kind Regards,
I have been wanting to try sewing sweater knits for a while, and this pattern got me motivated to try. Overall I found it much easier than I was expecting.
I have made two sweaters from this pattern. I am generally a small in ready-to-wear and a 12 ( with modifications) in most pattern sizing. The first sweater I made in a small generally fit well, thought the neckliine was a bit low (but not immodest, my husband thought it was fine!) and the sleeve length was a bit shorter than I prefer. For the second sweater I made the front neckline (at the collar seam) 1/2″ higher and lengthened the sleeves 1″.
I sewed both sweaters on a 4-thread serger. I recommend using a rotary cutter when cutting sweater knit fabric. It reduces fraying.
Thank you for your feedback, I am happy you got to make two sweaters. It is easier to work with knits than people imagine.
Kind regards,
Mayra
Just bought the fabric and printed the pattern, as a beginner I hope the cami will turn good . thanks to your instructions it will make the work a lot easier.on your fitting chart you posted the sizing from 8 and up but I need size 6 do I cut size 8 on the pattern without adding the seam allowance thanks in advance
It can work as long as you use the fabric I have suggested and you are a true size 6.
What a lovely sweater.. Now I just need more time to sew to make all the pretty projects you have on this site… and I just entered the sewing machine giveaway too.. it would make a wonderful Christmas Present for me…
[…] post Easy sweater pattern for non-knitters: Let’s call her Cami appeared first on So Sew Easy. Written by Mayra at So Sew […]
Thank you for the pattern and tutorial. Appreciate you for sharing so many great patterns.
This sweater knit top is just too adorable. I just saw a beautiful dotted knit fabric that I think would be perfect for your pattern, but can’t figure out how much yardage I’d need, if it’s 58″ wide.
Hi Nancy, please print the pattern and place it on the fabric you intend to use. If ordering online use the same width of fabric to work it out. It really changes from width to width and size to size. I just do not have enough time to work out everything for you. But, I will apreciate if you let me know how much it took so I can amend the post. Many Thanks in advance. Mayra
Really love the style of this ‘sweater’. I also love to knit, but mostly small stuff that I can travel with and doesn’t take too much time. I have some knit fabric in the stash that should work quite well for this. Thanks for so generously sharing this appealing sweater.
Thanks so much (again), when I can get back to sewing I’m going to make one with some merino knit I have stashed, love this style 🙂
Please, please share a picture. would love to see it with such a great fabric.
Kind Regards,
Mayra
I have downloaded your pattern. I see that the download is only for pattern pieces. Is there a way to download and print the tutorial?
Sorry Ginger, I literally just run out of time.
Ginger – you can use printfriendly.com to format this (and other tutorials) as a PDF. It comes out as 4 pages but there are nice pictures and there are no ads, etc. to deal with. It’s a very VERY handy tool to have.
Thank you. I am very glad to have this new tool.
Thank you. The pattern is nice and your instructions are wonderful. This was very generous of you. I think people are having trouble navigating because of the number of pop up advertising through out your wonderful post.
Hi Barbara, thanks for your feedback. We actually don’t have any pop up ads in our posts. There are some ads in the post text as you’ll on any free site or any newspaper. If you’re getting any pop ups, suggest you clear your browser cache.
It’s a beautiful sweater and one I’ll be making over and over again. Thank you so much!!
You are welcome Lucy!
Oh Mayra, Thank you very much. I recently bought some beautiful sweater knit from London, hoping I would have the time to search for a pattern. You saved me hours. As soon as the holidays are finished, I am sitting down and making my “Cami”
Happy Holidays.
Peg
I hope you share a picture with me, I am very curious to see what you found in London.
It’s just beautiful. I have the perfect knit to repurpose for it. I am a new sewer and new to using download patterns. When you wrote that pattern didn’t have seam allowances, does that mean I need to add them when I trace the pattern on to my fabric? My other thought is that you might mean the seam allow is included but not marked on the pattern pieces. Thanks for clarifying.
M
Yes, you need to add them. I suggest you print the size you require then add them on the paper rather than the fabric.
Thank you for the pattern.
You are welcome Pamela!
I think it looks great. However I live in Australia and print on A4 paper. Does this make any difference to the pattern piece sizes?
No, you can do it.
Can’t get to page 2
Here’s a direct link: https://so-sew-easy.com/easy-sweater-pattern-non-knitters/2/
this is absolutely fantastic …i don’t knit so this is a great way to have the look ..thank you very much….
You are welcome!
I see the size chart, but I can’t seem to find the yardage chart for each size. This is really cute.
I, too, was wondering where the yardage chart is. I just see a range of up to 2 1/4 yards, but no mention of how much for each size.
I would like to know this too.
Really cute but I cannot get the download to work-goes to a page r.rfm(1×1) that is blank-I will try with a dif computer and browser and see if that works
I was able to download the pattern using my Craftsy account so its all good-thank you for the pattern!
Hi Karen, here’s a link directly to the download page: https://www.craftsy.com/sewing/patterns/easy-sweater-pattern-for-non-knitters/469652?SSAID=1217208&sasClickId=c1k0_9wet3
This looks so amazing especially in camel color.Just when I think Im done with one project. Will definitely will try this out after I make the tunic you have posted for my vacation. Thank you for sharing this pattern. Will pot my results
“post”
Looking forward, please do share!
Thanks for this great pattern! I have the perfect sweater knit just waiting for this. You say the cowl is easily adaptable for less cleavage. I always have the problem with coals. How do I adapt it? Where do I shorten or fold or …adapt? I am not good st visualizing so I love details. This is my Christmas present for myself-thanks again! Lynl
HI Lynl, If you noticed I did not add seam allowance to the sweater because I am writing a tutorial on how to used this pattern to alter the fitting. it will come out next year and it will be only for the people who have regester for the forum. So hang in there very soon I will be sharing fitting lessons with you.
Kind Regards,
Mayra
Just printed the pattern and will be making it soon! Love your work, patterns and tutorials
Hi Myra, Did you do a tutorial to alter the fitting for this pattern as I would like to amend the neckline? I am registered for the forum but I have not seen anything. Thanks Marion
Hi Marion, no I have not had a chance to do this yet. So much to do, so little time, sorry!
I have looked everywhere on this page for the pattern but can’t find it. HELP
Hi Tamara, the pattern download box is at the top of the second page. The pages are divided as it would simply be too large to load the whole tutorial into one page. The page numbers are at the bottom of the post above the comments section. You can just follow the link below though. Happy sewing!
https://so-sew-easy.com/easy-sweater-pattern-non-knitters/2/
Thank you so much for the reply. Just starting to sew clothing. I can’t wait to try this.
This sweater is so cute! Very similar to one that I wanted at Kohls and now I can’t find. I can’t wait to try this pattern. I will post my results. Thankyou!!!
Love this sweater and I have the perfect fabric for it!! I will be cutting this out very soon. What is the purpose of the narrow inserts between the sleeve and front/back? Is this decorative or does it add to the fit somehow? I am learning so much about patterns. Thank you for all you do for us sewists!
HI Nancy, the bands are part of the fitting so do not take them out unless you know how to proceed without them. Originally I wanted to add a band of swarovski sequins to it, but realized I ran out of time and could not find them.
I think the bands are great and are just right for using an alternate fabric. I can’t wait for your fitting tute as I do have problem’s with fitting. When cutting ths pattern, do I add my own seam allowances?
Yes, Nancy please do add your own seam allowances
What a nice idea. I like the pattern. Would it be possible to include cm for inches in the chart above?