


 The Red Prom Dress is the first of a series of free (for now) patterns for prom dresses that I'll be sharing with you this year.
I have based this pattern on the minimalistic 1990's decade when strong shoulders and legs were “de riguer” assets (de riguer = required by current fashion).
Recently, according to the analytics more of the younger audience is clicking on this site. The 17 to 19-year-olds count for 18% of our traffic as of today. I'm delighted that this age group is starting to find the sewing machine a useful tool to express themselves. At such a young age, I hope a few will be capable of overcoming the fear of cutting fabric to make a prom dress. So welcome, I hope you stay awhile and find this tutorial useful!
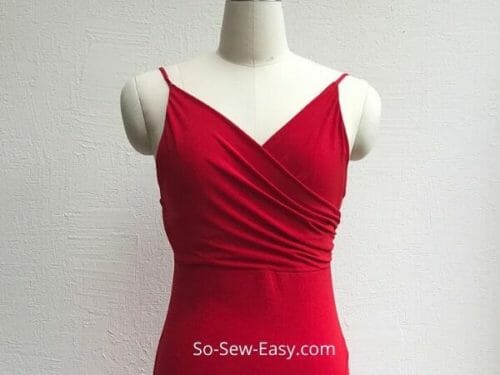
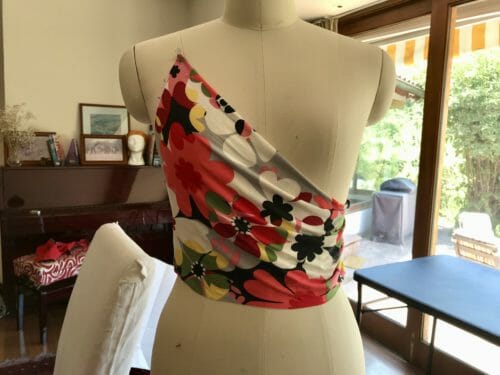
Any red prom dress is definitely not for the shy girl, and this one is no exception. This is a high waistline fitted dress, to accentuate the smallest part of your body. Also, the v-neck self-lined front will elongate your neckline.
The gathers can be worn over the breasts or
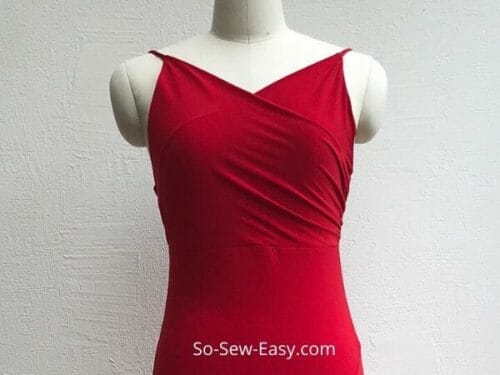
under the breast depending on how much cleavage you are willing to show. Elegant gathers on the sides to add support at the bust line.
There's a bra strap to adjust according to your body needs.
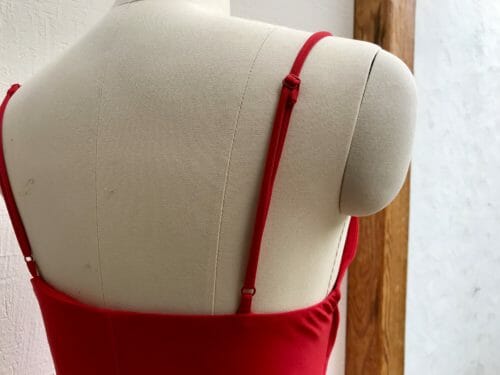
bra strap
A Bit Of History
Prom night goes as far back as the 1890s, with some colleges holding “promenade balls”. A practice that started in the northeastern USA particularly among sex-segregated schools. It served as a great opportunity for a young man and woman to meet, dance, and perhaps date culminating in marriage. Ah…..the good old days, so much more simple.
The trend later got picked up by the high school crowd, becoming a symbol or a right of passage at a time when leaving high school meant you were ready to take on the world, find a job, get married or join the army. It wasn't until the 1950s that “prom night” became a fancier dance with the classic 1950s dance dress that we so much adore today.
Materials
- Four-way stretch jersey with a 50% stretch
- Double point needle, size 70 or 80
- Thread to match
- 16-19 inches of 1/4″ elastic
- One pair of bra straps
Tools
- Sharp scissors
- Sewing machine with a small zigzag
- Serger
- Cover stitch machine is ideal but not essential (advanced seamstresses only)
Sewing Skill: Confident Beginner
I have made this pattern so that a beginner can make the dress. However, there are a few tutorials you must read before starting to work with knits if you have never done it before.
Please read the following three tutorials before starting this project, How & Why You Should Do A Knit Fabric Stretch Test, Top 5 Mistakes to Avoid When Cutting Fabric, and Sewing with Stretchy Knits.
Who Can Wear A Red Prom Dress?
Anyone. Red is the color of love and power. It is a color that enhances the beauty of a woman and tricks the human brain into thinking you are lovelier and more beautiful than you really are. And if that's not reason enough, there is a perfect shade of red that matches every skin tone.
Fabric suggestions from Amazon.com
Body Measurements
| Size | S | M | L | XL |
| Bust | 32-33 1/2″ | 34-35 1/2″ | 36-37 1/2″ | 40-41 1/2″ |
| Hips | 34-35 1/2″ | 36-37 1/2″ | 38-40 1/2″ | 41-42 1/2″ |
| Waist | 23-25″ | 26-28″ | 29-31″ | 32-34″ |
How To Download Your Red Prom Dress PDF Pattern
We're going to continue to use the new PayHip Webstore to distribute our patterns. As most readers know, Craftsy (Bluprint now) is changing a lot and they have stopped designers like us from publishing new patterns on their site, so we've had to move to another service.
Our patterns are still free, but now you now have the option of making a small contribution if you like our work! We'd really appreciate it and it will help is keep going with new and fun designs like this. Even a dollar or two really goes a long way. Maybe you don't know it takes an average of 26 hours of work to make a post and that does not include a video.
Thanks so much in advance for helping us out. You can use any credit card and you don't need a PayPal account, although you can use one if you have one.
I used the stacking method commonly used in patterns magazines such as Burda, This method is very confusing for many people but it saves a lot of paper. Use the print by layer method and print ONLY the size you need.
Pattern Download
Pattern Layout

Working Notes: Read all the instructions before starting this project. The pattern does not have a seam allowance. Please add 1/2″ to your muslin then on the final dress use a 3/8″ seam allowance.
How To Sew Your Red Prom Dress
Make a muslin, always unless, of course, you are the exact size as a high fashion mannequin. I am making mine with a fabric that has the same stretch as the fabric I will be using. See my working notes at the end of Step Two.
Step One: Making the bra straps
I have not added the bra straps in this tutorial, so you will have to follow it separately.
Here it is for your convenience:
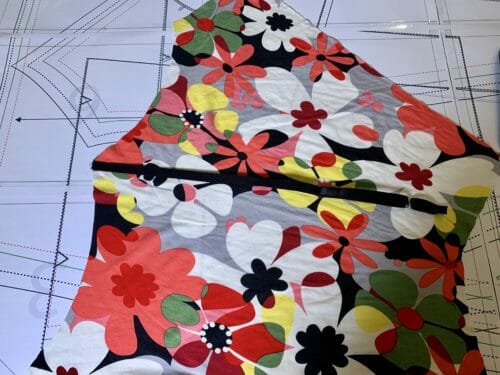
Step Two: Sewing the front right side
The front is divided into two sections that cross each other. So I suggest working simultaneously on both sides. When I mention the front right side I mean on the body, not on the photo. So imagine you re wearing the dress, and that is the right side we are going to begin working on.
Print sides together, fold in the top of the piece. You will notice one side is longer than the other, the longer side is the front and the short one is the lining. Pin the bra strap upside down, where a corner is formed. Align the raw edge of the strap with the raw edge of the shoulder. The strap needs to be placed with the slider upside down.
Fold the top over

Sew at 1/2″ or 3/8″ if this is your final dress.

Step Three: Gathering the side
Gather the side seam, how much you need to gather is exactly done by matching the lining side. One side will have gathers and the other will be smooth.


Working notes: I work using the draping technique on the mannequin. Always using similar properties of the fabric I will be using for the finished product.
If you have seen my Instagram account you would have seen the dress draped on the mannequin. When I am happy with the shape I transfer it to the pattern paper. I sew the dress step by step taking pictures and making a video. This can take me anywhere from 3 to 14 days depending on the project.
Align the top leaving the gathers on the left (on the body) leaving an inch from the armhole. Zigzag using a medium stitch to keep the two sides together.

Step Four: Sewing the front left side
Follow step three. You will notice that the right side will cover the gathers of this side but this is exactly what will give you a bit of support should you choose to wear the red prom dress as a deep V-neck dress.

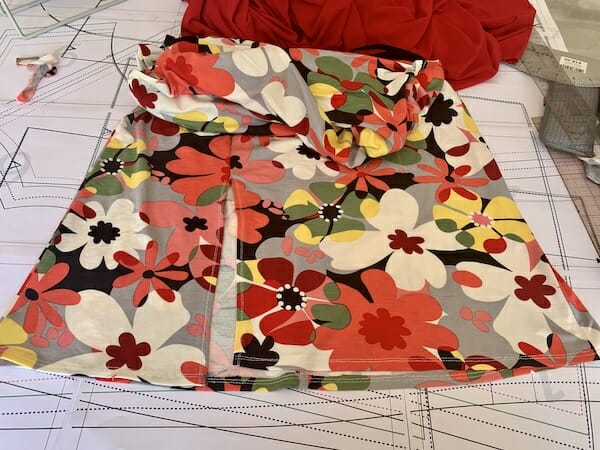
Step Five: Sewing the skirt front
Pin the side panel to the skirt front. Try not to stretch the fabric as you sew the curve. Sew until mid-thigh for showing a lot of legs but do not pass the knee since it will be difficult to walk.

Step Six: Sewing the back
Sew the back at 1/2″. Lay the back flat print side up.
Sew the facing at 1/2″.
Place the facing print side down aligning it to the back.

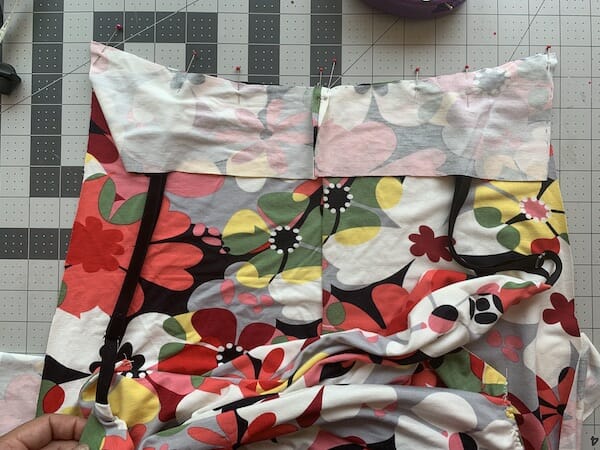
Lay the front of the dress print sides facing with the back and slide the bra straps under the facing.
Notice how the bra strap is upside down. Pin the straps 4 1/2″ from the center seam.
To make sure you have done it right you should have the front and the back of the dress print sides facing each other.
Sew the facing, bra strap, and back of the dress together.
Step Seven: Joining the front and back
Lift the facing off the back and sandwich it in the side front of the dress.

Lower the facing over the front of the dress
 Sew at 1/2″ all the way to the hem.

Step Eight: Sewing the front slit and hemming
Fold the fabric 1/2″ and use a double needle to sew a straight line. You can sew twice at a 1/8″ to 1/4″ distance from each line if you do not have a double-needle. The importance of keeping a straight line can be noticed here. I can see my needle is skipping. I suspect the thread is not very good.

I have repeated the same technique for the hem, folding at 1/2″. And I am done.

I have used a cheap fabric to test my pattern, and have corrected the sequence of the tutorial a few times trying to find the best way to show you how to make this dress. Knit can be daunting for a beginner but in the end, it's by far an easier fabric to use because the fitting is much easier.
Send me your questions with your fitting problems and I am more than happy to write about it.
Our Other Easy Dresses
A Future History Of The Prom Dress
I am writing a post about the prom dress throughout the decades. If you would like to be featured in this article send me your pictures and I'll be sure to use them in the article. Please tell me the date of your prom, what happened? Did you have fun? Did you go with your first love? Don't leave out of the juicy details.
Until Next Time, Happy Sewing!


Hi , a friend would like me to make this dress . How much fabric would i need for a L and how much for an XL ? ( i still have to measure her ) . Thanks in advance
Love this! Could you use a none stretchy fabric with a zipper with this pattern?
No Catherine, sadly you need the stretch to make it work. If you know how to alter patterns, a Ponte de Roma knit would be the least stretchable I would use on this pattern but you would also have to add a zipper to it.
This dress looks amazing! How many yards of fabric should I get to make it in small?
Hi Megan, because of the weird shape of the pattern the amount is 1.5 yards on a 60″ wide fabric. You will have left over perfect for headbands or a tube top.
Thank you so much for this dress pattern 🙂
I love the look of this dress, & really hope that I have some existing thus far unused fabric that will meet the requirements, so I can sew up this dress to wear at the weekend.
I really wish I could have donated something, but I’m rather broke at the moment 🙁
Hopefully I can make up for it by donating next time…
Dear Shanleigh, you can #soseweasy in your Instagram so I can see your dress, that would be payment enough. I hope your situation changes soon…Sending your good energy and many blessings.
I just ordered this and gave a nice donation because it’s such a simple, yet elegant design. I can envision this in many ways. Thanks.