Have You Ever Wondered How to Sew Waterproof Fabric?
There are many uses for waterproof fabric ranging from outdoor furniture, tents, and awnings to sports clothing. Waterproof items are, however, only as good as the type of seam that is used when making them. If the seams on something leak it will be small consolation to know it is designed from a waterproof fabric. Waterproof fabric that will face constant exposure to outdoor weather should be sewn with a flat-felled seam and ultra-violet protected thread.
The following step-by-step sewing details apply whether the item being sewn is a garment or any type of waterproof outdoor item.
Supplies Needed:
- Waterproof fabric like Gore-tex that has been cut according to the pattern dimensions (It is up to the user to select the pattern because there are so many different things made from waterproof fabric.)
- Ultra-violet protected thread (Thread often decays faster than waterproof fabric so this will make the item last longer.)
- Sewing machine
- Scissors
- Iron (optional)
- Straight pins (optional)


Steps for Sewing Waterproof Fabric:
- Put the ultra-violet protected thread on the sewing machine and set the machine on a medium length straight stitch.
- Put the wrong sides of the waterproof fabric pieces together. This is the opposite of what you would do for a standard seam.
- Sew the fabric using a 5/8 inch seam allowance. Do this by sewing 5/8 inch in from the raw edge of the fabric.
- Spread the seam open and cut off the raw edge by placing the thin tip of the scissors 1/4 inch away from the seam line on one side. It does not matter which raw edge you cut off but right-handed people will find it easier to do step 5 if they cut off the right edge and left-handed people will find it easier to cut off the left edge.
- Wrap the longer side of the seam around the shorter side. Place the raw edge right against the seam line and either iron the fabric down or pin it with the straight pins.
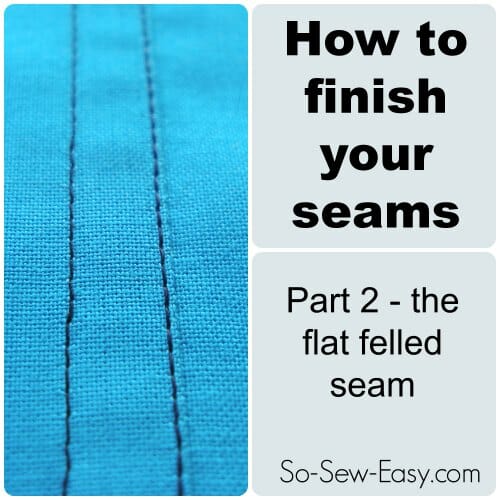
- Sew 1/8 inch from the folded edge of the seam. The seam will resemble the seam on jeans when you finish this step. If you are sewing on a heavy waterproof fabric like canvas you are done. If you are sewing a light finely woven fabric go on to step 7.
- Sew 1/8 inch from the original seam line. This will give extra durability to the seam on a light fabric.
These basic guidelines will create a tight, leak-proof seam on most waterproof fabrics because flat felled seams should not leak. If extra waterproofing is preferred a stick or tube of waterproofing can be purchased almost anywhere that sells camping equipment or sewing supplies.


Have you made anything with waterproof fabric? Please share your experience and even some pics in the comments below!
For more information on sewing flat felled seams, please check out this tutorial:


Can I use Fishing line to darn my raincoat?
Just an additional note:
If your waterproof fabric is coated with a plastic or rubber coating (like some fabric-backed pleathers and some raincoat fabrics), you should avoid using pins to secure the seams for sewing. Pins can leave holes in the coating which will compromise the waterproof surface.
Tightly woven waterproof fabrics without weatherproof coatings, like some ripstops and outdoor fabrics, shouldn’t have this problem as the weave should re-tighten after stitching.
I used waterproof material to make a cover for a small equine carriage. I didn’t make the seams correctly but luckily I had no leaks and it protected my carriage for 8 yes. My next project is to make a cover for my gazebo because I never get more than 2.5 months out of the ones I purchase. They just shred away and it’s getting to be too expensive to buy any more.
To a couple of the comments regarding the stitch actually making it NOT waterproof and the mention of the seam sealer tape / glue…
They work together. You use the flat felled seam to attach the fabric parts together and the seam sealer to seal where the stitch holes are. That makes it waterproof. You can you highly water-resistant fabric (like Gore-Tex) or Sil fabric that is even more waterproof (but not breathable). Finally, you do not need to cut the cloth after you’ve done the first stitch. You can stagger the cloth so you already have the overlap available.
Personally, I think the UV thread is overkill, but for something that will be constantly outside, it is probably a good idea. I’m working on outdoor clothes/packs/etc. I expect my use of them will kill them before the sun does.
I’m confused about how cutting one side vs the other makes it easier for right-/left-handed people. Can you not just start from the other side of the fabric and achieve the same goal?
Finally, I might add that using facebook/google/twitter to log on did not work…
I was after the needle type/size and stitch length actually. I’m making an outdoor tablecloth for a friend’s birthday. Would I use a sharp 14 and maybe 3 on stitch? Or am I way off base? Please help me, thanks, Marggie
It’s a good article I think. I’m just a beginner to sewing, and found it to be helpful for sewing waterproof clothing, but am wondering if you have any articles on heavy duty waterproof canvas for upholstered seating bases? I’ve just discovered this site and it looks to be a good one. Thanks for being here for us all.
Hi Cathleen, are working on a boat or outdoor sitting? if you want something completely water proof sewing is not the way. However if you purchase marine grade foam and water proof fabric it will be able to take water but dry fast. Have you heard of https://www.sailrite.com/ they have the best product to work with cushions I have seen. This is my humble opinion. Have a look at their product.
Wow, thanks so much for replying so quickly! I’m impressed. Actually what’s needed is the material that slides over two dowels like webbing or a “sling” would, for the seating base itself for patio dining set. It’s what the chairs cushions sit upon, instead of springs or wood. It’s how the original product was made, and was simply weakened in the sun and weather. I thought about trying to replace it with the old fashioned plastic tubing or webbing/weave, but decided against it. Do you happen to know of any specific sites that have done this type of work?
I think you can direct this question to Sailrite.com it is a fantastic site with a YouTube channel that is very helpful in Upholstery. Great machines too.
Thanks for your recommendation..
I don’t understand how this is waterproof. I understand how the overlapping folds make the fabric itself waterproof, but then we are piercing through all three or four layers with the needle and thread. Without some sort of sealant in addition to the seam design, I would think it would sill leak if the seam is under any amount of standing water, yes? (like a sagging outdoor rain cover)
True, but this tutorial is not for dry suits, camping tents or canoes, this is for clothing only. People that sew at home do not have the space for the machines to glue the fabric together.
On a picnic blanket should the shiny side be on the outside?
Yes, that is the waterproof side.
The word “waterproof”, does this mean that the fabric is plastic coated like, PUL fabrics?
Yes, that is right, the fabric must be laminated with a thin layer or plastic, vinyl or sometimes Teflon.
The best way to waterproof is to use a seam-sealer tape that is ironed on over the seams. Pins should not be used because they leave holes in the fabric – use bulldog clips or make sure the pins are within the seam allowance and will be covered by the seam-sealer.
Thank you for a great explanation. I was looking online for a similar idea and really appreciate it
Where does one purchase ultra violet protected thread?
fabric.com has Coats and Clark UV thread in many colors, I have purchased outdoor thread at Joann fabrics but am not sure if it was specified as UV resistant.