


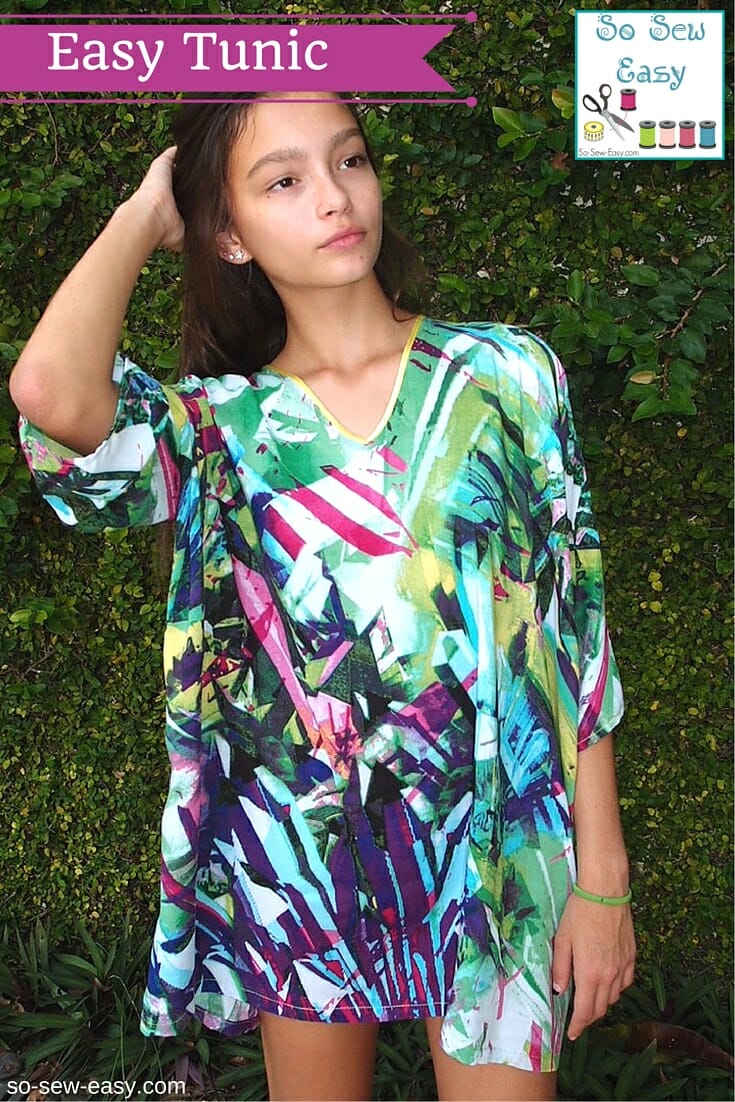
This is a tunic that is so easy to make that you will want to make many in different colors. This pattern would make a good project for those looking for their first garment.
The only slightly tricky part is applying bias tape to the v-neck which is why we've created a separate tutorial on that to make sure anyone and everyone can succeed at this project.
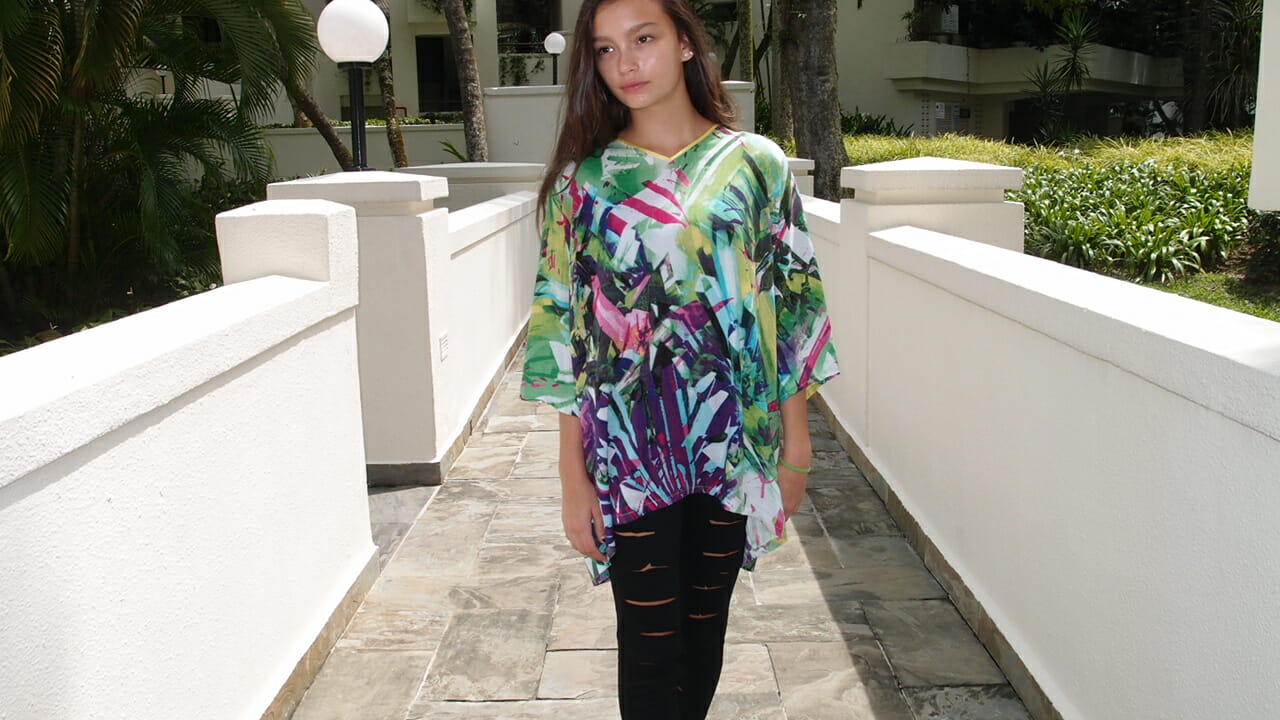
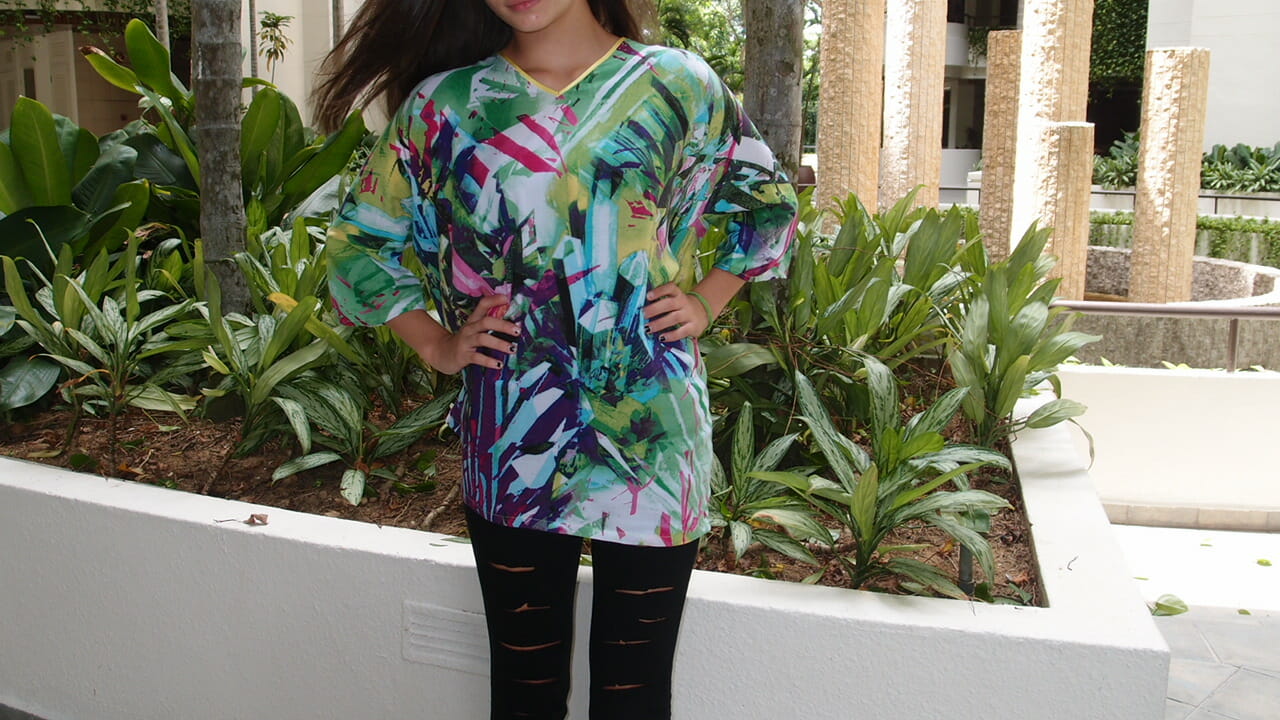
Last week we had the pleated blouse and many of you asked about elongating the sleeves so the arms will not show as much. We've tried to address that request in this new design. This tunic has a very loose fit, is very easy to make and easy to wear. Dress it up or down to be perfect for any occasion.
This tunic also makes an awesome mini dress if you make it a couple sizes too big.
Features
- Quick and easy to sew
- Relaxed and easy fit
- Longer length – pick your own length
- Fuller sleeves
- Option to leave open at the bottom to accommodate different body shapes
- Large range of sizes, 10 to 24
Materials
- 1 3/4 to 3 yards of challis, rayon crepe, crepe de chine, satin back crepe, viscose or printed silk. These links have a show suggested fabric designs as well.
- satin bias tape, bought or make your own continuous bias binding tape.
- thread to match
- sewing machine
- serger (optional)
Fabric Recommendations from Fabric.com
Download the Pattern
You can download the pattern and instructions for the Easy Tunic from our account at Payhip.
For help downloading and printing PDF patterns, please CLICK HERE.
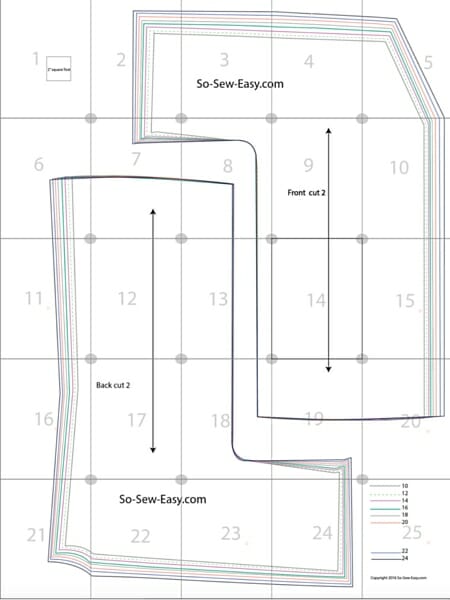
Pattern Pieces and Layout
- 2 backs
- 1 front cut on the fold
Pattern sizes are from 10 to 24.
For assistance with downloading and printing PDF sewing patterns, please refer to the tutorials below.
How to download and print PDF sewing patterns
How to print and assemble a PDF Pattern
Body Measurements

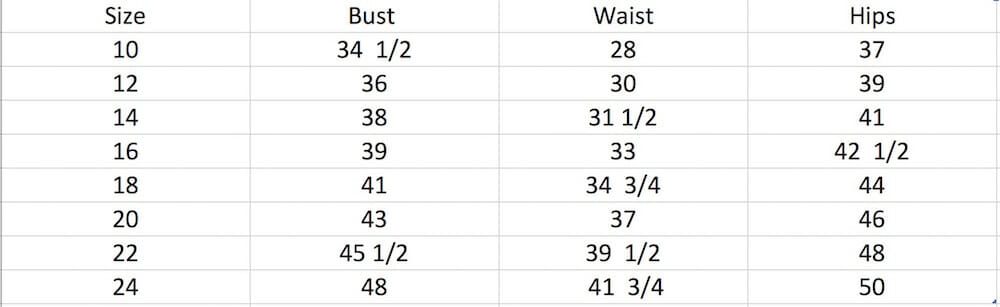
Step One: Sew the Back
Pin the back pieces together with the print facing each other. Sew the back at 5/8″ and use your serger or a zigzag stitch to finish the seams.
Step Two: Sew the Shoulders

Attach the front to the back by placing the front side facing up, (print side up) and back side with the print facing down, and sew the shoulder and finish the seam with your serger or zigzag if you prefer.
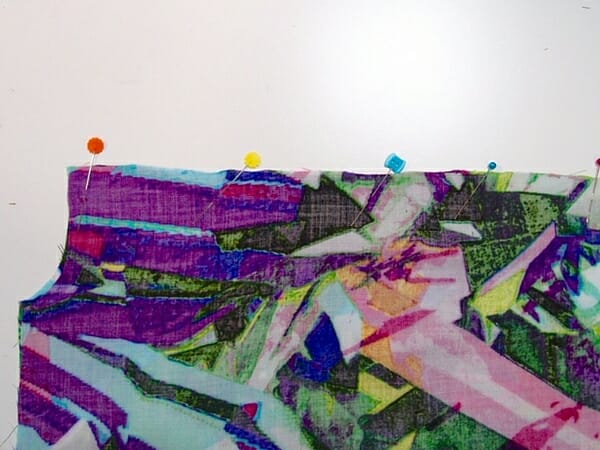
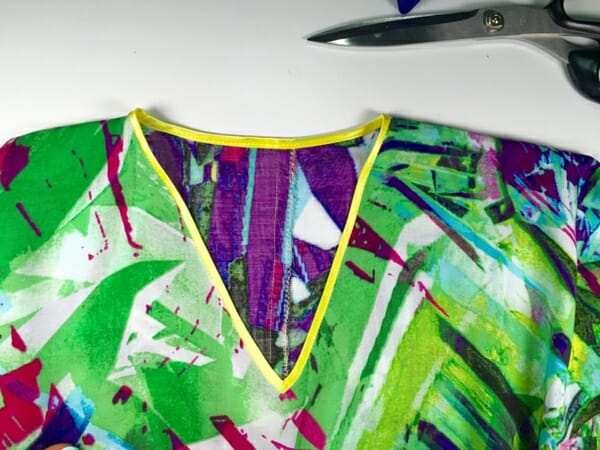
Step Three: Apply Bias Tape to the V-neck
Please visit our tutorial on how to learn the easy way to apply bias tape to a v-neck for a more comprehensive look at this technique.

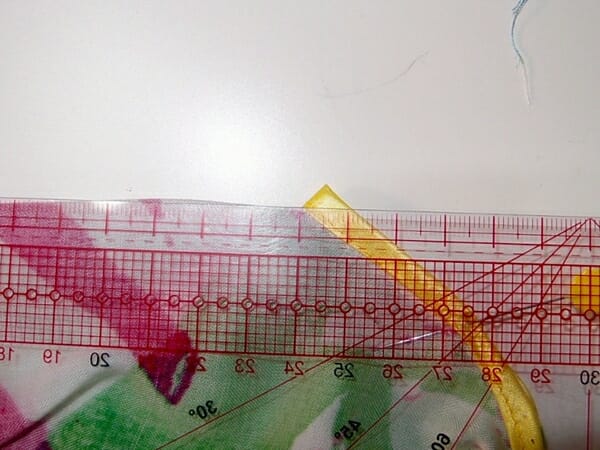
Pin the bias on the right side of the fabric. Start at the shoulder seam when you get to the V mark a point straight down from V with of the seam of your bias tape.
Sew the tape to that point and pivot your fabric and continue sewing the tape around the neck.
Pin the bias tape all around the neck and sew following the crease of the first fold of your bias tape.
Iron the tape and all seams of the neckline upward. This will make it easier for you to sew the other side more accurately.
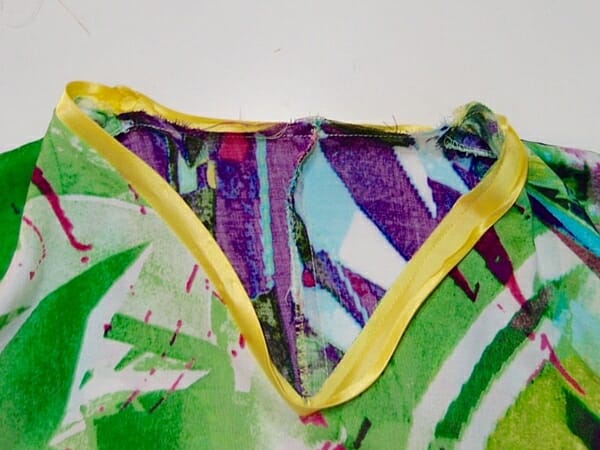
Cut a small notch at the point of the V-neck but stop about 3mm from the seam. Sew the bias tape all around the neck on the right side of the tunic. Be very careful to sew on the tape close to the edge making sure you catch the back side of the tape.
Turn the tunic inside out and fold the neckline in half. You will sew a small stitch line to make the bias tape take the shape of a V and the neckline lie flat.
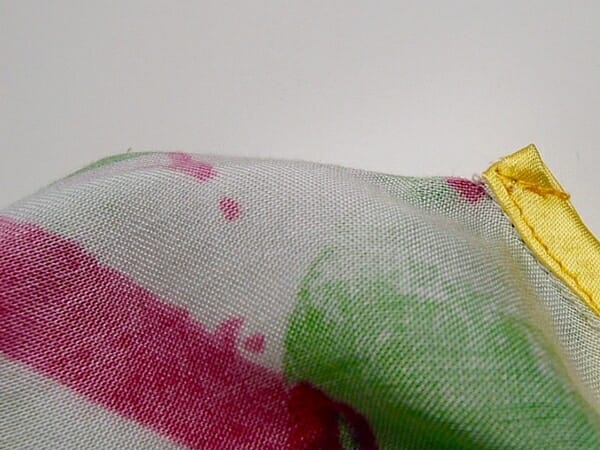
Back view of the neckline.

Front view of the neckline.
Step Four: Finishing Your Easy Tunic.
Sew the sides starting at the sleeves. Finish the seams by zigzag or using your serger. While you are at the serger, serge the sleeves and the hem. Fold the hem of the sleeves by 5/8″ and sew.
Fold the hem 1/2″ then another 1/2″ and sew. Press all seams after sewing and you are done!
In four easy steps, we have done a very easy but super attractive tunic. This tunic is perfect for running errands and when you need to run out of the house in a hurry. Add some jewelry and heels and you are ready for lunch with the girls or a pair of leggings for a walk in the park.
Fun Variation
If you need more room at the bottom of the tunic because you have a pear shape body, sew the sides leaving a 10″ gap at the bottom. However, this means you will have to hem the front and bottom separately.
If You'd Like To Support Our Site
If you want to help us continue to bring you a wide selection of free sewing patterns and projects, please consider buying us a coffee. We'd really, really appreciate it.You can download the pattern and instructions for the Easy Tunic from our account at Payhip.
For help downloading and printing PDF patterns, please CLICK HERE.


Hello there: I downloaded your continuous bias tape guide and also looked for “Calculator spreadsheet which i haven’t yet found. I did query for “continuous bias calculator” and found that i was sent to a google site with ads. I deeply dislike and mistrust google. They are truly the most devious and unwanted stalker on the planet.
I love your patterns and, did like your website. Since your invasion collaboration with google i have changed my mind and will do without your site from now on.
[…] via SoSewEasy […]
I would love to make this and other patterns; however size 10 is much too big. I wear size 0 or 2. Small would be ok for this pattern. Can you help with my dilemma?
It looks like it would be a great swimsuit cover-up.
Hi all. Jistt want to know, should the patern be cut on the outside or inside of my material?
Thanx
Thank you so much for your patterns and tutorials! I have a very full bust. Is there an easy way to adjust for that or is it easier to start with a bigger size and take in the waist and hips? Thanks!
Hi, It is best to use your bust, then measure your waist and choose the right size for you, it is always best to increase a pattern because of the shoulders. A blouse should fit well on the shoulders the rest can be increased. Let me know if you need further help. Kind Regards,
Thank you! After I commented I also saw a tutorial on FBA. Your site is great. Have a great weekend.
Thank you!
If you make A0 pdfs I can take them to my office supply store and have them print a copy for me. No more taping. I do that with other patterns I get online.
Hi – I have a large format printer and would like to print the pattern on paper bigger than 8.5″ x 11″. Is there a PDF of the pattern that’s on one page (where the page is the size of the pattern, in this case 42.5″ square)? thanks in advance!
You mean A0 size, not it is not available for this type of printers. The reason is because very few people have this type of machines at home. This patterns are for home sewing not intended for industrial use.
Loving the fabric that has been used for this tunic!
I would love to try this but I can’t download the pattern! When I click on the button it takes me to a new page, looks as if it will load, then goes blank. The new page tab is shop.mybluprint.com
What am I doing wrong please?
It could mean that you do not have an account registered in Bluprint where this pattern is hosted.
This is perfect! Thank you for sharing! I can’t wait to make a few of them!
Such a versatile pattern! I have made several very similar except leaving the front open to create a jacket. So easy!
Hello, you say to cut two front pieces but you don’t mention to sew the front seam and your diagrams look like you cut your front on a fold to eliminate the seam?
You place the front piece on the fold. You cut 2 pieces of the back. It has a seam in the back but not the front.
I like the tunic. Will have to try the v-neck with bias tape.
Cut one front on fold – two backs pieces not on fold – at least that is what it says in the directions
Hi, on the pattern, page 9, it says “front cut 2”. That’s a typo, correct?
Yes. The front is placed on the fold. The back has 2 pieces.
very cool. I will have one cut today as the 90 degree muggies are upon us here in Northeast. Yeah
One more question. Pattern says cut 2 back pieces and 2 front pieces. I see where instructions show to sew back 2 pieces together. I don’t see where it is showing to sew 2 front pieces together. Should the front piece be just one piece placed on the fold? thanks in advance for your help and thank you again for the lovely pattern.
The front is placed on the fold.
love this. Just getting back into sewing (only really sewed simple curtains and halloween costumes) and this looks like a great way to start. What is the rectangle 4″ x 22″ for? is it to make your own bias tape?
OK, so on step 2 — why would you pin the front “print side up” to the back side “print down”? You wouldn’t pin them wrong side out, as in step 1, so as to sew the seam on the inside? Maybe there’s a reason for it, but it doesn’t make sense to me, so I did it the same as step 1 and seemed to work. Also, I find a bias tape finish v-neck pretty difficult for a first project. Thanks for the pattern, though.
Hi, thanks for the lovely pattern. I can’t find where it says what to do with the two straps at 4″ X 22″ as mentioned on page 2. Are they a sash?
HI Holly, it is typo just ignore that. Thank you.
Just what I need for this florida weather. Thank you for sharing!!
Would linen be a good fabric choice? I love it for summer.
Thanks!
Exactly what I have been searching for??
Lovely. And I really like your choice of fabric pattern – very summery – and being non-directional, no matching or wrong way up. I truly look forward to all of your designs (even the ones I can’t use) as they are current, on trend, and easy to work with. You are very talented and generous sharing your talent with us all.
This is just the pttern I was looking for. Simple, quick and comfortable.
Something I can make in different fabrics and feel well dressed for the day.
Thank you very much.
How do I figure out how much fabric is needed? 1 3/4 to 3 yards is a wide range.
The easiest way is to print the size you are planning to do, decide what fabric you are going to use. It depends on the width of the fabric and if you are planning to match the print. The variations are many 🙂
There is no front seam shown and pattern piece does not indicate cut on fold? I’m interested but confused.
Pattern says 2 backs and one fron, cut on fold.
Look under pattern pieces and layout. It says 2 backs and one front, cut on fold
But the pattern layout for the front says “cut 2”
the front says to cut on fold
Do you have any tutorials for sizing down your patterns as I am a size 4.
Hi Laurie! I do not, the model in the picture is using a medium and she is size 4 and she is using it as a pool dress. It is supposed to be flowy use the fabrics indicated only.
thank you for another great freebie! Love your designs
If I really wanted to use cotton knit, would I need to size down? I’m not so great at sewing with thin or silky materials yet.
No, I don’t think you need to size down as long as the fabric drapes well. It needs to be a loose weave cotton knit. If you use a walking foot you will find sewing difficult fabrics much easier.
This is fantastic. I haven’t done a lot of clothes before but this looks like something I can try. Really looking forward to it. I love your designs. Thanks for putting them out there.
Pouvez vous me donner les correspondances de tailles en français; Il me faut du 44 ; je vous remercie beaucoup
Mamilou
It looks really easy. The only problem I have is how much material to buy. I will make a size 18 top, with a pattern material. It is actually for a New Year Chinese party so matching pattern on two is not 100% necessary if it results in lots more material. Can you give me any tips?
Hi Sarah! you will need around 2.5 yards if using a 45″ wide. the best way would be to print the pattern and assemble it. Then work out depending on the width of the fabric how much you need so you do not over spend. it really depends on the width of the fabric. Try some silky material and please do share a picture wearing it. I would love to see what you come up with. Kind Regards,
Mayra
I love this. It look so comfortable and breezy. I’m going on a cruise in Dec. and I think I’ll try to make a couple to take with me!
“sew the sides leaving a 10″ gap at the bottom”
Don’t you mean 1″ rather than 10″? That’s one heck of a gap otherwise!
No, that is what I meant, I left 10″ on the side, but you can do it smaller if you want. Kind Regards,
Mayra