


Welcome to Episode 5 in the How to Sew A Skirt Sew-along series. The subject for today is: How to sew darts
Let's recap so far
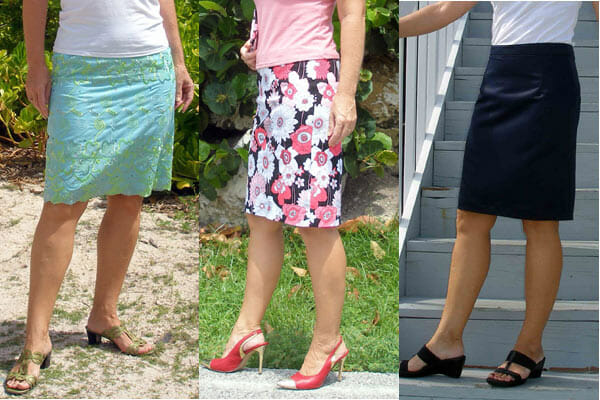
How are you enjoying the Sew A Skirt series so far? If you are new to sewing you may already have learned a lot about fabric, measuring, patterns, and the preparations you need before even starting to put a needle to your skirt.
To recap the series so far –
- Overview, tools and equipment and choosing your fabric
- Drafting your custom fit pattern, and all about ease and seam allowances
- Cutting your fabric and pattern matching
- Marking darts perfectly
Today it's time to start sewing. And the first step is to sew the darts in all 3 pieces of your skirt, the front and the two back pieces. If you have followed and drafted the pattern from step 2, then you will have 6 darts to sew.
If you have never sewn darts before, then I suggest practicing several times on some scraps of fabric before getting started on the skirt itself. They aren't difficult if you take your time, but getting it wrong on your skirt could leave puckers or bubbles at the bottom.
How to Sew Darts
- Mark your darts and snip the very ends of the dart legs as shown in the tutorial in step 4 above. Go back and take a look if you need to.
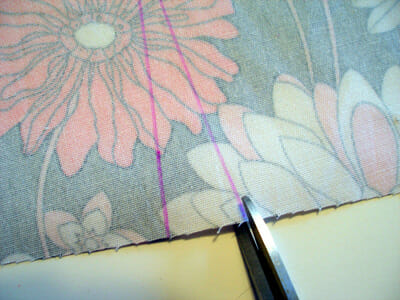
- Fold the fabric with the right sides together matching up the two little snips at the top of the dart legs. Continue the fold until you get to the bottom of the dart and make sure that the very point of the dart is on the fold of the fabric.
- Secure just under the point of the dart with a pin to stop the fabric moving. Now put a couple of pins through the dart leg from one side, making sure it passes through the marked leg of the dart underneath too.

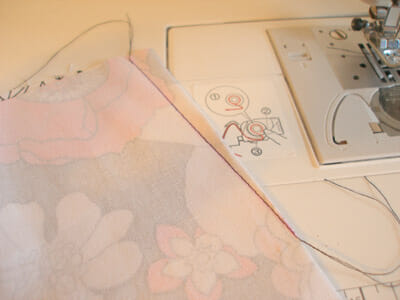
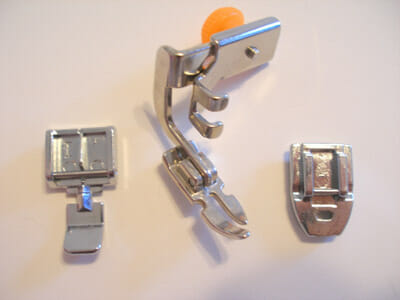
- Now take the fabric to your machine. Pick a medium stitch length, regular straight stitch. Line up the wide end of the dart under the presser foot so that when you sink your needle, it pierces the marked line.
- Sew two or three stitches and then back stitch two or three to secure.
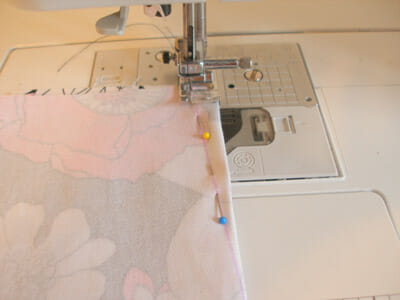
- Follow the marked line, removing pins as you go. Slow down as you approach the point and take care. Your final few stitches will be very close to the edge of the fabric until eventually you sew right off the end at the point.
- Do NOT back stitch at the point of the dart, but remove from the machine and leave long thread tails.

- Tie the two long thread tails at the point in 2 or 3 knots, and then cut the threads leaving little tails so that you don't cut right up to the knot.
- Repeat the process for any more darts.
Pressing your darts
- Once sewn, you need to carefully press your darts for a good finish.
- Look at the instructions on your pattern for how to press. Normally horizontal darts such as bust darts are pressed downwards, and vertical darts such as these at the waist of our skirt, are pressed towards the center.
- Bear in mind the function of the dart as you press – it is there to curve the fabric to your shape, especially around your behind, so you should allow the fabric to curve as you press. Many sewists like to use a Tailor's Ham to help pressing curved seams and darts.

Congratulations ! Your darts are finished and looking good.
Our next steps
Join me soon for the next step in our Sew A Skirt series – Inserting the Zipper, Which Zipper Foot to Use?
If you want to know when the next post in the series is published, do sign up for the newsletter to get it right into your inbox.
Authored by: Deby at So Sew Easy
Never miss a post, and follow along with the Sew A Skirt tutorial series. I'll send all updates to your mailbox twice a week for you to keep and follow along at your own pace.
I'm really looking forward to seeing your skirt and featuring it on Sew So Easy!
I promise, no spam. Just an email once or twice a week with the new posts.


Wonderful and easy to follow tutorial – thank you.
[…] How to Sew Darts – How to Sew A Skirt Series […]
[…] you are a beginner and have never sewn a dart before here is a comprehensive tutorial for […]
I just want to give you a big THANK YOU!!! I haven’t sewn in years, and all your tips have refreshed my memory on how to do things. You have also shown me things I never knew. You have been very helpful! Please keep up the good work!!!!
I’d never heard that you shouldn’t backstitch at the bottom of a dart…I’m going to have to try this!
You have made sewing skirt super easy. I’m going to try it out.
Great advice and ideas. Can’t wait to try them!
it is really a great post! Beauty is the nature of a woman, they will do anything to stay healthy, beautiful and young, including making clothes for themselves and waist training.
Great work and tutorial, thank you for sharing !
Thank you! Thank you! I thought I could figure this out myself after viewing pictures of various pouches. But after several pouches and hilarious results, I knew I needed help. You’re the BEST…
Great tip! This is a great idea. I hope that I can have a good skirt. I will practice doing it right now. Thank you for sharing useful information.
Really helpful, thank you! This has really helped me, as a beginner, to improve my early projects.
My mother was a professional dressmaker in the 70’s but no one was allowed to touch her revered Singer sewing machine! Like you, I learned to sew at school (on their machines, and like you, I made a garment that took all year to complete, a horrid orange sleeveless jumper that went right in the trash after I got an A+ grade on it! I’ve been an avid clothes and handbag designer, and quilter ever since, some 4 decades now. There are alot of methods I do quite differently than the way I was taught at school in 4th grade (which was always the hardest way) and the way I make darts is one of them. I put 3 pins in my drawn darts ‘horizontally’; one exactly at the point, one half way down and one at the bottom.
I begin with my machine needle lowered down into the fabric right in front of the pin AT the point (instead of the dart legs), which is basically only 2-3 threads off the edge of the fabric, which might cause your needle to push the fabric down under the throat plate if I didn’t have a pin there. I take exactly 2 stitches forward and 2 stitches back and another half a dozen stitches forward by turning the wheel by hand before sewing the rest of the dart electrically. As my mother did before me, I ALWAYS backstitch at the beginning and ending of every seam no matter what the project unless it’s just a basted seam. It’s just good sewing sense to do so for the longest wear of the garment or project. It’s just that sometimes, like for instance the teeny point of a dart, you need to do the beginning few stitches and backstitches manually and very slowly.
Also, I always steam press my finished darts (from the back side) BOTH ways to ‘set’ the stitches before pressing them in the final direction that they will go.
Just goes to show you that there are alot of things in life that you can put your own spin on to get the results you’re looking for and sewing methods are definitely some of them. Contrary to my mother (who wouldn’t share her sewing machine with me) and my Home Economics teacher (who insisted I do things HER way claimed, I went on to design the infamous Pound Puppy toy back in the 80’s, so there’s alot to be said for ingenuity.
I think I’ve watched just about ever one of your videos after stumbling across the first one after searching Youtube for videos on ‘putting a recessed zipper in a handbag’, a thorn in my side for getting it put in ‘just right’. I’ve enjoyed getting to know you through your video tutorials, which are very well explained in easy-to-understand terminology without any distracting music. I also purchased your ‘Lucy Bag’ pattern just to get someone else’s perspective on putting a darn recessed zipper in! LOVED all the pictures with the corresponding step by step instructions. Even a beginner sewer could easily make the ‘Lucy Bag’ with your clear instructions, in my opinion. Great job!
Best regards,
Becki
Spot on regarding how to sew darts. After sewing them, press the dart fold before pressing the dart down (bust darts) but only inside the stitched area. For skirt and pants darts, they should be pressed “away” from the center of the garment, toward the hips. Otherwise you can have odd looking bulk pointing toward your tummy! And who wants that?!! Your picture is correct, but misstated in the text.
I am loving your website and everything you are doing. I’ve been dismayed to see fabric shops and decent sewing supplies go downhill and disappear over the years. And the few shops left are more “craft” than sewing. So I’ve been turning to the net to find supplies and fabrics. And I’m amazed at what’s available on ‘You Tube’ for tutorials – where I found you. Your vids are great for getting me refocused and on track for reviving skills that I haven’t used for many years. I’m just excited to see how many new and seasoned sewers are out there.
Thank you for sharing your sewing journey with us.
I am glad you mentioned about which way the darts are meant to be pressed! I just finished my first simple skirt and it does exactly what you mentioned because I pressed them the wrong way. I found this page trying to figure out what I did wrong. None of the tutorials and blogs ever mentioned which way to press the darts… maybe its obvious to most. But thanks! I am teaching myself so its a learning journey.
An update:
I unpicked yesterday’s work and fixed the darts and the skirt looks great!
I’d never heard that you shouldn’t backstitch at the bottom of a dart…I’m going to have to try this!
Great tips! This would also work if you needed to take in a skirt that was too big, which I’m often trying to do for my daughters!
I love this tutorial. This is exactly the way that my mom taught me!!
This whole series has been great, and so informative! And I’ve been sewing for a while! I feel like I always learn something new…thank you!