


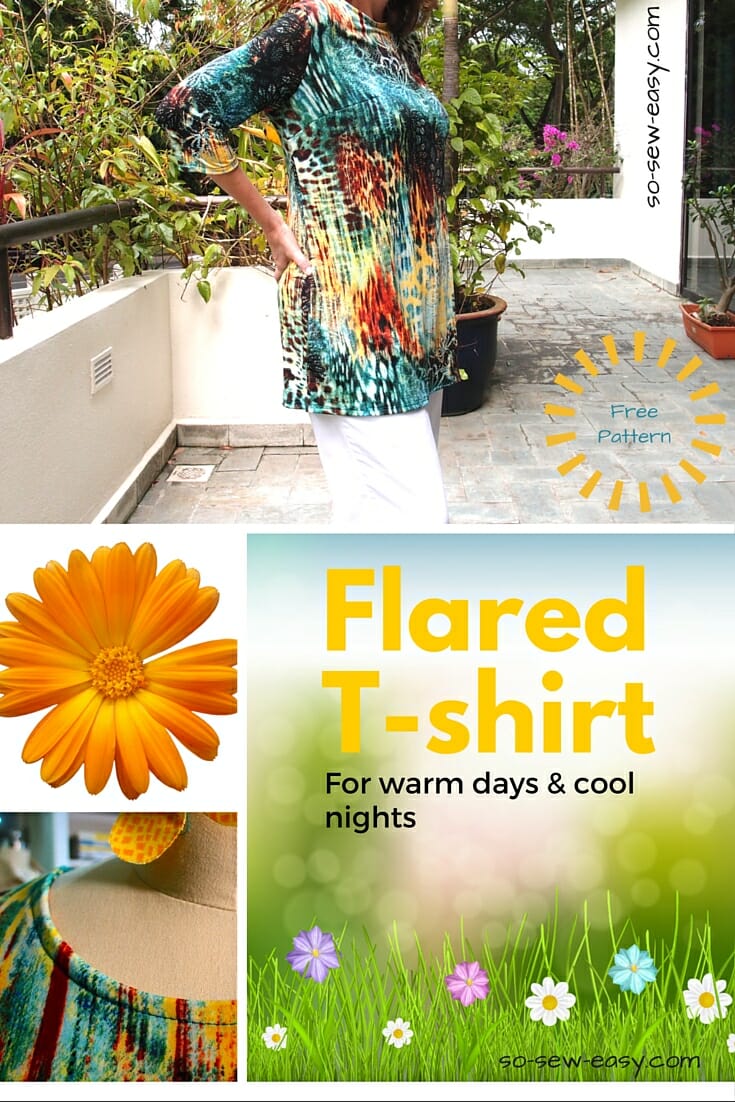
 Spring is the time to dress comfortably and in layers. A flared t-shirt is one of those pieces of clothing we can just throw on with a pair of jeans, leggings, capri pants or if the top is long enough, it can also be a short mod-style dress. Perfect for a quick run to the supermarket or picking up the kids! This is an incredibly easy pattern and I have added two sleeves lengths to give you some flexibility. If you want to, you can even eliminate the sleeves entirely and it becomes yet another top.
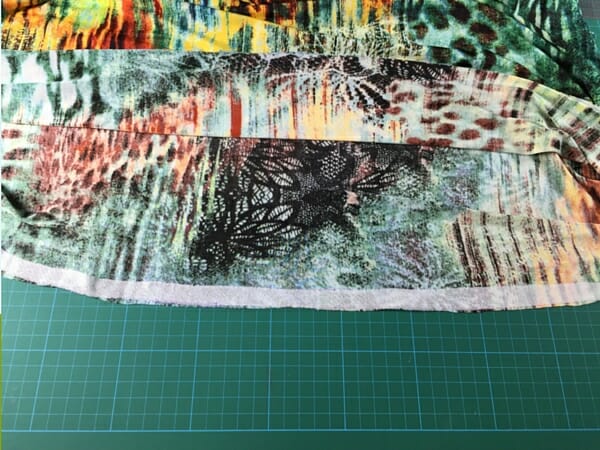
I am using a fabric from my stash because I am determined to reduce the amount of fabric in my sewing room. I realize it is spring after all and that you would want to see some flowers. I am not a flowery kind of person, but I gave it a try. I hope you like it:). For your flared t-shirt, you can select any lightweight and soft knit. It can be 100% cotton or a blend. As you get ready to start to project, it might be helpful to review our tutorial on mistakes to avoid when cutting fabric. It might save a little re-work.
Before you start, I strongly recommend you to take a scrap of your fabric and practice so you can achieve the right setting on your machine necessary to come up with the best looking stitch that you can. I am using a very basic machine –the equivalent of a tractor– but I know some of you have such fancy machines which the equivalent of a Lamborghini. I had a hard time finding the perfect stitch, my (tractor) machine kept skipping stitches, so I opted for a ballpoint needle and a walking foot.
While the pattern is easy to follow, this is probably an advanced beginner or intermediate level project. It's helpful if you've had some experience in sewing knits which can be a bit tricky to sew sometimes. If you run into any problems, please leave your questions in the comments after the post and we'll do your best to help you out. The pattern accommodates sizes 8, 10, 12, 14, 16, and 18 with corresponding bust sizes 36″, 38″, 40″, 42″, 44″ and 46″. The finished garment in the photo is size 18 and it will accommodate a 46″ bust without stretching the fabric. The ITY fabric I used has great “drappability” and terrific stretch.
A note: The dart seems higher because I had to pin it at the back for my friend Janice to wear it. She is not size 18, she is size 14 but her chest is 16. She kindly accepted to model the top for me. This is exactly the reason why if your bust is bigger you should always use the right size for your shoulder rather than going with your bust size. I explain this in this article on how to make a full bust adjustment.
This pattern and tutorial are completely FREE to you. The design and pattern are entirely original and, as you can imagine, they have taken some time to put together. All we ask is that you share this post with your friends and family using one of the social media buttons below.
For the 3/4 sleeve version, you will need the following materials.
- 1 1/2 yards of soft knit, I am using ITY that I got from Fabric.com a while ago.
- 1/2″ knit stay tape or stretch fusible interfacing strip of 5/8″
- a Schmetz ballpoint needle or a twin needle. Any brand should do but Schmetz is one of the best.
Fabric Recommendations from Fabric.com

You can download the pattern and instructions for the Flared T-shirt from our account at Payhip.
For help downloading and printing PDF patterns, please CLICK HERE.
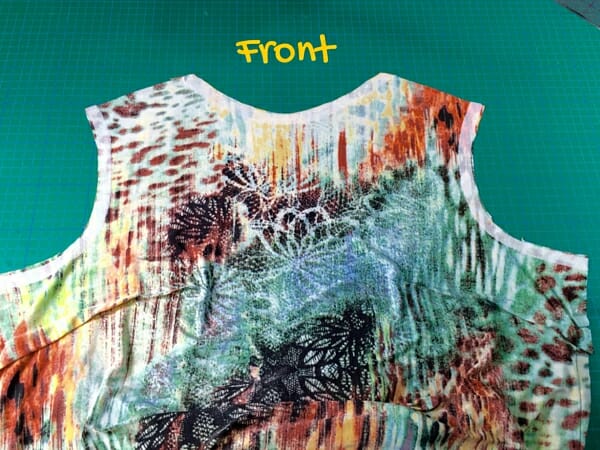
Step 1: Print and place the pattern; cut to your size
If you have not used PDF patterns before, here is an article on how to download and print PDF sewing patterns that you might want to review.
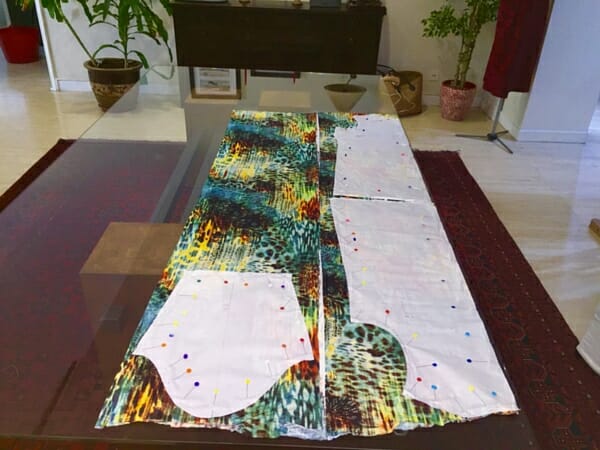
I have placed my pattern on the fold, you could trace the other side of the pattern and cut on the fabric on one layer. In addition to this pattern, you will need a strip of fabric to find the necessary measurements in the pattern.
Cut the fabric to the size of your pattern. All seam allowances are 5/8″ and are included with one exception which I will explain below.
Step 2: Apply stretch fusible interfacing or stay tape
Apply the stretched fusible interfacing to the armholes and neck seam allowance. If using the stay tape, please iron the tape 1/8′ from the edge. Make all the notches marked in the pattern. These are important.
 For the back piece, apply the stretch interfacing or stay tape on the armhole, shoulder, and neck seam allowance. Make a notch the middle of the neck. You will need this notch to align the facing later on.
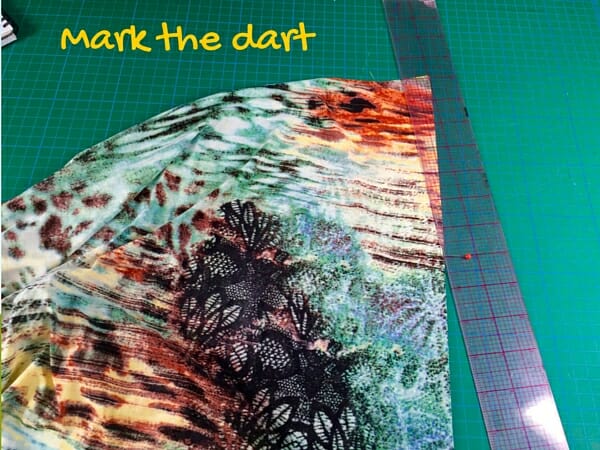
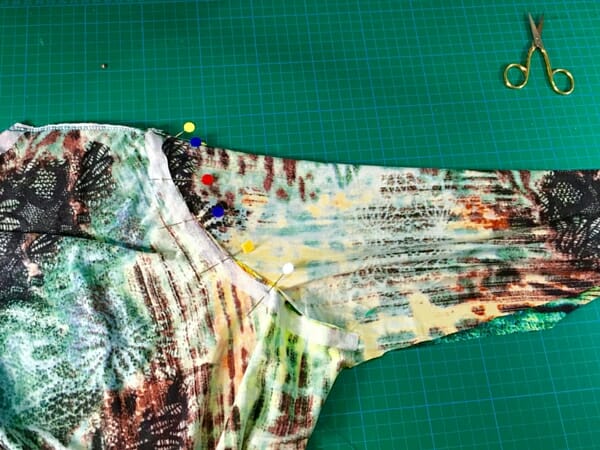
Step 3: Mark and sew the dart
Using a ruler and pencil or erasable pen mark the dart and place a pin on the end of the dart. (If you're asking “what's a dart?”, please review our tutorial on how to mark and sew double ended darts which is linked here.)
Step 4: Sew the shoulder
At this point, you can use your serger to finish the seams, but because I am using ITY Knit, this knit does not unravel so finishing the seams is entirely optional. Unfortunately, my serger has a dull blade and made a royal mess of the seams, so I am using an overcasting stitch with my regular sewing machine. You can learn more about how to use overcasting stitches in the tutorial linked here.
Step 5: Sew the sides of the top
Place the front and back with print side together and sew the sides.
Step 6: Attach the sleeves
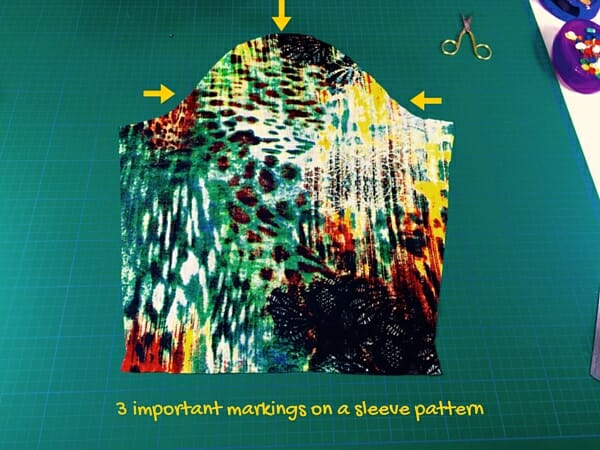
The sleeves pattern has 3 important markings. There are 2 notches that will tell you this is the back of the sleeve, 1 notch to show you the front and the center of the sleeve telling you where the shoulder seam is located.
There are 2 methods you can use to attach the sleeves. You can start sewing the sleeve to the armhole and then sew the arms straight with the side seams of the top. It is basically one continuous seam from the sleeves all the way to the hem of the top. I only recommend this way if your serger is at hand because it can create bulk in your armpits, and who wants that.?
 Instead, as another method, I am using the set-in technique: sewing the sides of the sleeves, then the side of the top, and lastly attaching the sleeves around the armhole, trim and zigzag to reduce bulk in this area.
Step 7: Sewing the facing to the neck
NOTE: Sad to say not all the sizes can out on the file, I dod not noticed this until Cindy Curwick wrote a comment pointing at the fact that one facing is thicker than the other, just trim the thicker one and keep going. Also there is just one size of the facing not all the sizes, I will be sending an email so you know that is going to happened.
This is the same technique you need to apply should you decide to make this t-shirt without sleeves.
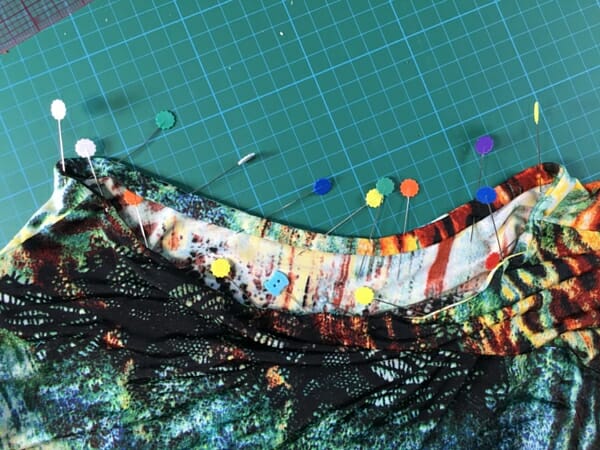
Start by measuring the neckline, cut the strip the length of the measurement you have take minus one inch. Sew at 3/8″. With the print facing down, Start pinning at the shoulders, alight the stitches of the strip with the shoulder seams. Next, pin the facing to the front and back of the t-shirt. You will find the facing is shorter than neckline. This is fine because the fabric is very stretchable and this is necessary to maintain the shape of the neck.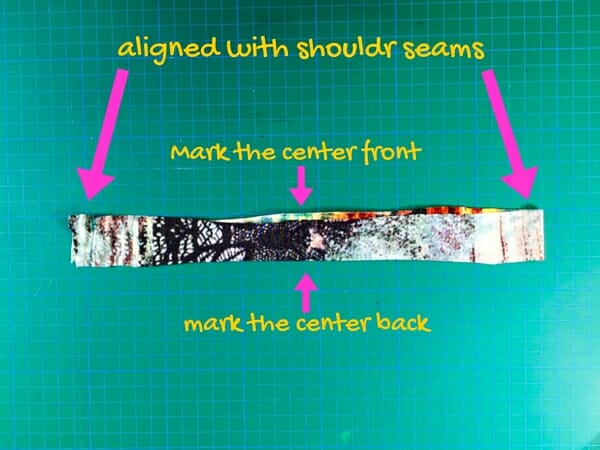 With the print facing down, start pinning at the shoulders, align the notches of the facing with the shoulder seams. Next, pin the facing to the front and back of the t-shirt. You will find the facing is shorter than neckline. This is fine because the fabric is very stretchable and necessary to maintain the shape of the neck. I have also added more fusible interfacing to the facing because my machine is not liking this fabric very much, this is optional. Sew the facing to 1/2″ seam allowance.
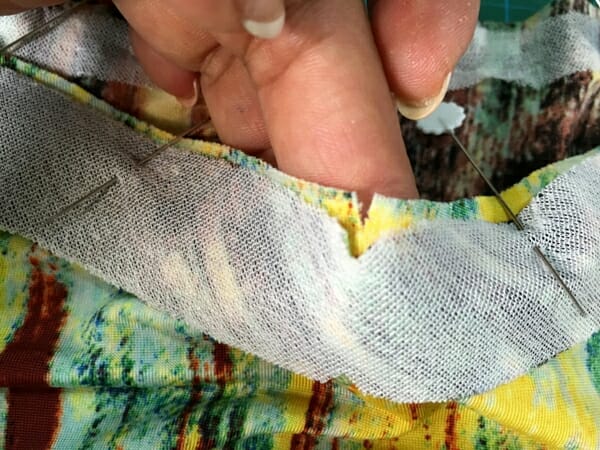 Trim the facing close to the seam.
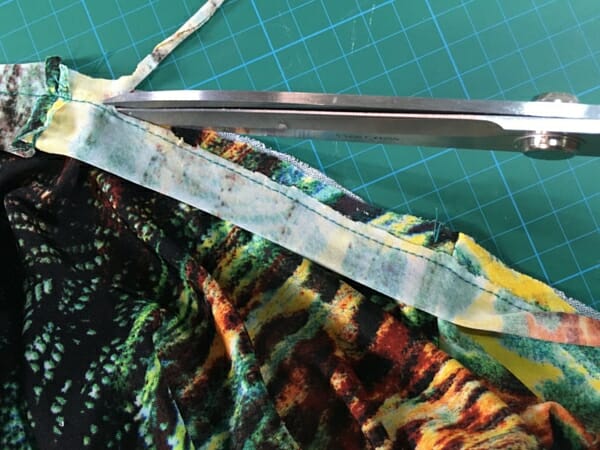 Fold the facing to the inside of the t-shirt 1/2″, pin all around and iron.
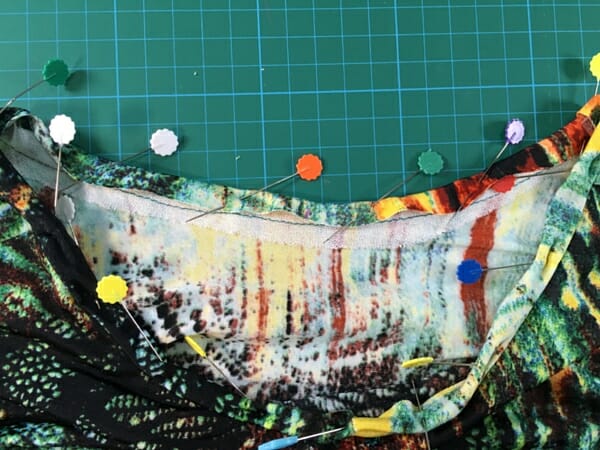 Fold another 3/8″ pin all around one more time.
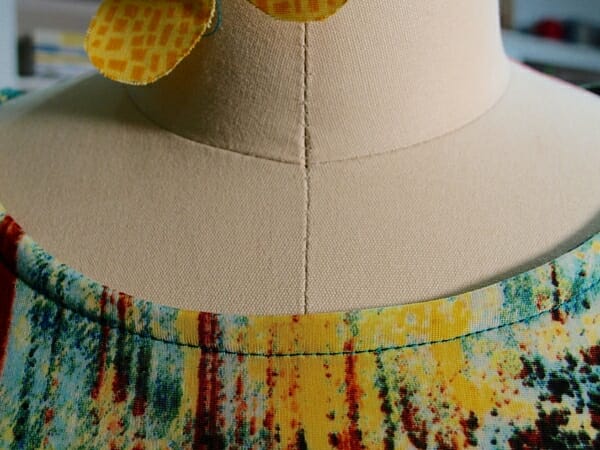 If you are a newbie and are not familiar with working with knits you could make a baste stitching all around the neck. The reason for that is that this kind of facing needs to be sewn on the right side of the fabric and it is very hard to do that if you are not experienced. You could also change your needle to a twin needle and sew the facing creating a nice double stitching detail. If you need some guidance on how to use a twin needle, please check out the tutorial linked here.
Step: 8 Hemming your flared t-shirt
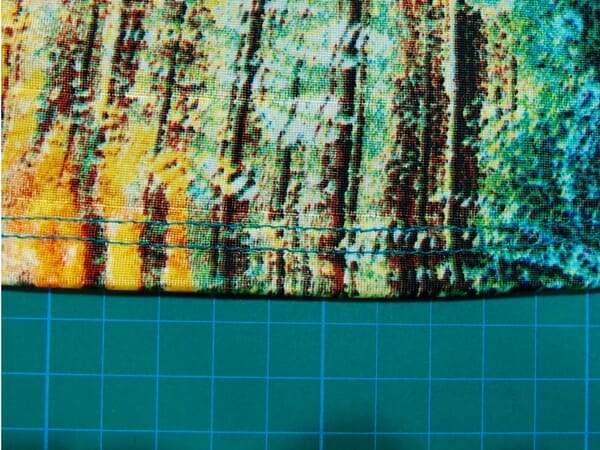
Apply the stay tape to the hems, both in the sleeves and on the bodice, and simply fold 5/8″ and hem your T-shirt.
I hope you enjoy this free flared t-shirt pattern. It is very easy to make and is a staple in any women's wardrobe. The flared t-shirt is the perfect top if you are not ready to bare all in the new season. Throw on a light coat on and a pair of jeans and you are ready to rush out of the house for just about anything.
What other pieces of clothing would you like to sew before summer? Please let us know if the comments below and we'll do our best to help!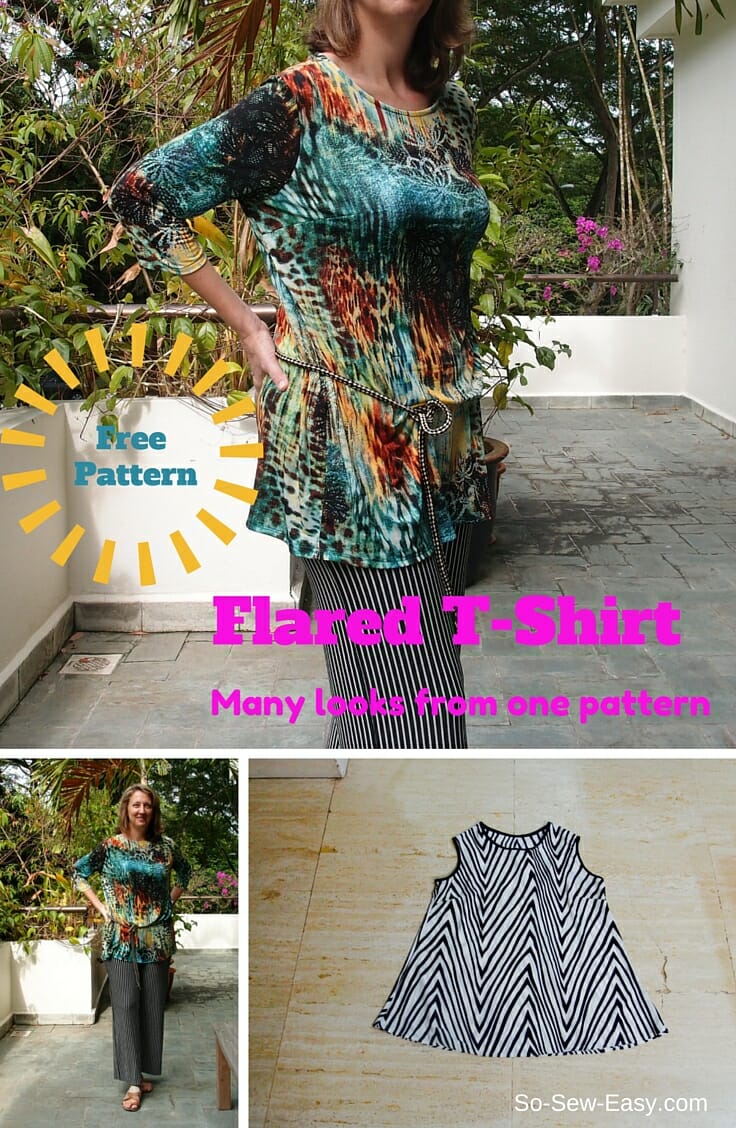


Small busted women don’t need bust darts, especially in jersey tops. They’d look pouchy on me! How can I alter these patterns to eliminate the darts?
The procedure you need is called dart manipulation. I will have to show you with pictures so I can explain myself clearly. Stay tuned please. Kind Regards, MC
Thank you for the pattern and tutorial. I can’t wait to try this.
Hello Myra. I have downloaded your flared T-shirt pattern from Payhip. I am having difficulty printing the correct size as I am unable to get a 1 inch square to print accurate. I operate on Mac. I am printing using adobe reader. I Set the download pattern to 100% from 65%. Set my printer to custom scale 100%, portrait orientation and current page. the 1″ square comes out 7/8 inches x7/8 inches. I have also tried setting my printer to actual size, portrait orientation and the 1″ square also comes out 7/8” x 7/8”. And my printer starts screaming at me that it does like the paper size.
I have wasted so-so much paper trying to get the correct size.
Can you please tell me what I am doing wrong and what I should do to successfully print this pattern.
This is the first time I have had such difficulty printing the correct size for a PDF sewing pattern.
Thank you
Barbara Fousek
‘
Hi Barbara, I have the feeling it has to do with the settings in your printer. Some printer has the ability to scale the work according to the paper size, uncheck that option. Print using portrait, and no scaling at all, use actual size. Do let me know if you are still having troubles.
Hello Mayra, I tried again to print the test square and follower your suggestions above. I still got a square measuring 7/8 x 7/8 inch.
next steps and suggestions please.
Hi Barbara, Are you using Adobe Reader? Actual Size and not scaling the pattern? Please let me know to find out what else we can try.
I will have another try and get my ‘techy’ son to help and let you know
Hi Mayra
Got the 1 inch square to print. It was user error. I missed the prompt to open Adobe reader. Thank you for your patience. All is good now.
One flared T shirt coming up.
Barbara
Hi, I’d like to sew this t-shirt for my woman. You say that the seam-allowance is 5/8″. My question: Do I have to add these 5/8″ to the lines in the pattern – or are these 5/8″ already contained in the pattern (so that the sewn t-shirt will be smaller than the pattern)?
The seam allowance included, please read the feedback in the comments. For some wearing the larger size, the sleeve hem is too tight. Measure against your woman and , make the appropriate changes if needed.
I’m getting ready to make this pattern and I noticed that the facings are different WIDTHS. Is there a reason for that? I’ve not encountered that before. Please advise! Thanks. I can’t wait to make the t-shirt! ????
Hi Cindy, That should not be unless I loaded the wrong file, can you please tell me if you have any guide to tape the pattern together? If not that means I loaded the wrong pattern. I will appreciate if you can tell me or send an email to mayra@so-sew-easy.com with a picture of the pattern you have. I really appreciate your help.
Actually, now that you say that, there was NOT a guide to tape the pattern together. I have done that so often that I just taped it together the way it seemed to fit together.
I don’t have the pattern in its “taped together” layout. I cut it out, but I could show you a pic of the two pieces of facing that are different widths. Let me know if you would like me to do that. 🙂
No that is not necessary, I have printed the pattern now and checked that indeed the facing do not match, best to do is to make your own. Just cut the facing on a bias, measure the neckline and subtract 1″ from the measurement. It should be smaller but not so that it will pull. Thank you for letting me know this was an issue. I will add it to the instructions.
I realised the guides and the rest of the facings did not make it on the file. Not sure what happened, there are several scenarios of what happened and they all point to human error. My bad!
Thank you for your quick reply. I will do as you suggest. That makes sense. ????
What kind of material is ity? The print you chose for the pictures is lovely, but doesn’t show what you are doing on the pieces. Which end of the dart do you mean to put the pin in, and for what? (when you say to mark it and put a pin in the end) I’ve been sewing forever and this left me wondering.
I am using a ITY knit, the dart is not really necessary for knit fabrics but I like to use the same pattern to make it on a cotton linen woven fabric place on a bias where a dart is needed. If you have been sewing for a while just sew the dart. The pin at the end trace the dart is so the beginner person can see where to stop sewing, some prints will not let you see if you mark with a fabric pen or chalk. This is the case of velvet.
The pattern looks great. However I noticed the bust darts are far too high for the model wearing the T-Shirt. Is it that she is full busted so this pattern would have needed to be adjusted?
The top is 18 but she is actually 14 with a size 16 bust so I had to pin at the neck so her cleavage does not show so much. Indeed the dart needs to be moved down if you do not wear the right bra. you can eliminate the dart all together if you use a 4 way stretch fabric.
I can’t get the pattern to download for the Flared T-shirt
Hi Rosalinda, were you able to download it?
thank you so much. i love this pattern, i have used it before, then we moved and i lost more than one box of sewing things. so glad to see this again, thank you.
Thank you. I have used other tee patterns from you and love the fit, ease of use. Will get started as soon as I have made my pattern.
I would love to make this tshirt but my bust isn’t 36. It’s 32. and i have narrow shoulders. How would i change the pattern to fit me?
You are several sizes smaller than the smallest size (10). Grading would be the way to go, but I would have to do it for you, a lot of work involved to be able to explain in a comment.
Bonjour
Merci pour toutes ces explications que j’essaierais de mettre en pratique.
Bonne journée
I really want to try this but my bust is a 51. Is there a way to size up?
If you use biggest size and do a full bust adjustment you can achieve to adjust the pattern.
Is there a way to flare the sleeves? One of the problems I have is that I have lost weight, but I still have very large arms from the weight I once had.
yes of course, the first option on this tutorial will give you that. https://so-sew-easy.com/bell-sleeve-top-pattern-transformation/
Painstaking and detailed instructions all the way. This took a lot of time and effort and shows the writer wants you to achieve this with results she has mastered. Very weel written presentation..if in class I would give you an A!!!
The full bust adjustment and the sleeves is just what I needed. And with the Juki contest you are doing now I could see some of the fabric shown would be perfect for this not t-shirt.
HI Donna the Juki contest is over.
Thank you so much for your patterns and for a beginner like me, this is awesome.
I just printed this pattern out, but am confused about taping it together. I don’t see any marks to match pages properly. Are the pattern lines supposed to be touching each other? If so, that’s quite an overlap of the paper.
Hi Val, is square test correct? I work on A4 (I do not live in any of the 3 countries where US Letter is available) so when drafting a pattern it needs to be able to be printed on A4 and US Letter.
I have admired your patterns for sometime because your approach gives confidence to new sewers. This is a brilliant, easy pattern. Thank you.
I am just finishing the top. First time using a stretch knit fabric. I’m also using an overlocker for the first time too and a twin needle after watching your ‘How To’ video. Taking note of the post regarding tight arms I reduced the seam to 1/2 cm. They fit perfectly. Next time (yes, there will be another top soon) I will just add 1 cm to the pattern on each side. The only alteration I made was to ‘True’ the dart so that it laid flat after sewing the side seam. Very pleased with the results.
Hi Ann, I am so happy you are pleased with the results, I would really love to see a picture. Keep in touch would love to hear what tickle your sewing interests!
I have almost finished the blouse and found that the sleeves are much too tight! I am going to cut them off and turn under the remaining for a sleeveless look. I hope this works. I am wondering if anyone else’s sleeves were too tight.
Thank you very much for the pattern! I will sew it for my daughter and for myself this spring.
Let me know how it turns out. Enjoy the project!:)
I too need a larger size. I’m going to wing it tho’ to extend the size. I’ll add vents on the sides. The vents are an alteration I do often on ready-to-wear because everything seems to tighten on my hips when I sit down.
Please post a picture, I think so many will benefit from your hack of this pattern.
What are the 4” x 22” straps for? I don’t see them used in the instructions.
HI Annie, that is an annoying typo. I copy and paste the beginning of the instructions so I do not repeat myself but I did not notice I posted part of the instructions from the “beach dress”.
Thank you. 🙂
Hi Ladies. Yet another super wearable pattern! Thank you. My wardrobe is now almost all me made and the things I reach for most days are So Sew Easy patterns. Keep up the good work please.
You are a gem! Thank you!
Bought fabric to make this top today. Thank you for the pattern!
You are most welcome Annie.
Would you consider making a pattern for us extra-large ladies. I would love to make this for my mother and myself and we need the bigger sizes. Please let me know. The 1x to 4x are the ones we need. Thanks.
Hi Sally, I do not mind but I need pattern testers. Would you be interested?
I also would appreciate a size 24. This looks like a great pattern!
Would you like to become a pattern tester?
Is that a glass table that you cut on? I have a hard time cutting fabric, just trying to figure how to cut in limited space and doing it well. Thank you
I hate doing darts! I’m very pear shaped, not very busty at all, so is it possible to eliminate the darts? (I’m pretty sure I have the instructions in a book)
You can, I Placed the dart there because this pattern can also be used on a woven fabric on a bias. But, now come to think of it I never did the post 🙁 completely forgot!
I love this pattern however I am a true petite size. 5’1″ and wear a Size 0,1 or 2. How can I adjust the pattern?
HI Melissa, the smaller version would still be too big for you. Give it a miss at least for now until I share the smaller sizes. Kind Regards,
I was wondering if this is available in plus sizes. I love it but I need a pattern as I have no idea how to adjust patterns. Can you help please.
Hi Narelle, what size do you need?
Love the look of this top both with sleeves & without. But enlighten me what is ITY fabric? And thanks for all the great tuts I find on your site.
HI Laurilli, ITY stand for Interlock Twist Yard it is literally a twist in the yard to make it look and feel soft. it is very easy to use and it has great elasticity so you will be able to use size 18 if you are a 20.
I think you meant to write “ITY stands for Interlock Twist Yarn” not “yard” (which is a linear measurement, not a thread type). ITY refers to how the YARN is spun, not the yardage (which isn’t twisted). Also, the special twist in ITY yarns usually makes the knit very stable, easy to sew, and nearly wrinkle-free, although it can be a bit slippery to handle.
Yes, Linda, that was a typo. Thanks for the help!
Thank You for the free t shirt pattern. I need help. I need in size 22-24. how can I alter to fit a bust 49, hips 61
Hi, Denise, I would have to do it for you and publish the higher grades. The explanation requires photos to do it well.
I love this pattern and would love to make I. Unfortunatey, I see it isn’t big enough for me. My bust is 52″
Once again you have mad a great thing here. Thanks!
You are welcome, Maggie!
What a lovely pattern. Thank you for sharing!
You are welcome Rose!
This is lovely! I will venture away from Bags and try out this stunning pattern. Thank you for all the work you’ve put into this — and offering it to us free of charge! I’ll post photos when I’ve finished!
Looking forwards, Beth please do.