


Welcome to Episode 9 in the How to Sew A Skirt Sew-along series. The subject for today is: Lining a Skirt with Zipper – part 2


If you have been following along in the Sew A Skirt series, then you have your basic skirt shape finished complete with darts, zipper and the lining is attached at the waist. Now it's time to finish off the lining – and we are going to do it all by machine for a nice neat finish. No hand sewing for us!
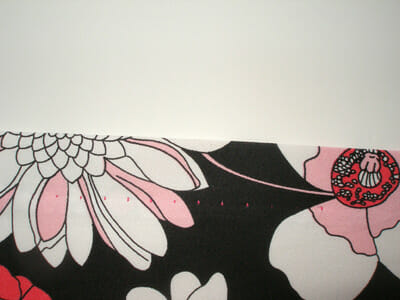
Lining a skirt with zipper
If you haven't yet added the lining to your skirt at the waist, do go back to Part 1 of the Lining a Skirt and do that first. Then…
- Turn the skirt right side out with the lining on the outside and turn over the top waist hem at the line of stitching, with the hem towards the lining on the outside.
- Keep the center back seam of the skirt out flat and pin the edge of the skirt lining to the zipper tape from top to bottom of the zip. It should look like this.
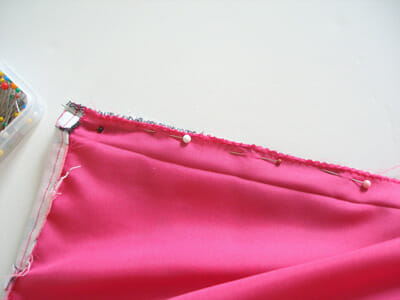
- Repeat the same and pin on the other side of the zipper.
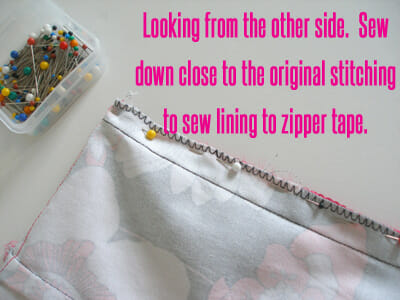
- Use your adjustable or regular zipper foot to sew down the side of the zipper, attaching the lining to the zipper tape underneath. Don't get so close as you did for the zipper itself, leave a small gap so the lining won't get caught in the zipper teeth.
- Do both sides of the zipper, stopping just where the zipper pull comes at the bottom.
- Now turn the back of the skirt the right side out and check your lining. If it isn't quite close enough and isn't attached to the zipper tape in one or two places, then simply turn it back again and sew a little closer. No need to remove the original stitches.
- Once you are happy, just trim away some of the bulky fabric at the top part of the seam corner, and turn the skirt the right way out, pressing those corners out nice and neatly at the top of the zipper.
- Now its time to finish off the bottom of the skirt center back seam using your zipper foot. Start sewing at the top where you just finished off at the zipper tape, back stitch to secure and then stitch all the way to the bottom. If you don't remember how to do this, you can look back at the earlier instructions for how to sew an invisible zipper.
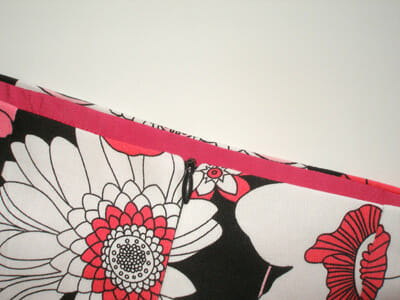
- Neaten the edges of that center back seam.
- It should look something like this from the inside.
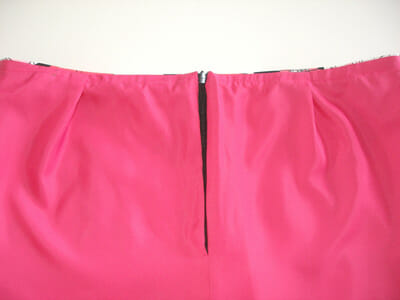
- Now time to give the top of the skirt a good pressing. Turn the skirt the right way out and press around the top of the skirt, just slightly turning the lining to the inside so it can't be seen from the outside. You should be able to get a nice neat finish on the waistline and at the zipper, both inside and out. Press that center back seam open too.
Your skirt is nearly finished. Try it on again and make sure you are happy with the fit before going any further. It's still not to late if you need to take in the waist or side seams a little. Just turn it inside out and restitch the side seams in you need to.
Our next step
A quick recap of what we have completed so far in case you have missed a step and need to review :
- Overview, tools and equipment and choosing your fabric
- Drafting your custom fit pattern, and all about ease and seam allowances
- Cutting your fabric and pattern matching
- Marking darts perfectly
- Sewing darts perfectly
- All about zipper feet
- Sewing an invisible zipper
- Lining a skirt – part 1
Join me soon for the next step in our Sew A Skirt series – Sewing an Invisible Hem
If you want to know when the next post in the series is published, do sign up for the newsletter to get it right into your inbox.
If You'd Like To Support Our Site
If you want to help us continue to bring you a wide selection of free sewing patterns and projects, please consider buying us a coffee. We'd really, really appreciate it.Never miss a post, and follow along with the Sew A Skirt tutorial series. I'll send all updates to your mailbox twice a week for you to keep and follow along at your own pace.
I'm really looking forward to seeing your skirt and featuring it on Sew So Easy!
I promise, no spam. Just an email once or twice a week with the new posts.


[…] Sew a skirt series. Bookmark the permalink. SaveSavedRemoved 0 […]
I am super happy to have discovered your site. 🙂 . I am entirely self-taught and rate myseld somewhere between beginner to intermediate. Though I do sew Indian ethnic wear, I am new to western clothing styles, never attempted to stitch those yet. I found the lining attachment a bit complicated…why not simply sew the lining exactly the way you sewed the skirt, complete with darts, attach it at the waistline before sewing on the zipper-and only then finish the centre back seam?
You could do that, but that is not a conventional way of sewing a lining to a skirt. If you use this technique do let me know how it worked out for you.
I’ve done this. I used cheap polycotton to make a toile (that’s a muslin in US English) then made the outer skirt, took the zip out of the toile and used it as the lining. As long as you remember to point the lining and outer darts in opposite directions when you stitch the two sections together, it works out fine. I used a stretchy fabric for my outer so it was quite forgiving, though; if neither of your fabrics has any stretch then it may be trickier.
Thank you so much for these tutorials, you guided me through my first lined skirt and I am delighted!
With your help I have managed to make the exact skirt I wanted for £15 having seen a very similar (unlined) one for £60 in a fairly average high street shop.
How do you attach it if the skirt has a waistband
Sew the zipper to the skirt, then attach the lining leaving the 5/8″ on top to sew the waistband.
Hi! What if you want the zipper to go all the way to the top of the waistband? I have seen patterns where the waistband is sewn on first, but never a good explanation as to how to insert the zipper. Could you explain?
Hi Arielle, I will come up with a separate tutorial for you. Thanks for the recommendation!
This tutorial is soooo helpful and I’m really pleased with my project so far. Thank you so much! Just wondering if there is a small mistake above – I fiddled for a while and I think after the sub heading ‘Lining a skirt with zipper’, should the first bullet point read ‘turn the skirt the wrong side out’ rather than the ‘right side’? Perhaps I’m just getting in a muddle with the words, but I’ve just achieved it nicely, but with the wrong side out. Apologies if I’ve got it wrong.
Hmm, right side out works for me, but it is very hard to explain in words. I have the right side of the fabric facing up and the right side of the lining facing down in the example. Glad it worked out OK. I remember trying to write this – I should have done a video really, looking back.
Simple!! I can do this! Thx for sharing.
Thanks a lot for this tutorial! I am going to start my sewing class soon and it’s nice to know that there’s a lot of great tips and tutorials I can find online! I am surely going to be a regular visitor of your awesome blog! 🙂
Great tutorial.
This is beautiful and just perfect for summer.
Thanks for sharing.
I love sewing in my linings with a sewing machine! I do not have the patience for handsewing. Thanks for the great tutorial!
I thank you so much for this skirt tutorial. I love your Craftsy top too. I am also taking that Craftsy sewing with knits class and was overwhelmed at the fabric store trying to choose the correct knit. Gave up, but will try again another day.
Just to clarify in the skirt tutorial: Lesson 9 is adding a zipper to an already lined skirt, right? And Lesson 8 is adding lining to a skirt with the zipper already installed. It’s just two different ways to do zippers and linings. Correct? Thank you, Robin
Hi Robin. Actually Lessons 8 and 9 follow on from one another. In lesson 8 you start to add the lining by sewing it to the top of the skirt. Then in lesson 9 you carry on by sewing the lining to the zipper and completing the back seam. So you would follow all the instructions in lessons 8 and 9 to fully complete the lining. If you can’t figure it out or have any questions, do let me know.
Oh, Okay. I get it. I guess I didn’t read it that thoroughly. Thank you for your quick response. Robin